The notification group is used to send alarm notifications when an alarm policy triggers an alarm. You can set the recipients and specify the notification methods for alarm notifications within the notification group, such as SMS or email.
2. In the left sidebar, choose Monitoring & Alarm > Notification Group to go to the Notification Group management page.
3. Click Create, and in the Create dialog, enter the following information:
Basic information
Name: Enter a custom name for the group.
Query Data URL: The link used to query detailed data in alarm notifications. It generally does not need to be modified. When using CLS via DataSight, it is recommended to use the DataSight domain name so that you can view detailed alarm data in DataSight upon receiving an alarm.
Notification Rules: Specify which alarms require alarm notifications to be sent and the specific notification channels.
Rules:
Supports setting criteria based on the alarm level, notification type, alarm policy, alarm classification field, notification time, and alarm duration. Multiple criteria can be configured with AND/OR relationships.
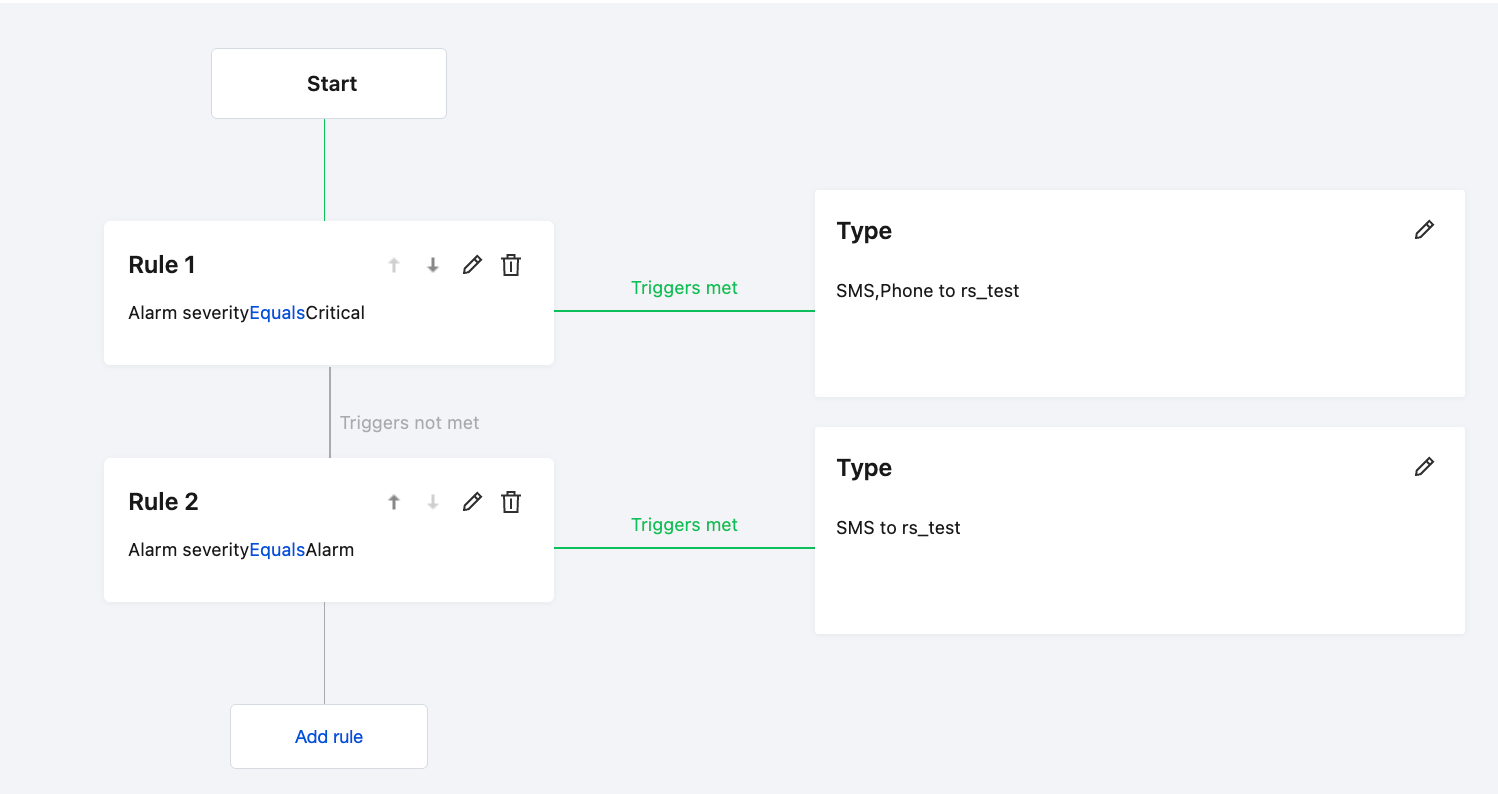
When an alarm is triggered, rules are evaluated sequentially from top to bottom. When a rule is matched, notifications are sent using the corresponding notification channels for that rule.
Note:
When a rule is matched, the evaluation process ends, and subsequent rules are not executed.
Each notification group can have up to 50 rules, and each rule can have up to 10 notification channels. For Email, SMS, WeChat, and Phone Call types, up to 50 users or user groups can be selected.
For example, "Critical" alarms are notified via phone and SMS, "Warning" alarms are notified via SMS, and "Info" alarms are not notified.
Channel types: channels used to send alarm notifications
Email, SMS, WeChat, and phone
Recipient: Specifies users or user groups (containing multiple users) notifications can be delivered.
Notification Template: Select an alarm notification content template. Within the content template, you can customize the content and format of alarm notifications.
Notification Period: the time period during which alarm notifications can be received. Supports cross-day ranges. For example, 22:00:00–08:00:00 means notifications are sent daily from 10 PM to 8 AM the next morning.
Notify By: Enables you to select the required notification channel.
Note:
Recipients must be added in the CAM - User List. When such information as phone numbers, email, and WeChat is configured, verification is required.
Phone alarms are subject to sending rate limits. It is recommended to use phone calls only for Critical alarms. Specific rate limits are as follows:
A single phone number can receive at most one phone alarm within 30 seconds, three within 10 minutes, and 50 within one day.
A single phone number can receive at most 3 phone alarms between 22:00 and 08:00 the next day. To remove this restriction, enable the Nighttime Reception Status switch in the Message Center.
The above limitations are not limited to phone call alarms generated by the Cloud Log Service. Phone notifications generated by the Cloud Observability Platform and Message Center are also subject to these limitations.
To receive alarms through phone calls, it is recommended to add the following phone numbers to the allowlist of your phone. Otherwise, the calls will be blocked.
If the phone list contains many numbers and you want to use a fixed set of a few phone numbers, enable the Fixed Voice Number Notification switch in the Message Center.
WeCom, DingTalk, and Lark
Webhook Address: The Webhook addresses for WeCom, DingTalk, and Lark bots. Please create them in advance in Integration Configuration.
Recipient: Supports mentioning specific members (@username) or all members (@all) in group messages.
Notification Template: Select an alarm notification content template. Within the content template, you can customize the content and format of alarm notifications.
Notification Period: the time period during which alarm notifications can be received. Supports cross-day ranges. For example, 22:00:00–08:00:00 means notifications are sent daily from 10 PM to 8 AM the next morning.
Note:
Each bot can send a maximum of 20 messages per minute. If you have multiple alarm policies, it is recommended to create several bots to distribute the binding of these policies. This will help prevent situations where multiple alarm policies trigger alarms simultaneously, which could lead to missing some alarm notifications.
Custom Interface Callback
Webhook Address: Select a custom callback API address that you have created in Integration Configuration, or select "Custom" and directly enter the callback API address here. The Webhook address must be accessible via the public network, as CLS cannot call back to private network addresses.
Request Method: This needs to be configured when the Webhook address is set to "Custom". POST and PUT are supported.
Notification Template: Select an alarm notification content template. Custom callbacks do not have fixed request information. You need to configure this information as needed within the notification content template, including the request header (Request Header) and request body (Request Body).
Notification Period: the time period during which alarm notifications can be received. Supports cross-day ranges. For example, 22:00:00–08:00:00 means notifications are sent daily from 10 PM to 8 AM the next morning.
Note:
Each custom callback API can send a maximum of 20 messages per minute. If you have multiple alarm policies, it is recommended to create several custom callback APIs to distribute the policies across them. This helps prevent simultaneous alarm triggers, which could cause you to miss some alarm notifications.
A custom callback is considered successful when the HTTP status code returned by the custom callback API is in the 2xx range. The callback is considered failed when the status code is in the 4xx or 5xx range. Redirection (status codes in the 3xx range) is not supported. The egress IP address for custom callbacks is dynamically updated. If you require a fixed IP address, please contact Technical Support.
Alarm Escalation: When an alarm remains unclaimed or unresolved for an extended period, it can be automatically escalated to the next notification stage. Each notification stage can include multiple notification channels. For details, see Alarm Claiming and Escalation.
Advanced Configuration:
Unified Custom Callback Parameter Settings: When custom callback API parameters are individually configured within an alarm policy, enabling this switch will cause the content template to override the configuration in the alarm policy, facilitating the batch setting of callback parameters.
Alarm Operations Without Login: When it is enabled, this feature allows you to directly mute/claim related alarms from within the alarm notification, without needing to log in to the Tencent Cloud console. It is enabled by default. For details, see Blocking an Alarm and Alarm Claiming and Escalation.
Deliver Logs: After this feature is enabled, alarm execution logs are delivered to a log topic. This topic incurs charges based on data volume.
Target Log Topic: Select the log topic to which alarm execution logs are to be delivered. Cross-region selection of log topics is supported. It is recommended to use a STANDARD storage log topic.
Range of data to ship:
All: Logs generated each time an alarm policy is executed, including cases where no alarm is triggered. This option is recommended.
Alarm triggering and recovering logs: Logs generated when an alarm policy sends "trigger" and "recovery" notifications.
Note:
After logs are delivered to a log topic, it is recommended to enable key-value indexing for that log topic and enable the Auto Configuration feature to facilitate statistical analysis (for example, using the Preset Dashboard to analyze data). For a description of the fields in the delivered logs, see Alarm Notification Variables.