The single-line full regular expression mode is applicable to the log parsing mode in which each line of log text contains an original log, and each log can be extracted as multiple key-values by regular expression. If you do not need to extract the key-value, please refer to Full Text in a Single Line for configuration.
When configuring the single-line full regular expression mode, you need to enter a sample log first and then customize your regular expression. After the configuration is completed, the system will extract the corresponding key-value according to the capture group in the regular expression.
This document describes how to collect logs in single-line full regular expression mode.
Prerequisites
The server where the target file resides has LogListener installed. See:
2. In the left sidebar, select Overview to go to the overview page.
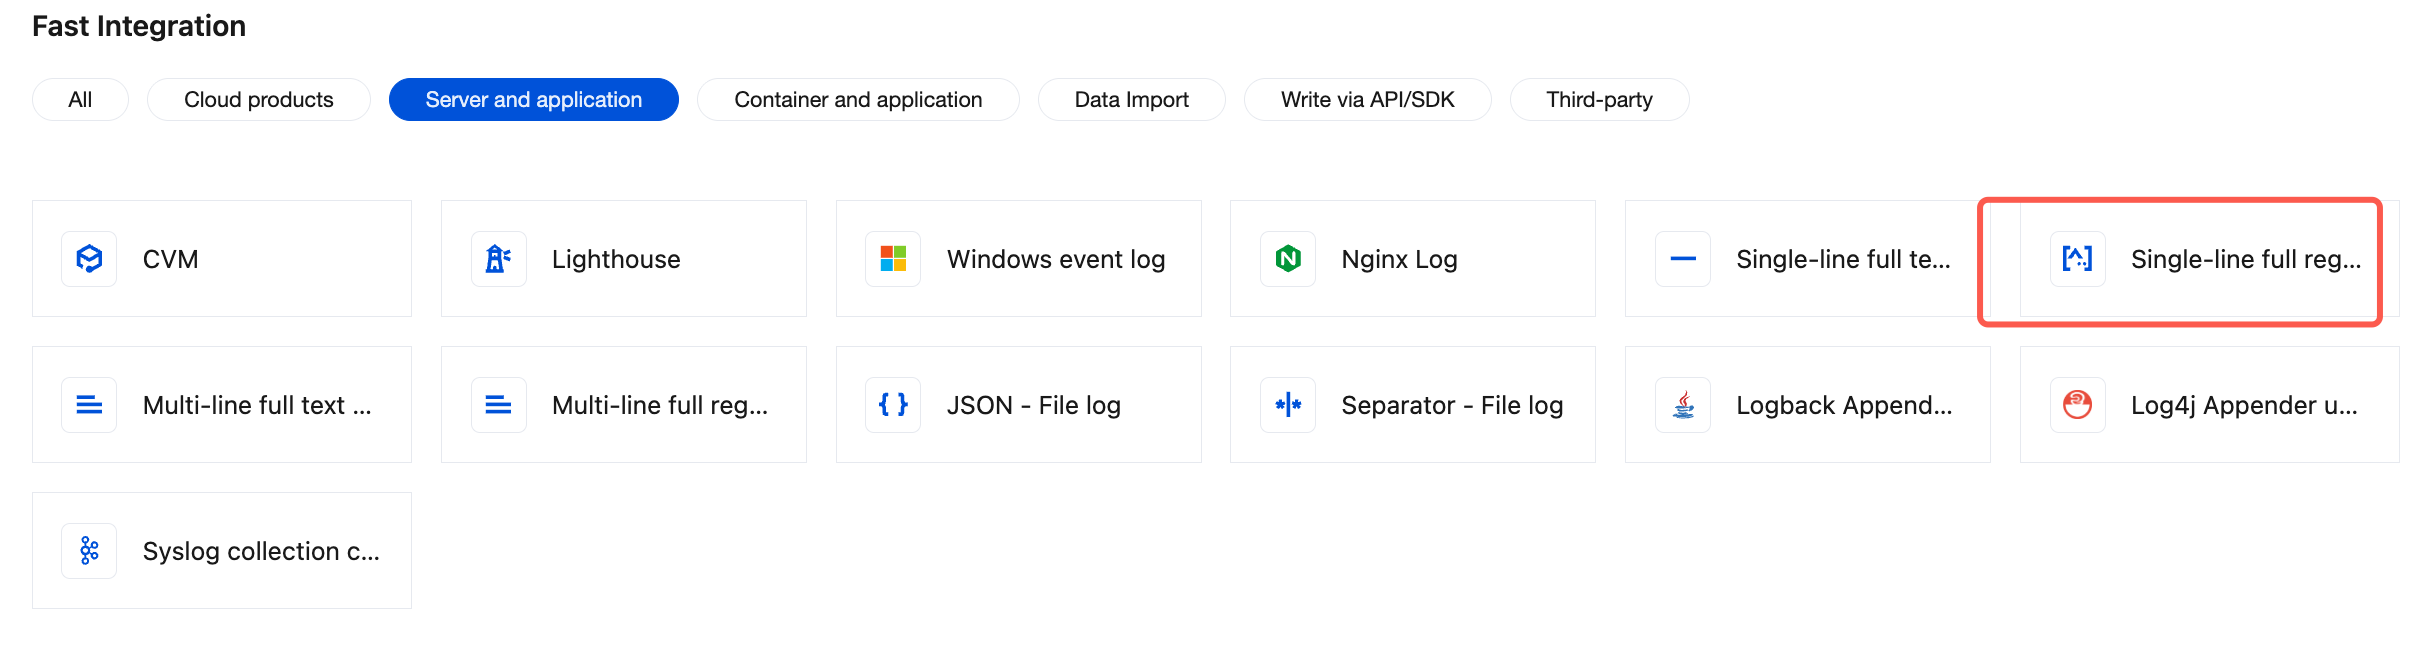
3. In Fast Integration > Server and application, locate and click Single-line full regex - File log, and enter the data collection configuration process.
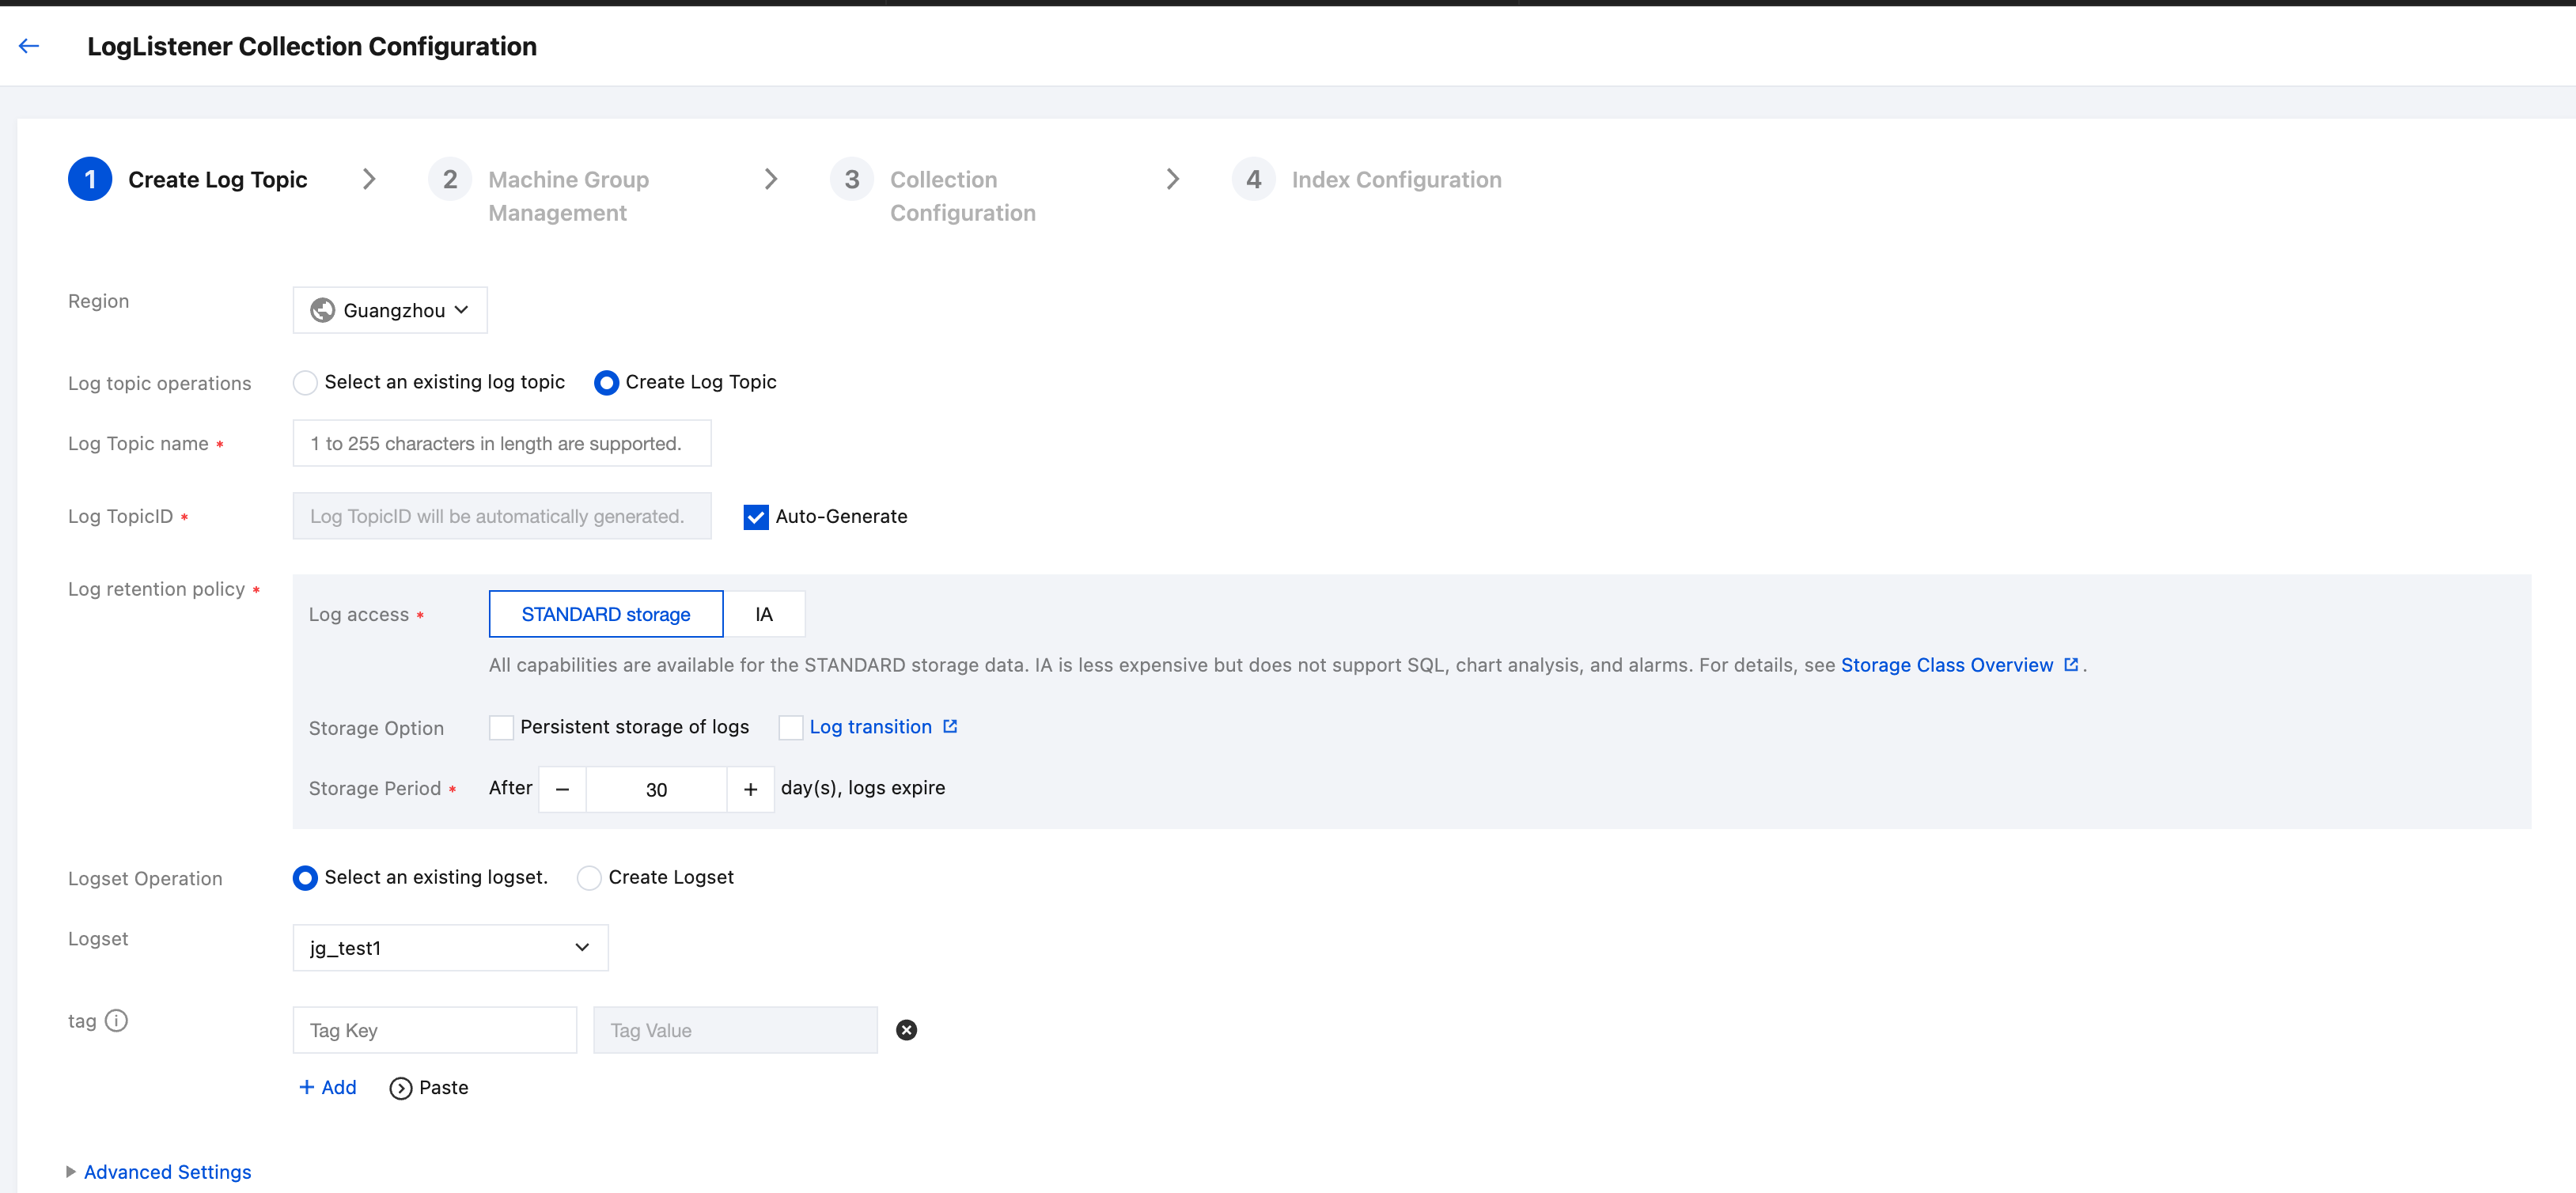
4. On the Create Log Topic page, specify the log topic name, configure the log storage duration, select a logset based on your actual requirements, and click Next.
If you want to select an existing log topic, perform the following operations:
2. In the left navigation bar, select Log Topic, then select the log topic to be delivered, click the log topic name, and enter the log topic management page.
3. Select the Collection Configuration tab, click Add in the LogListener collection configuration section to go to the collection configuration process page.
4. On the log data source selection page, select Servers and application, locate and click Single-line full regex - File log, enter the machine group management process.
Step 2: Machine Group
If you need to collect data from a target server without LogListener installed, see:
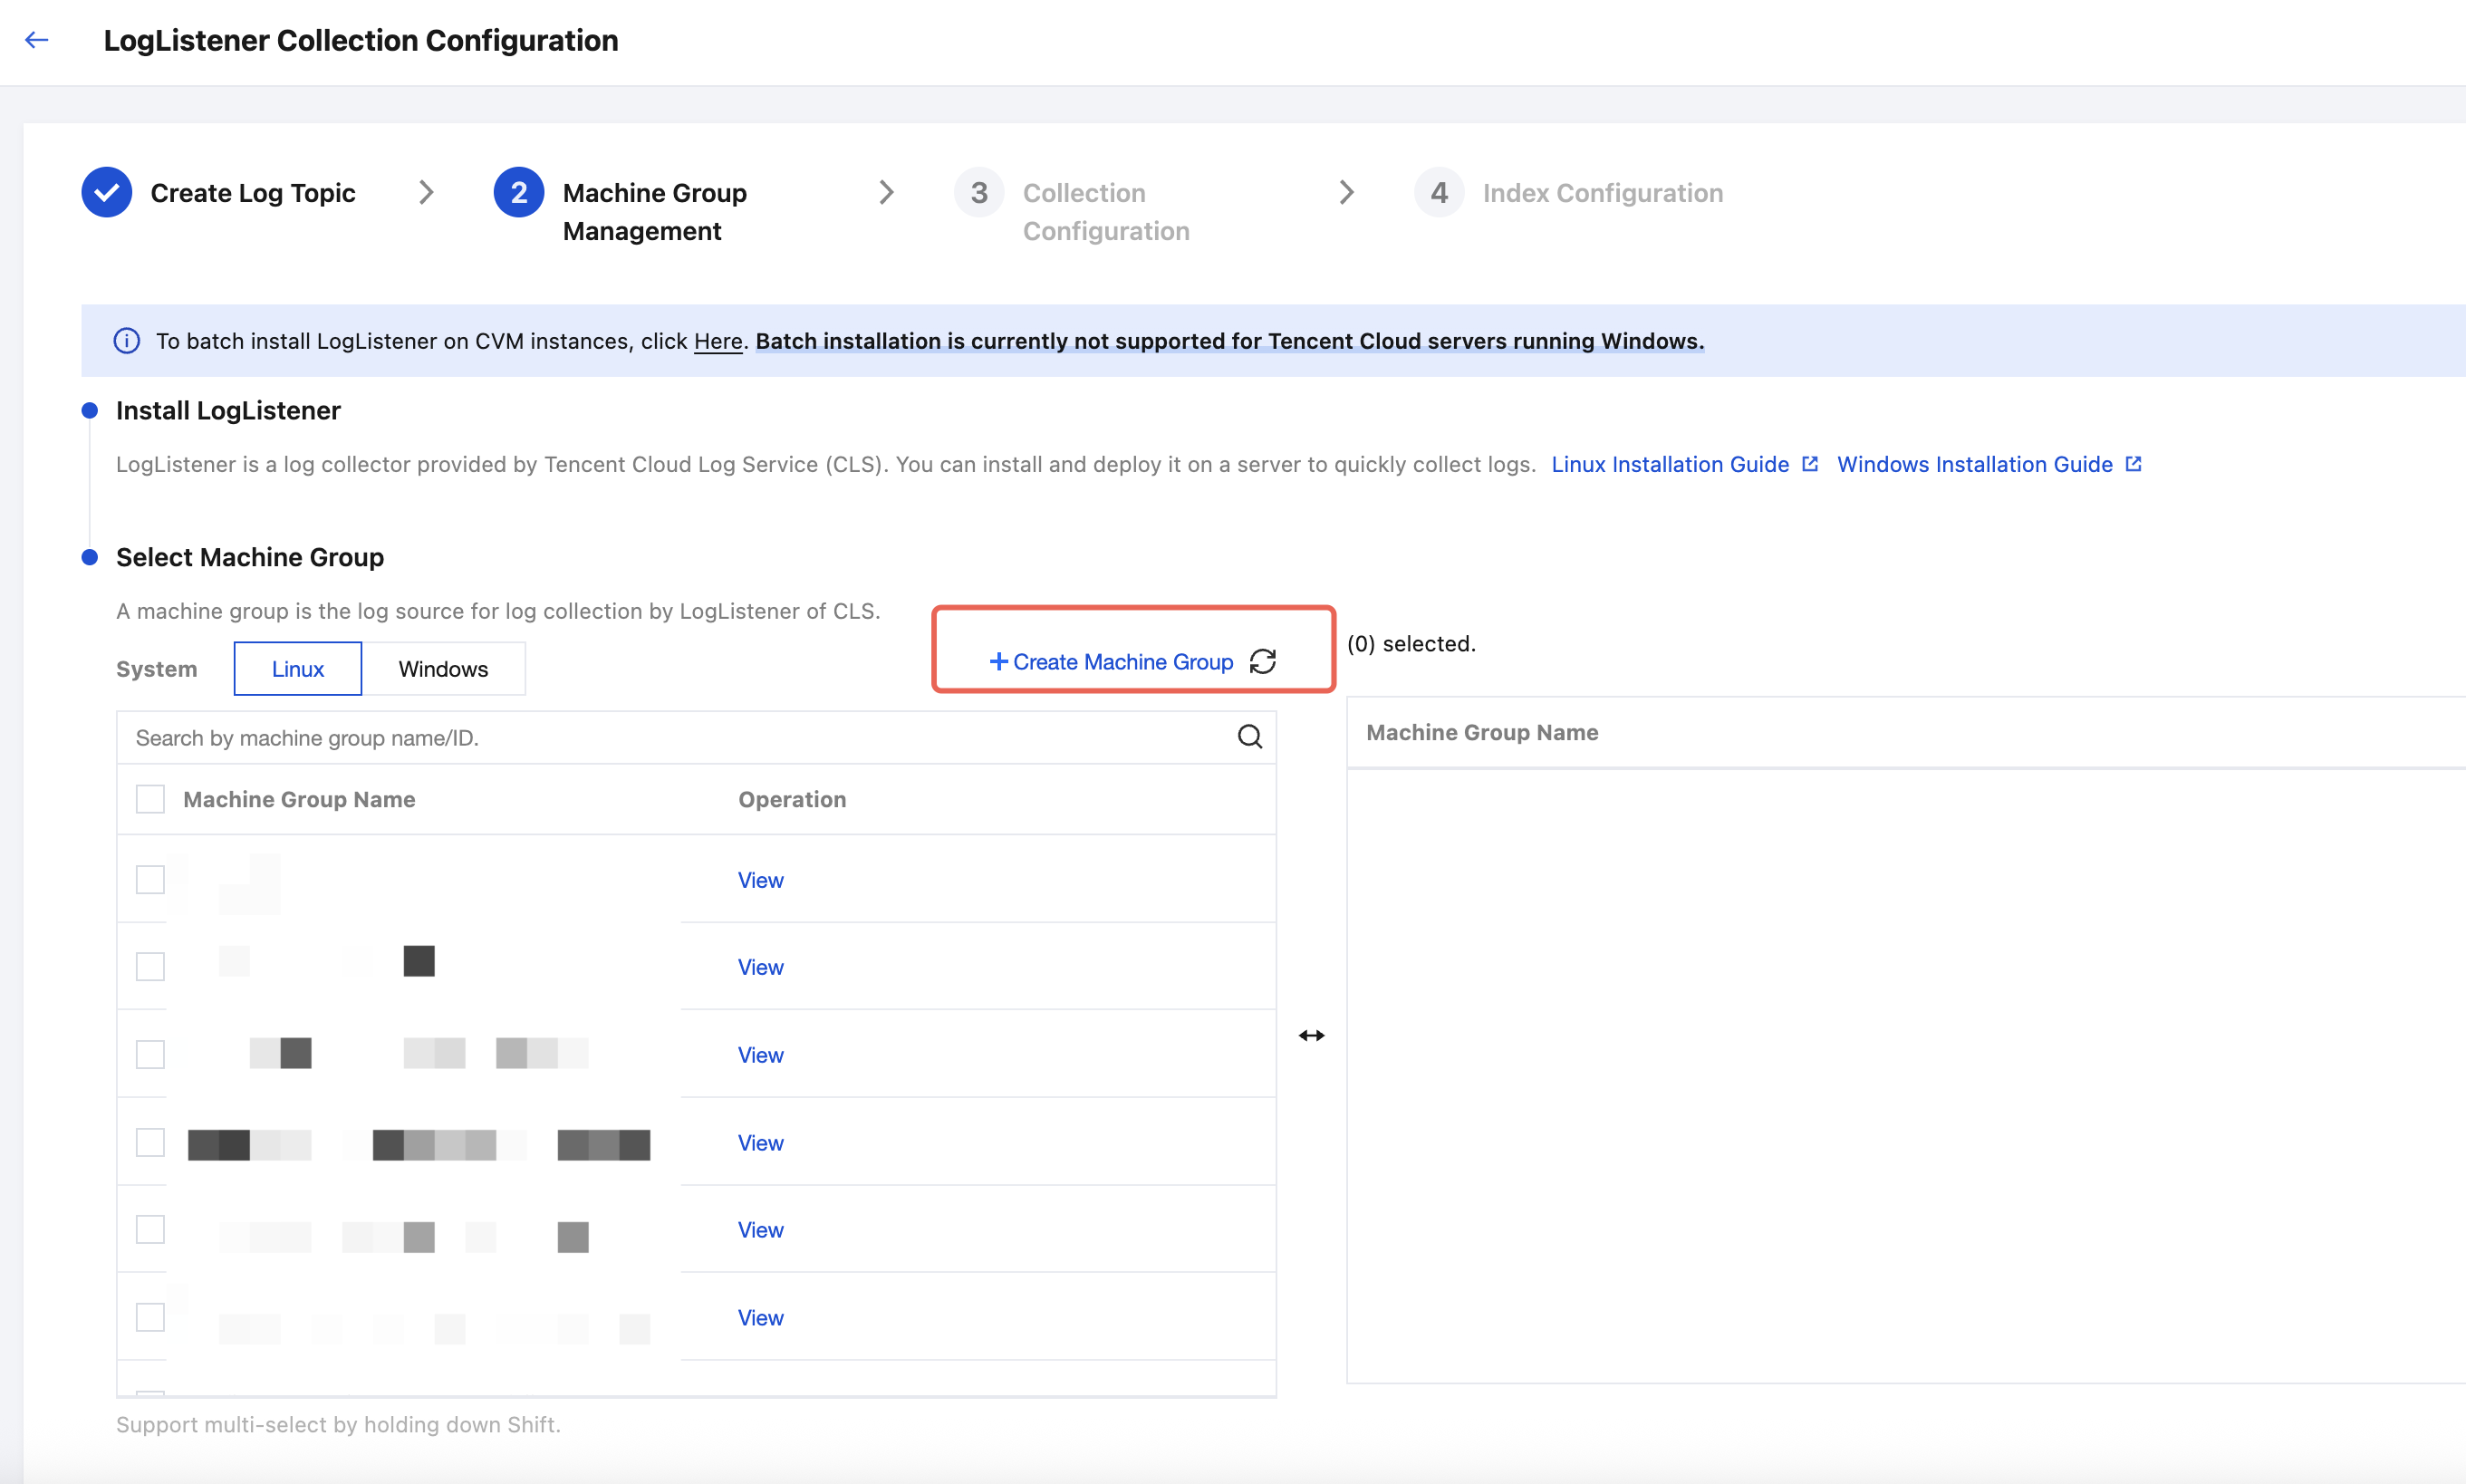
If you want to create a machine group, perform the following operations:
1. Click Create Machine Group.
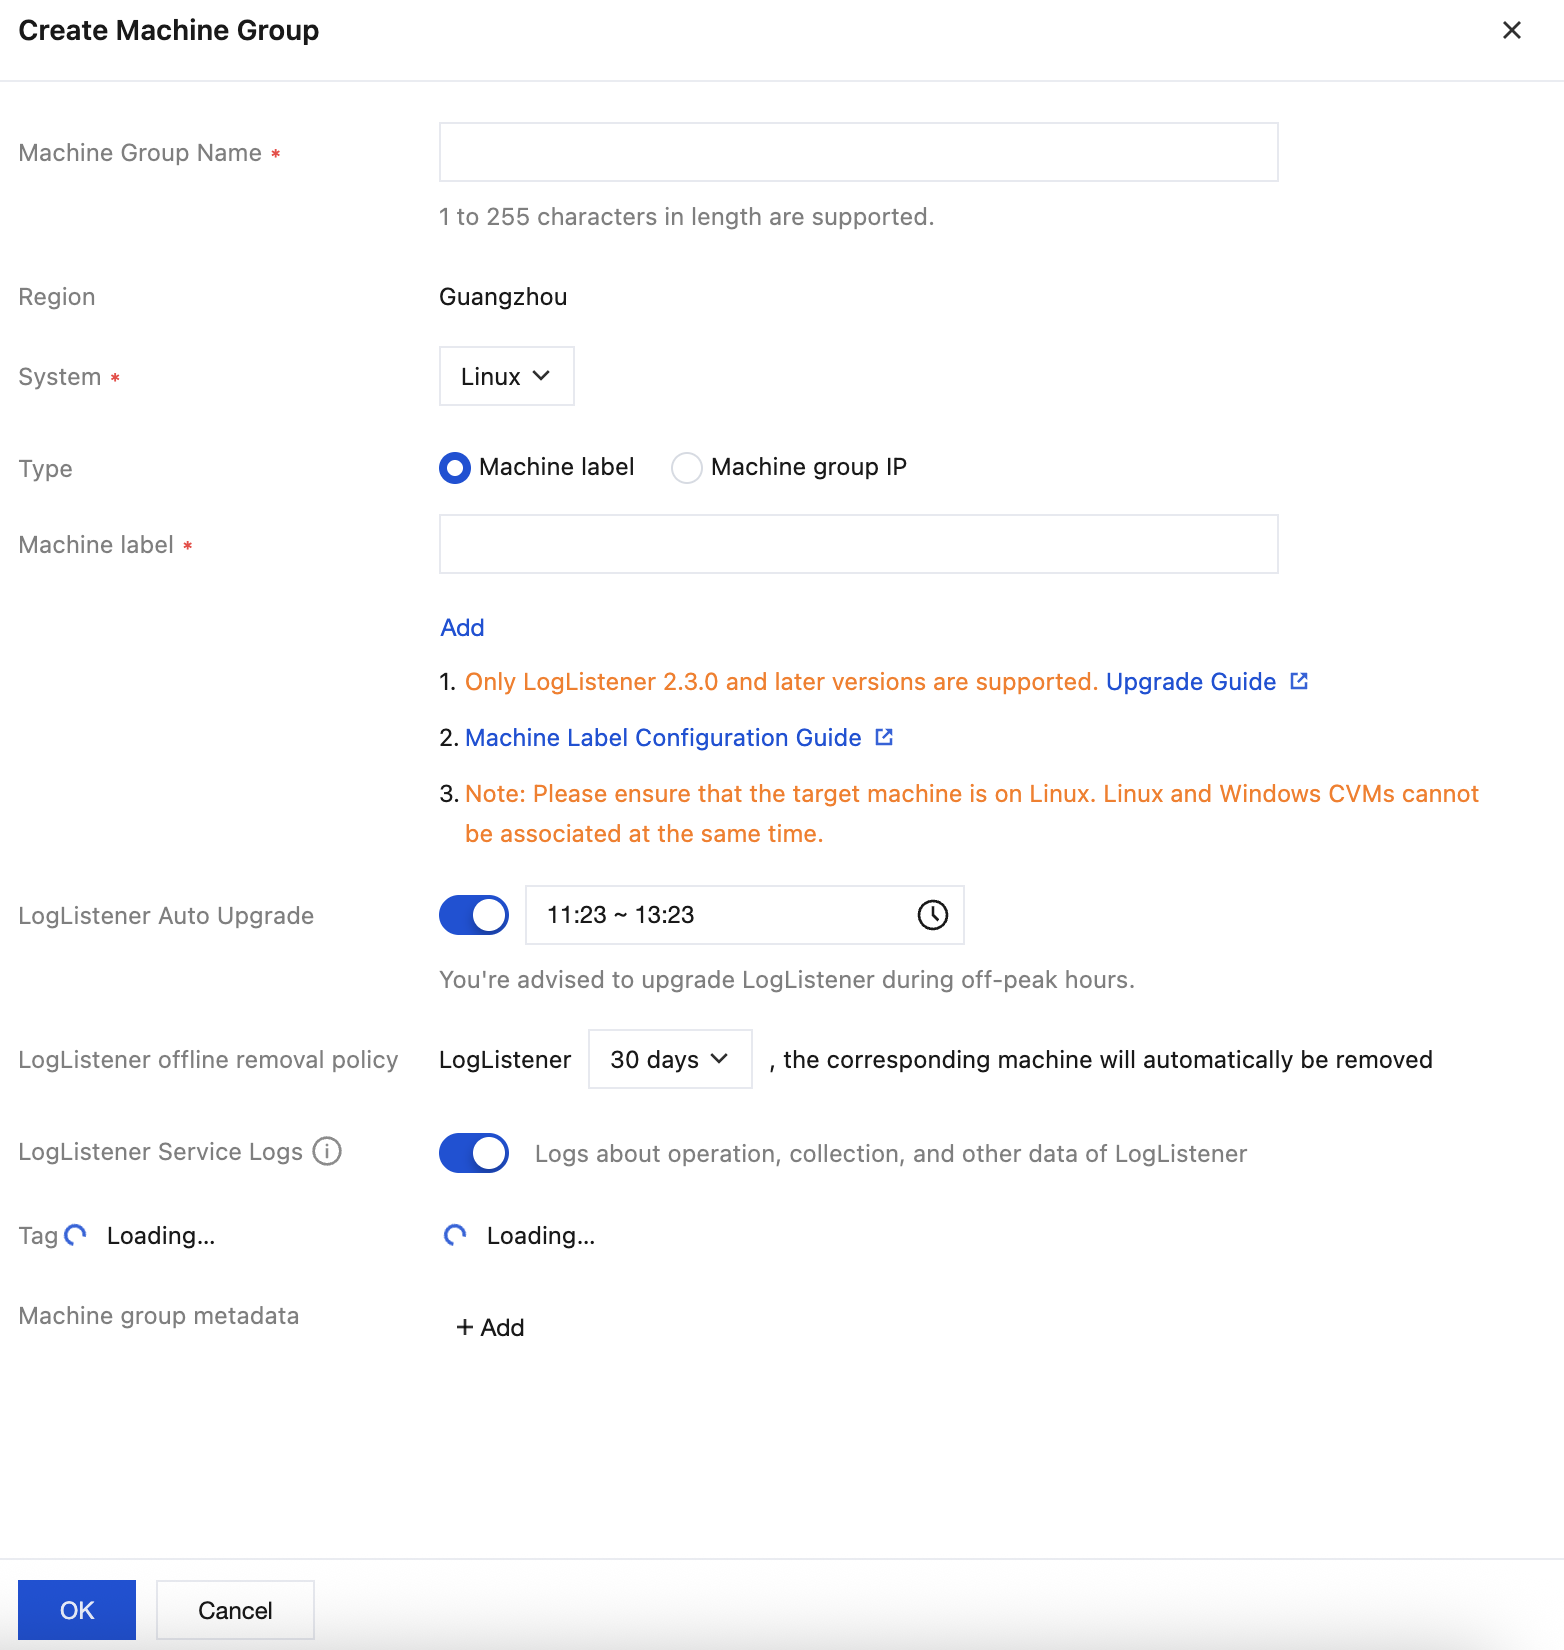
2. Fill in the machine group name, associate the target server with LogListener installed via machine label (see Machine Group for details), and then click OK.
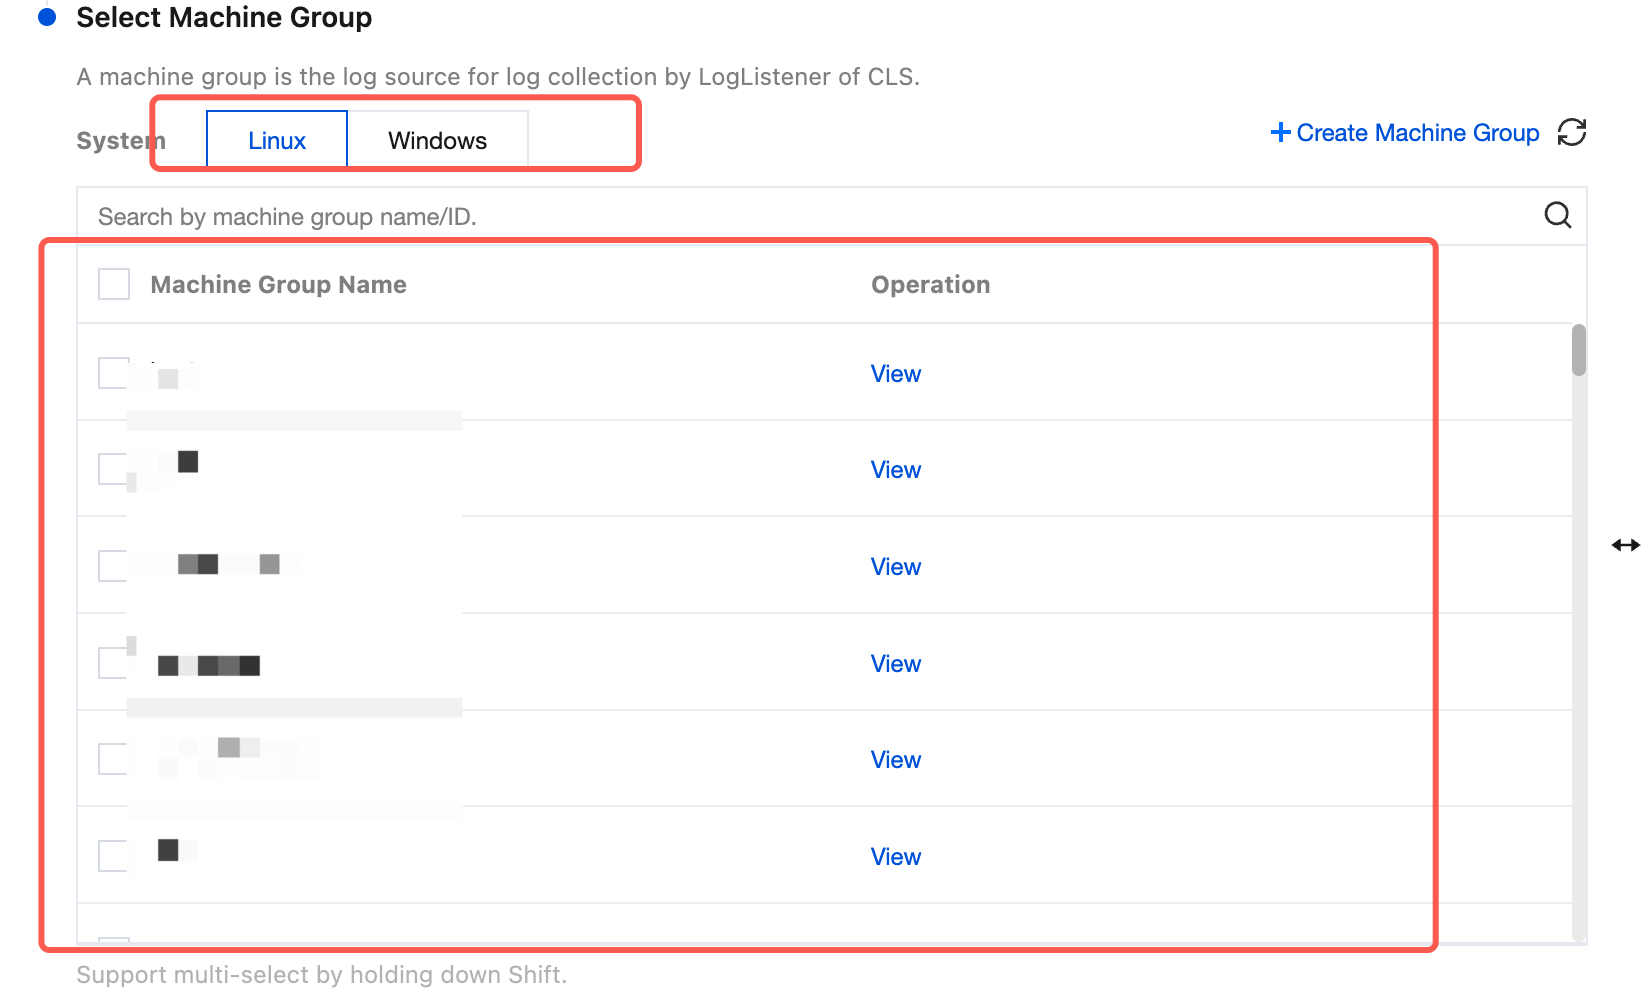
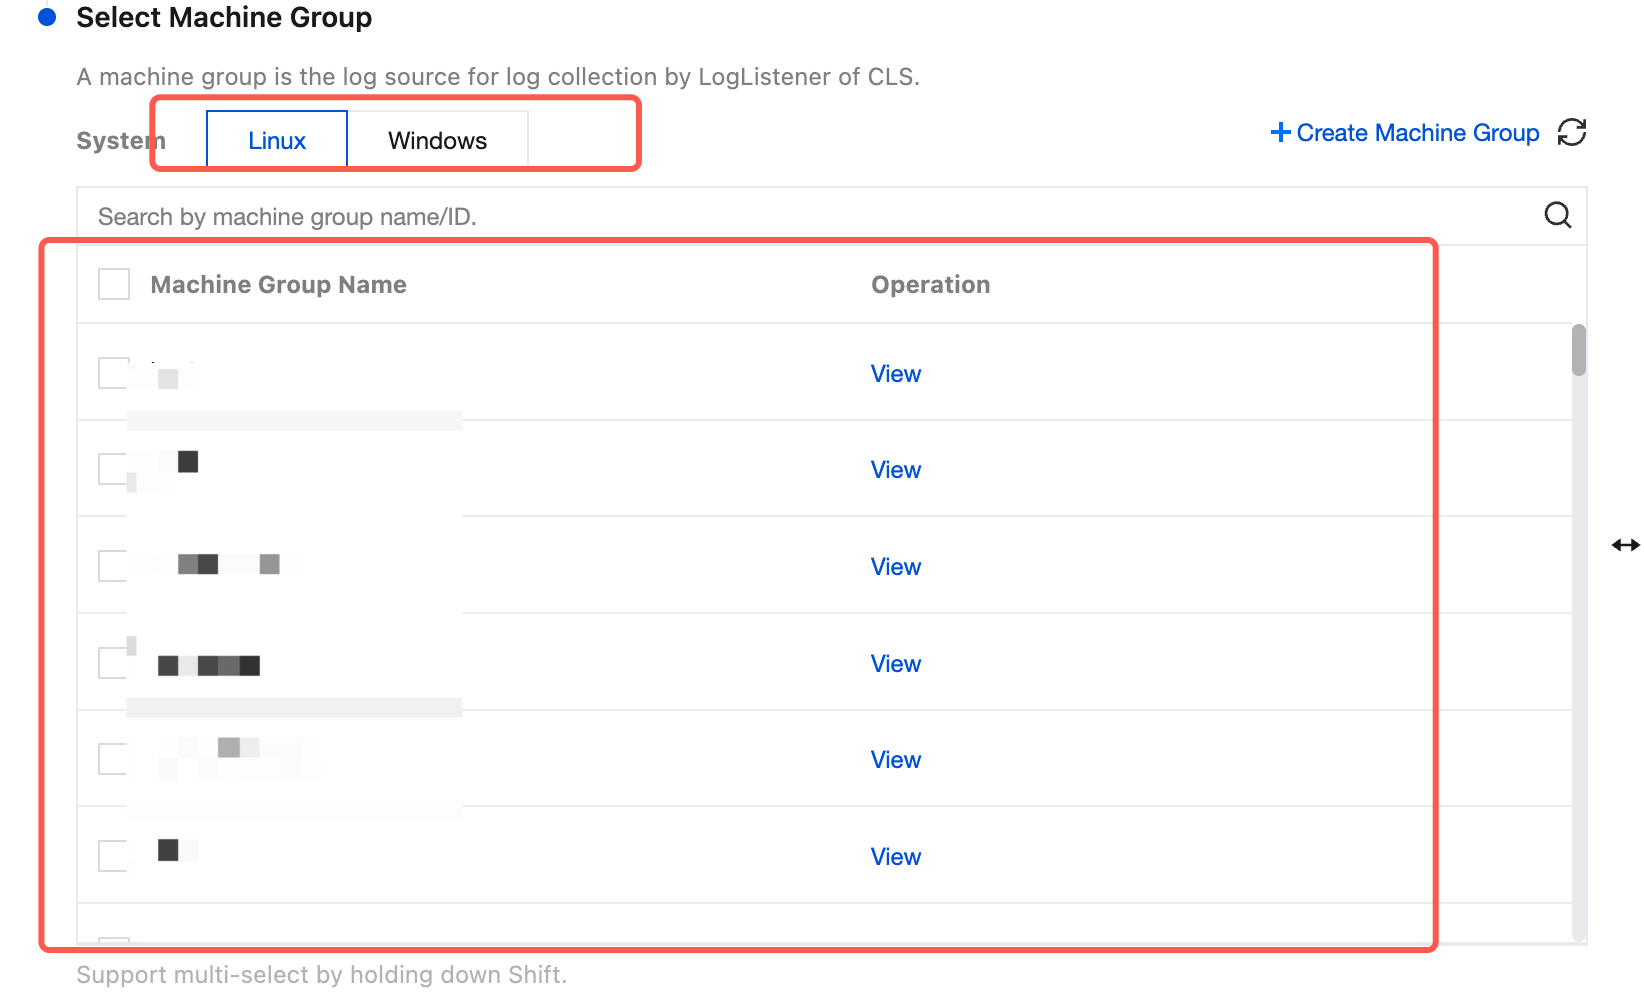
3. After creation is completed, select the system environment of your created machine group from the Tab options, check your target machine group in the list, and click Next.
If you want to select an existing machine group, select the system environment of your created machine group from the Tab options, check your target machine group in the list, and click Next.
Step 3: Collection Configuration
Configuring the Log File Collection Path
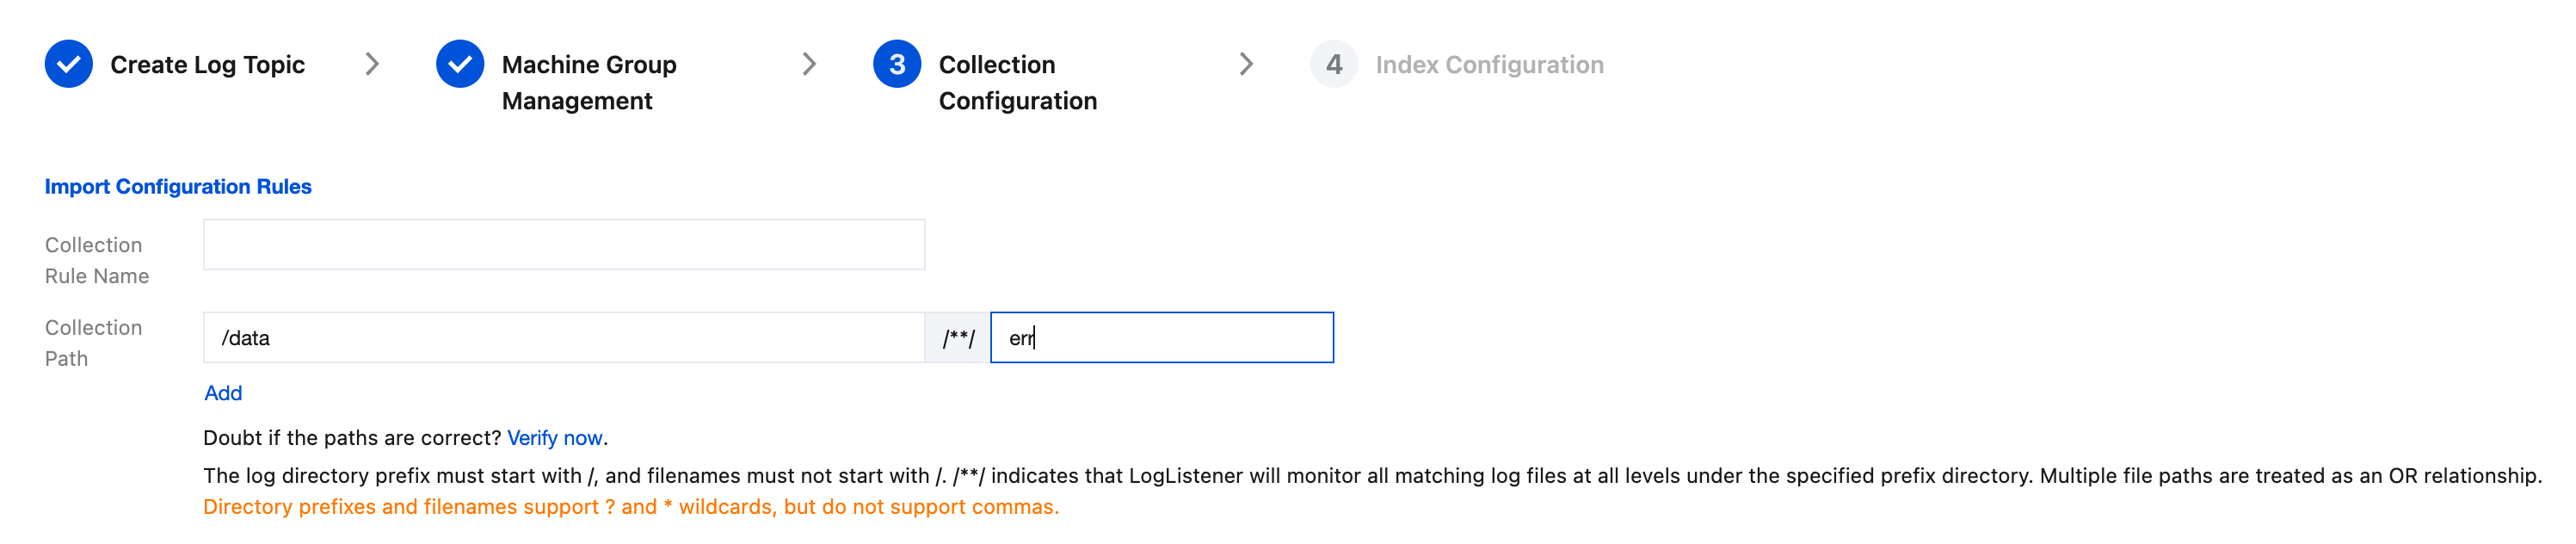
On the Collection Configuration page, fill in the collection rule name and the Collection Path according to the log collection path format. See the following for the log collection path format:
Note:
For Linux systems, the log path must start with /. For Windows systems, the file path must start with a drive letter, such as C:\\.
Log path in a Linux system: /[Directory prefix expression]/**/[File name expression]. Example: /data/log/**/*.log.
Log path in a Windows system: [Drive letter]:\\[Directory prefix expression]\\**\\[File name expression]. Example: C:\\Program Files\\Tencent\\...\\*.log.
After the log collection path is filled in, LogListener will match all common prefix paths that meet the rules according to [directory prefix expression] and monitor all log files that meet the [file name expression] rule under these directories (including sub-layer directories). The parameters are detailed as follows:
Number
Directory Prefix Expression
File Name Expression
Description
1
/var/log/nginx
access.log
In this example, the log path is configured as /var/log/nginx/**/access.log, and LogListener will monitor the log files named with access.log in all subdirectories under the prefix of /var/log/nginx.
2
/var/log/nginx
*.log
In this example, the log path is configured as /var/log/nginx/**/*.log, and LogListener will monitor the log files ending with .log in all sub-directories under the prefix of /var/log/nginx.
3
/var/log/nginx
error*
In this example, the log path is configured as /var/log/nginx/**/error*, and LogListener will monitor the log files named starting with error in all subdirectories under the prefix of /var/log/nginx.
Note:
Windows environments do not support soft link collection.
Only LogListener 2.3.9 and later versions support adding multiple collection paths.
It is recommended to configure the collection path as log/*.log, and rename the rotated old log files as log/*.log.xxxx.
By default, a log file can only be collected by one log topic. If you need multiple collection configurations for a file and the file resides in a Linux environment, add a soft link to the source file and add it to another set of collection configurations.
Configuring the Blocklist of Data Collection Paths
Enable the blocklist of collection paths to ignore the specified directory prefix or complete file path during collection. Directory paths and file paths can be fully matched, and wildcard pattern matching is also supported.
The collection blocklist is divided into two types of filtering and can be used at the same time:
File name: In the collection path, the complete file path for the collection needs to be ignored. The wildcard * or ? is supported, and ** path fuzzy matching is supported.
Directory: In the collection path, the directory prefix for the collection needs to be ignored. The wildcard * or ? is supported, and ** path fuzzy matching is supported.
Note:
LogListener 2.3.9 or later is required.
The collection blocklist excludes paths under the collection path. Therefore, in both file name mode and directory mode, the specified path should be a subset of the collection path.
Configuring Collection Policy
All Collection: When LogListener collects a file, it reads from the beginning of the file.
New Collection: When LogListener collects a file, it collects only the newly added content in the file.
Configuring Backtracking Collection
When Collection Policy is set to New collection, you can further set the starting point for backtracking collection herein, and specify whether to start collecting from the position offset by the specified number of bytes from the latest position when LogListener starts.
Note:
Windows environments currently do not support custom metadata.
Encoding Mode
UTF-8: Select this option if your log file encoding mode is UTF-8.
GBK: Select this option if your log file encoding mode is GBK.
Configure Single-Line Full Regular Expression Mode
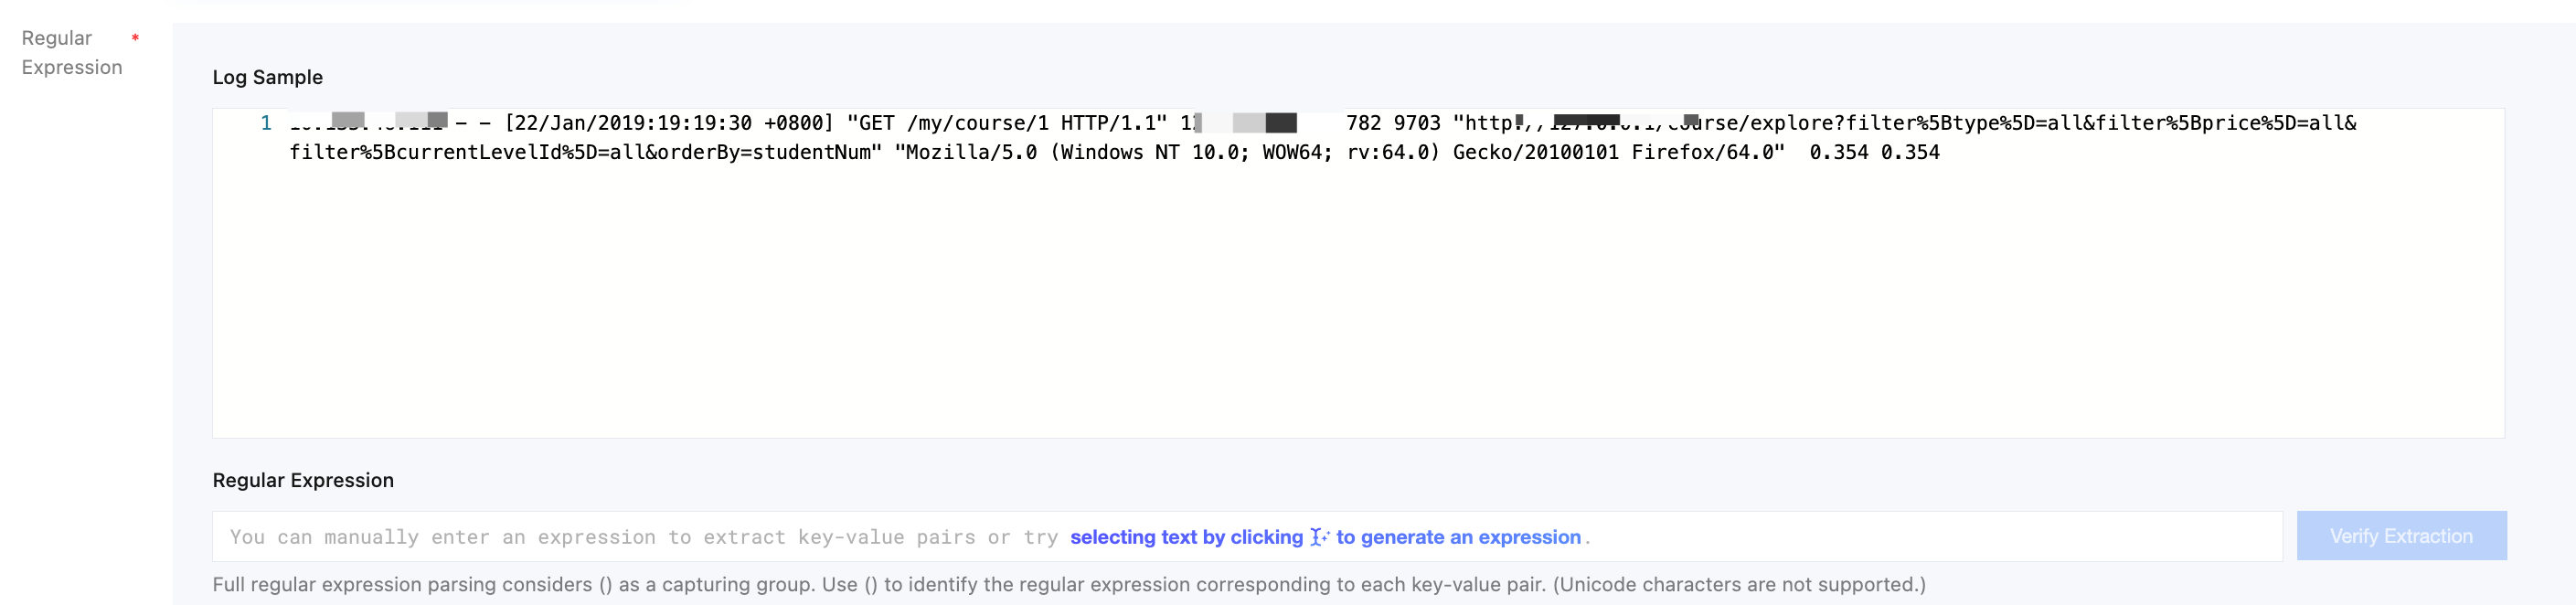
1. On the Collection Configuration page, set "extraction mode" to Single-line Full regular expression, and enter a log example in the "log example" textbox. As shown below:
2.
Define regular expression according to the following rules:
The system provides three ways to define regular expressions: AI word mode, auto mode, and manual mode.
AI word mode: Click selecting test by clicking to generate an expression in the regular expression, then click AI one-click word to enter AI word mode.
Auto mode: Click selecting test by clicking to generate an expression to switch to automatic mode.
Manual mode: Directly enter the expression manually, extract and verify key-value.
The system will automatically extract and verify the corresponding key-value based on the selected schema and defined regular expression.
AI Word Mode
Auto Mode
Manual Mode
1. Click the selecting test by clicking to generate an expression tool.
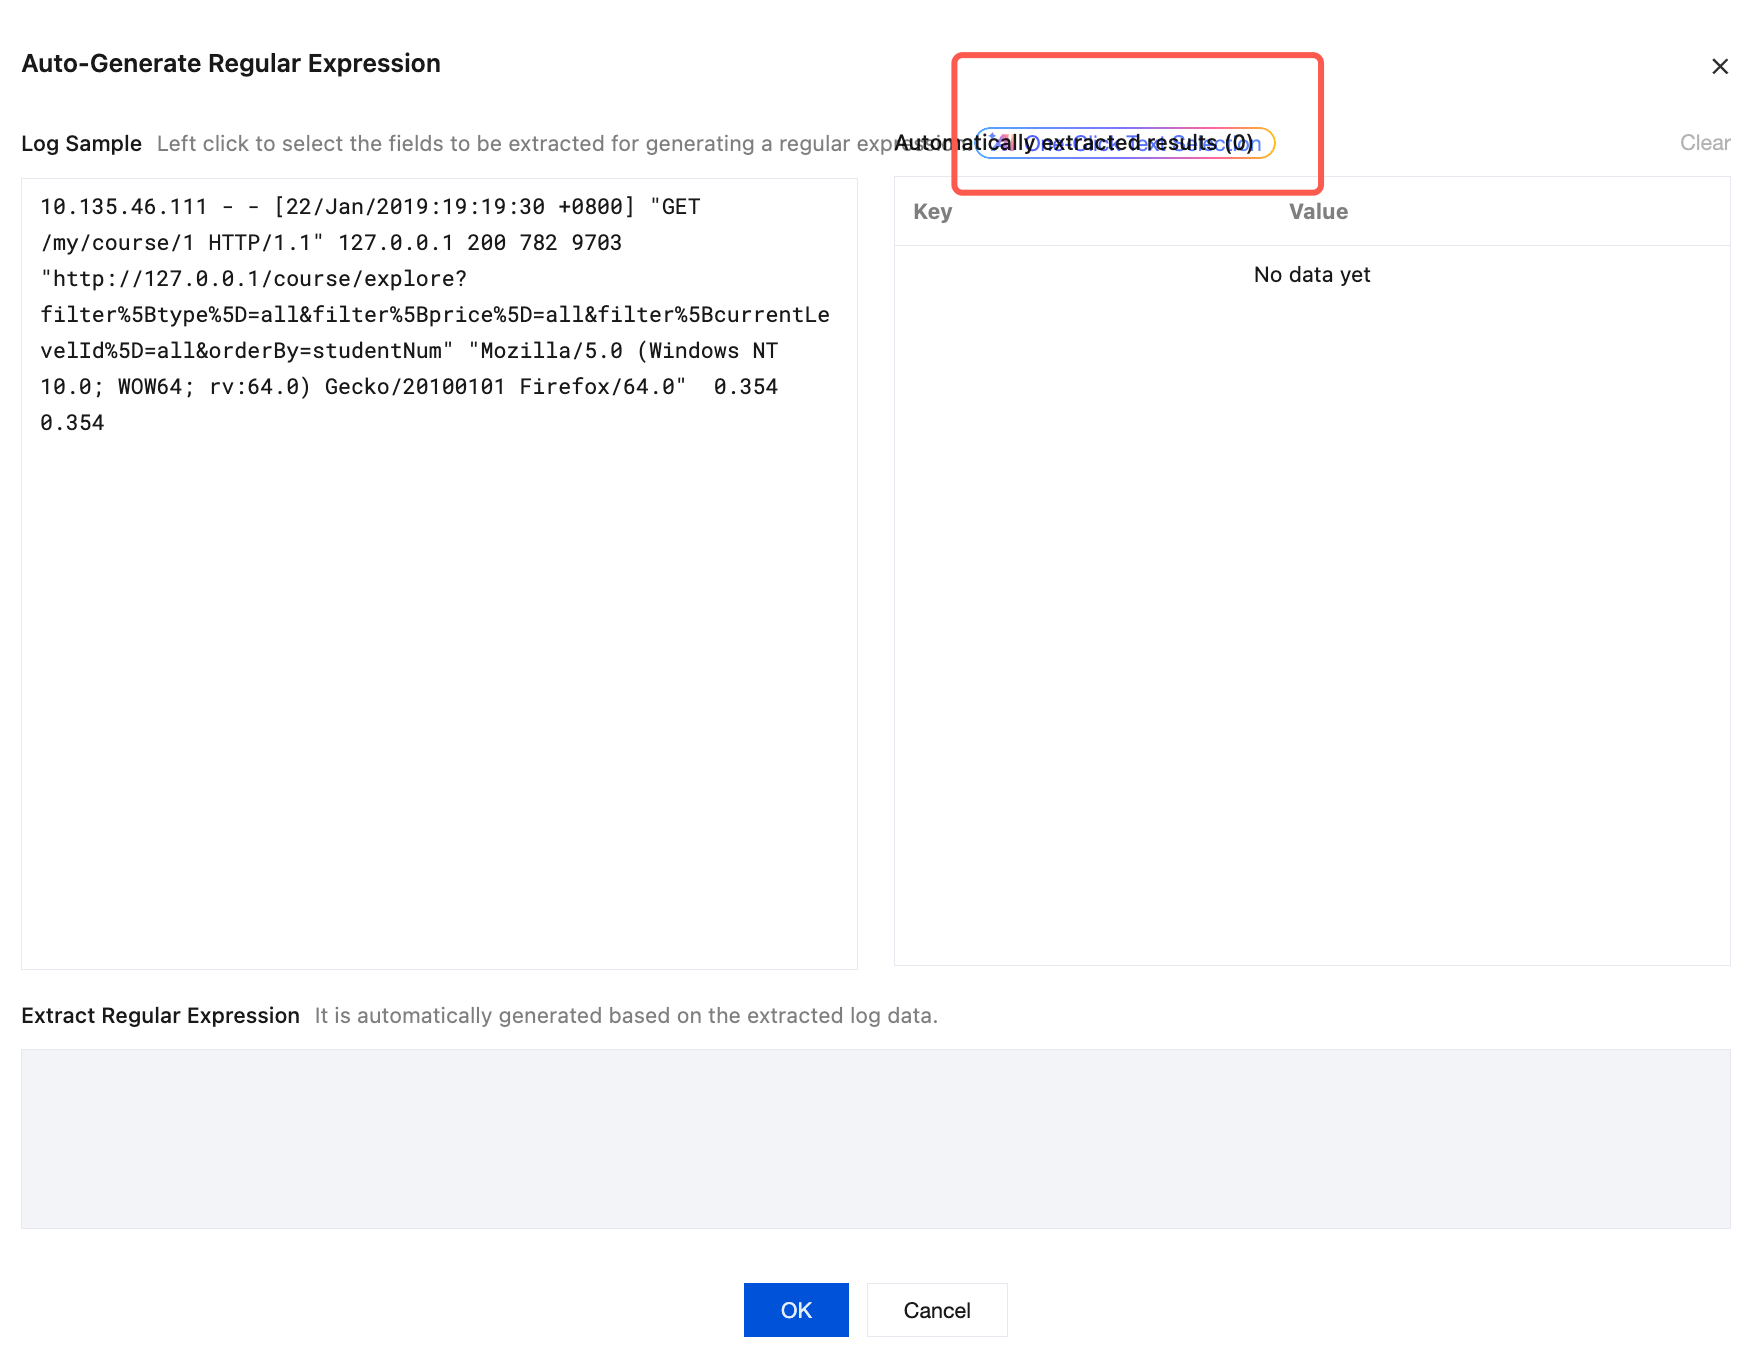
2. In the pop-up "Auto-Generate Regular Expression" modal view, click the
AI One-Click Text Selection
tool.
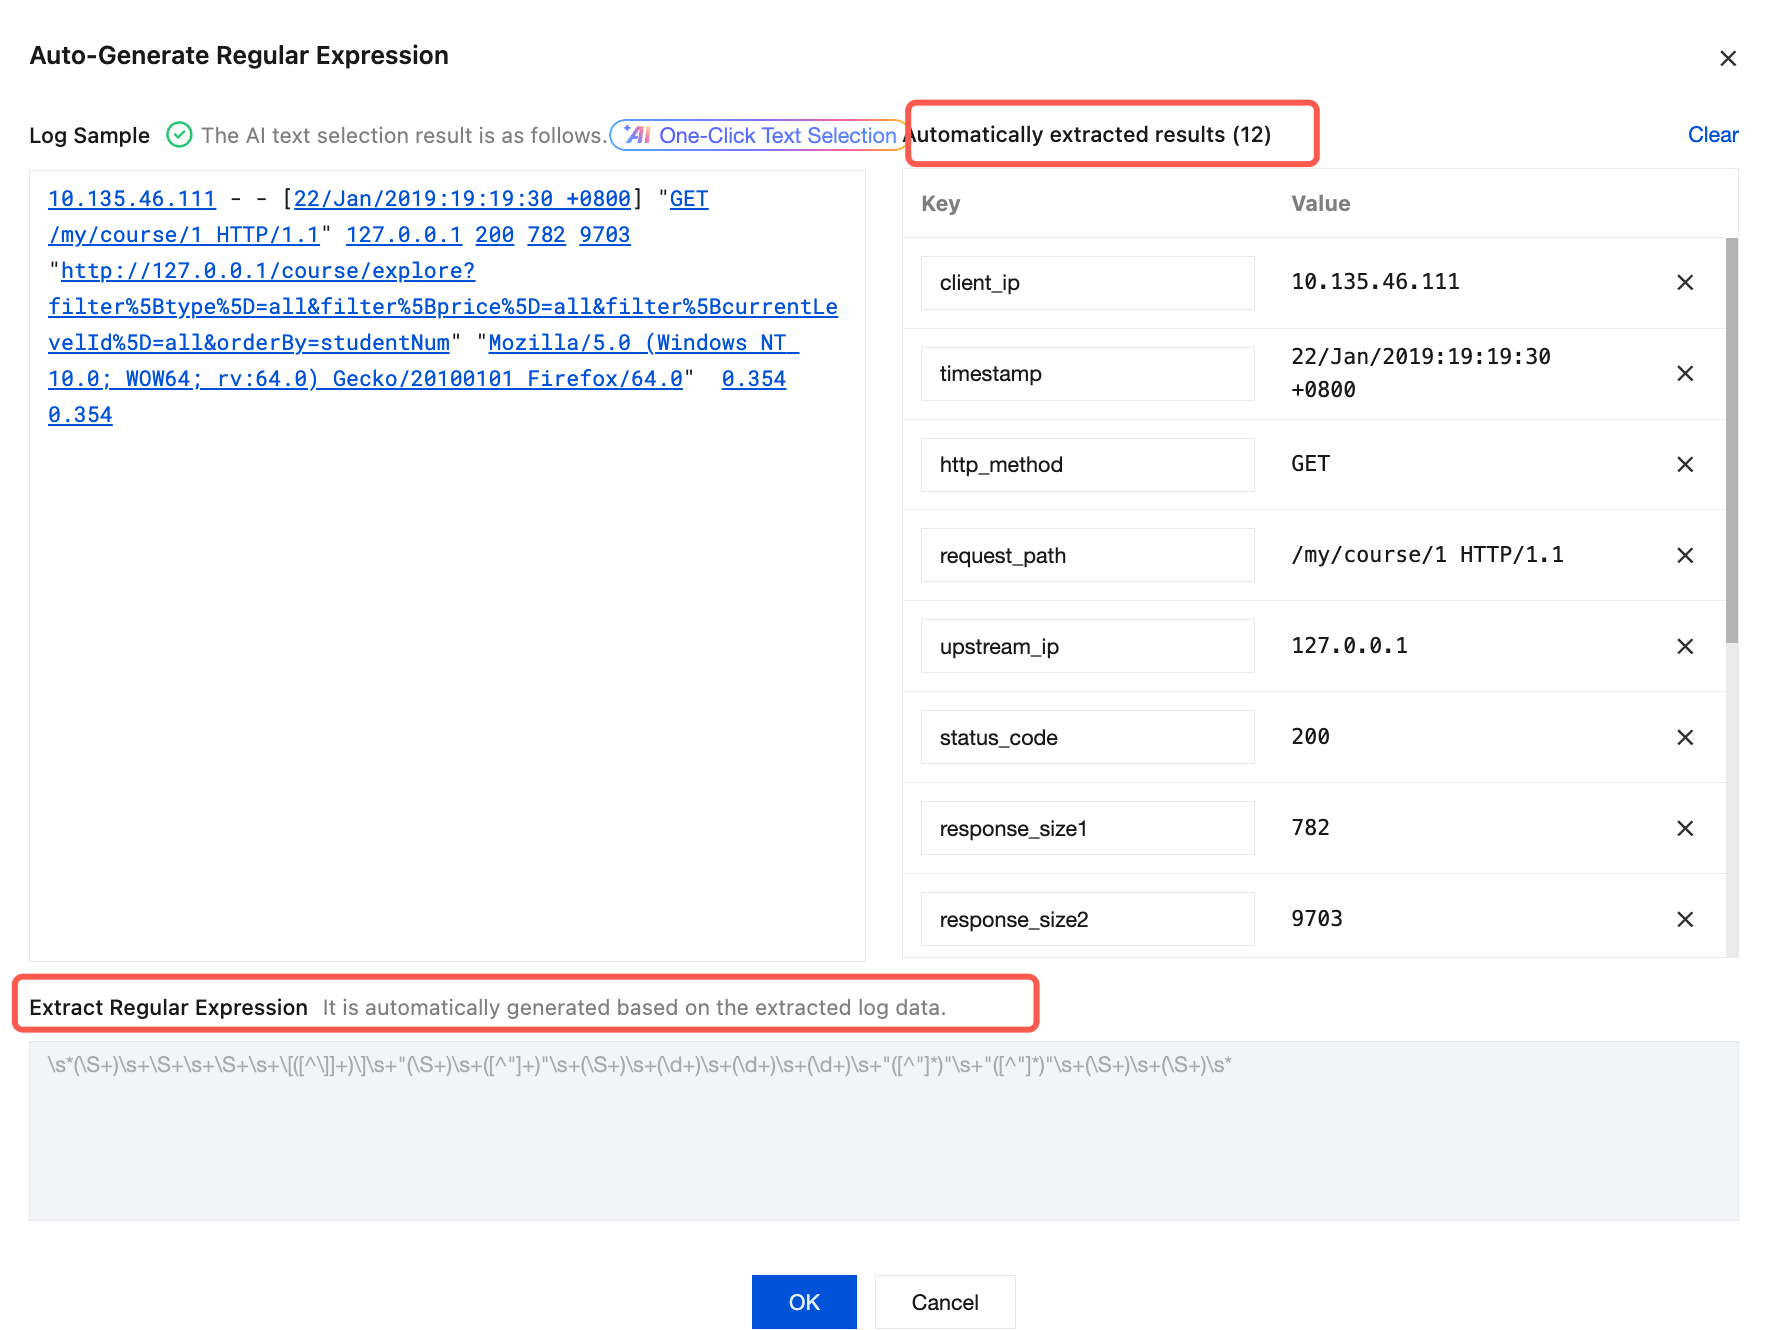
3. AI will intelligently select words from your log, identify the corresponding key-value structure, and automatically generate keys based on values. The selection results will be displayed in the Automatically extracted results table on the right, where you can modify the keys. Meanwhile, the system will automatically generate the Extract Regular Expression based on the selection results and display it in the table below. As shown below:
4. Click OK.
1. Click the selecting text by clicking to generate an expression tool.
2. In the pop-up "
Regular Expression Automatically Generated
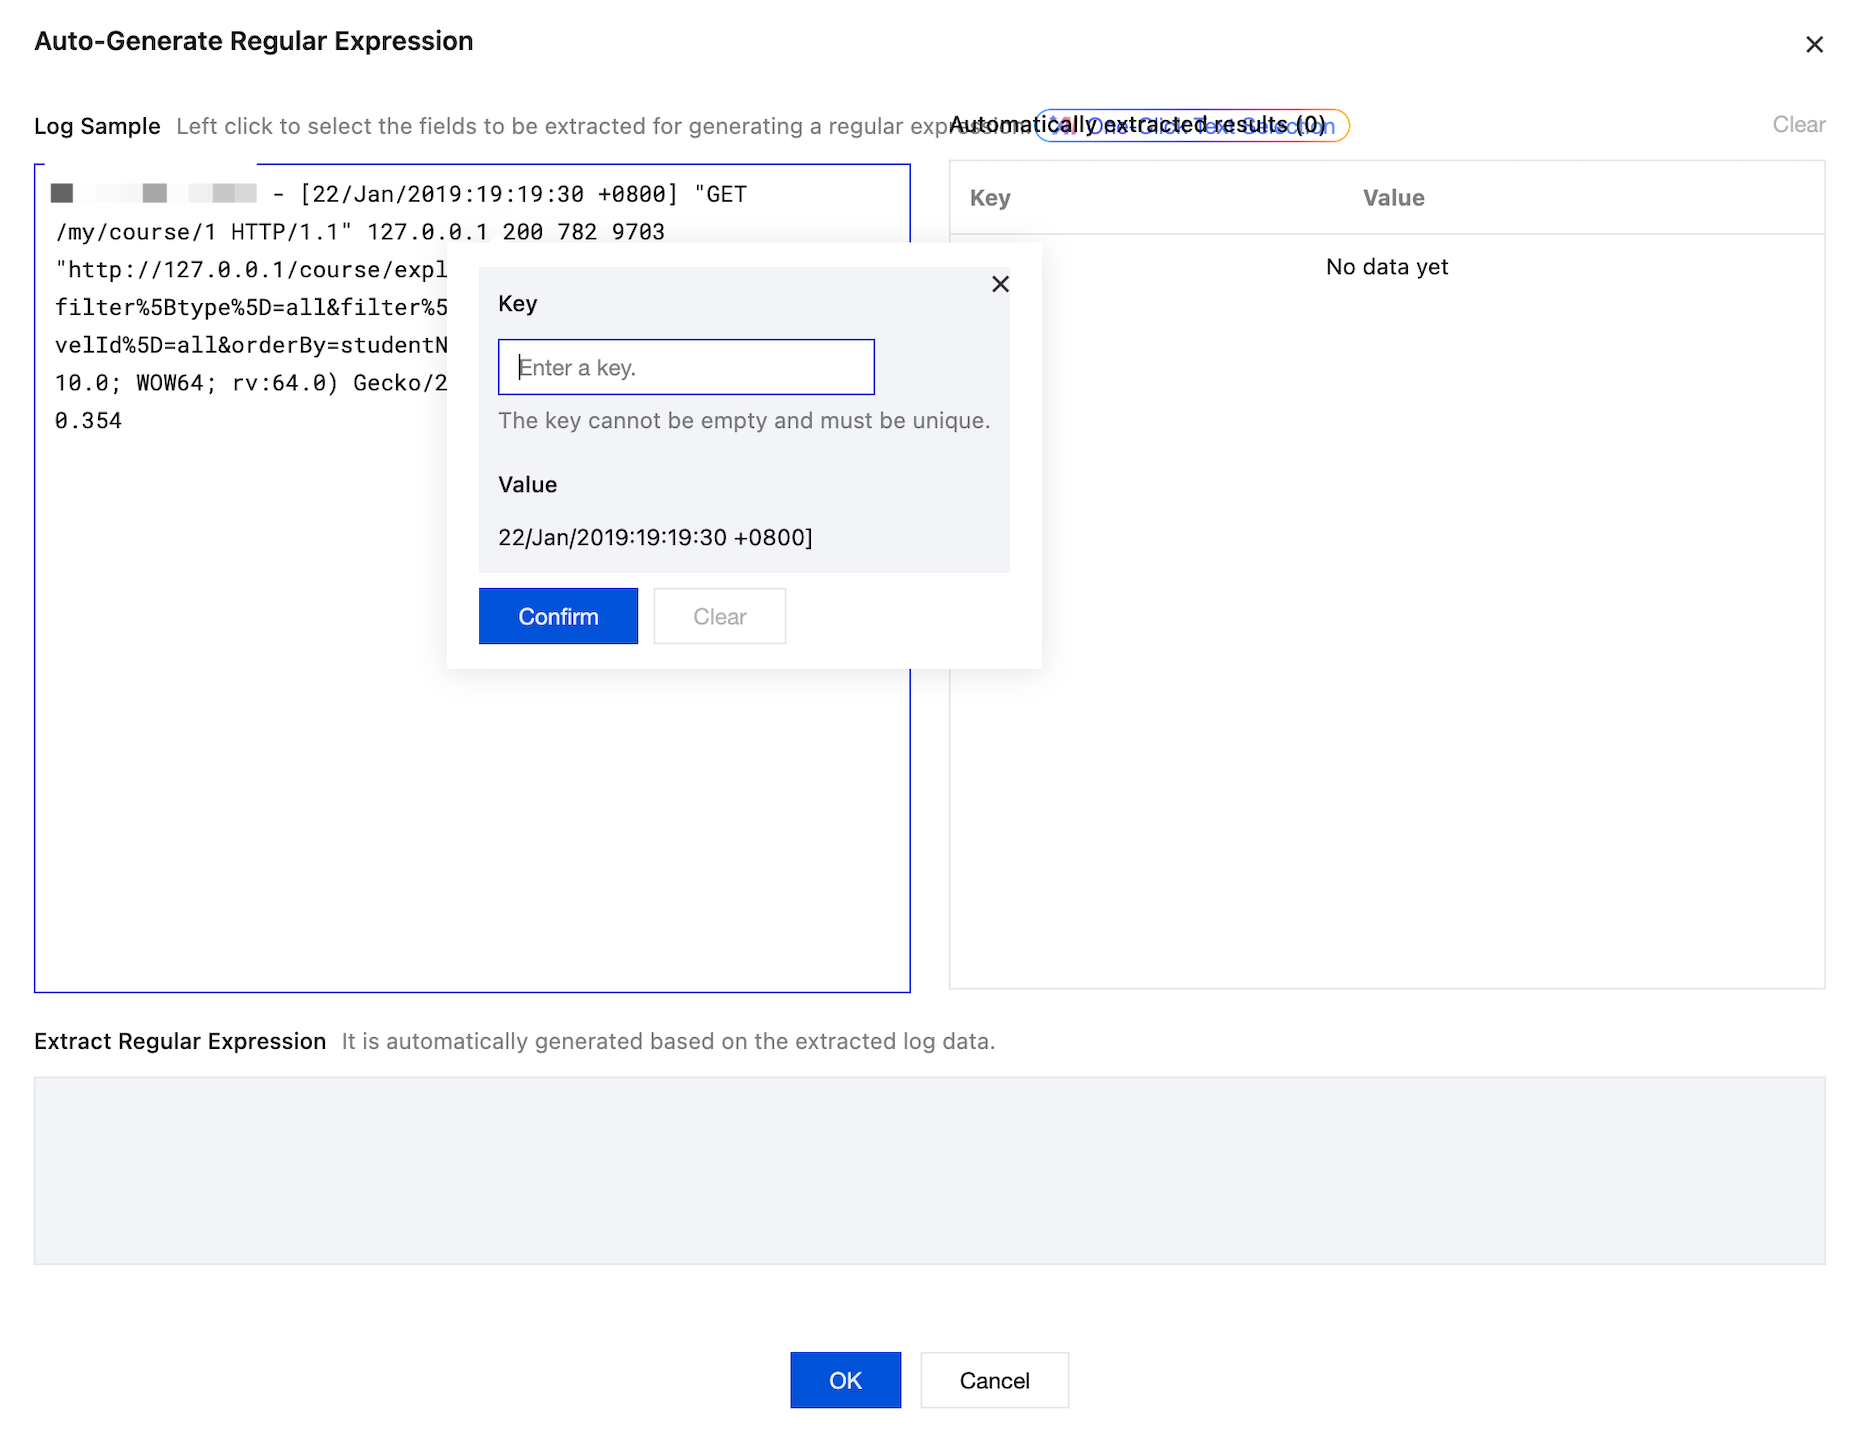
" modal view, select the log content requiring key-value extraction with the left mouse button based on actual retrieval and analysis requirements. Enter the key name in the text box that appears and click Confirm. As shown below:
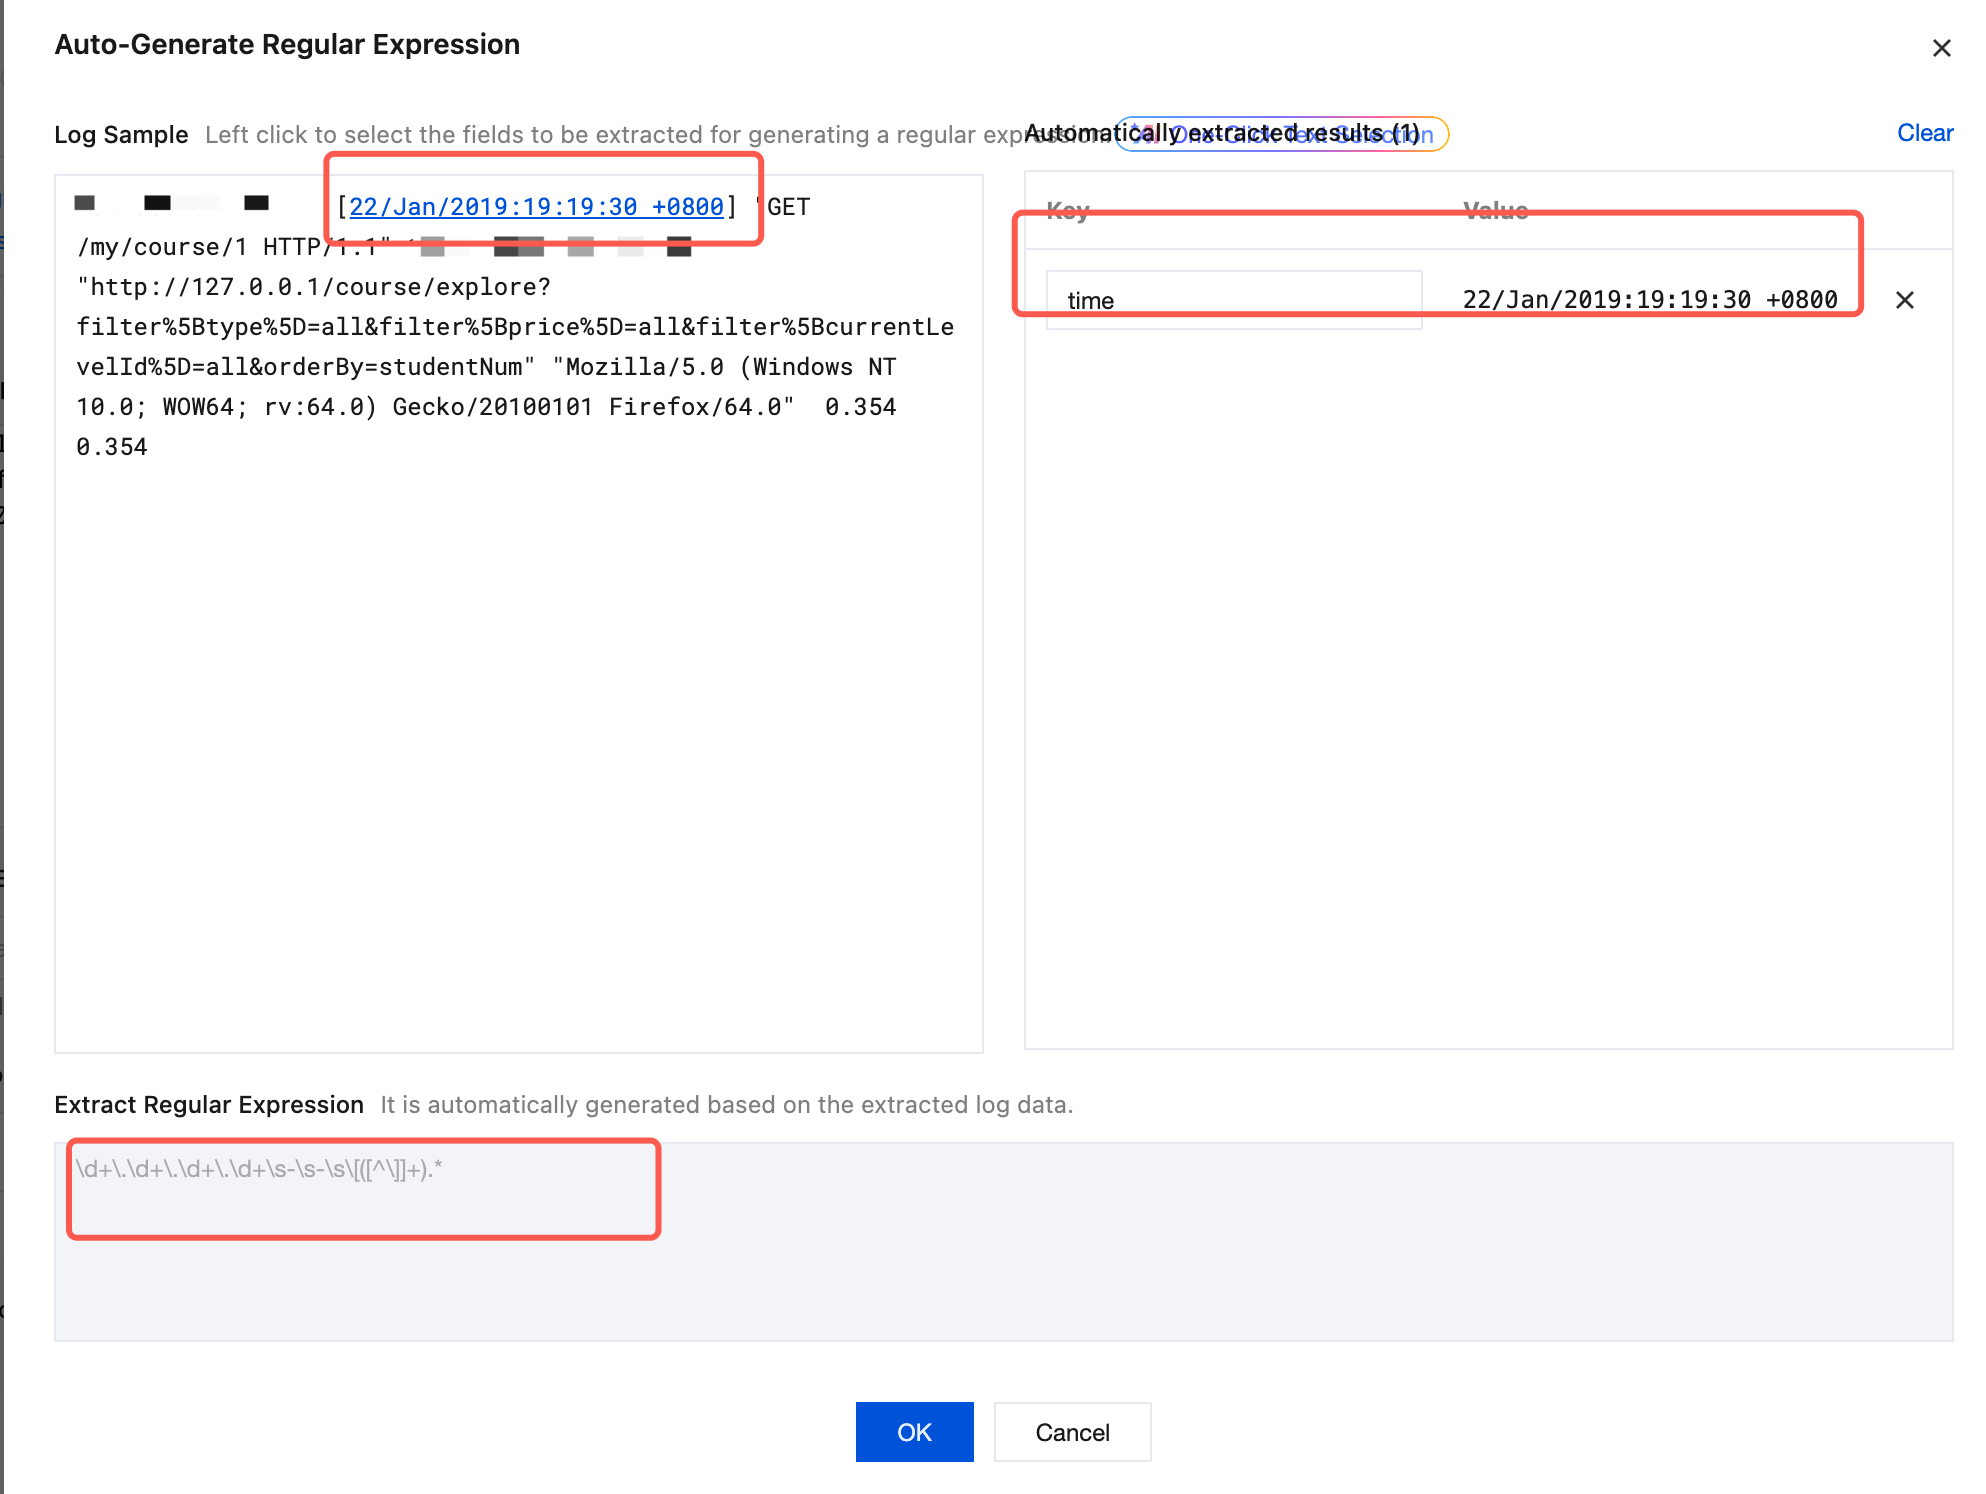
The system will automatically extract a regular expression for this part of the content, and the Automatically extraction results will appear in the key-value table on the right. The Extracted Regular Expression automatically generated based on the Automatically extraction results will appear in the table below. As shown below:
4. Click OK, and the system will automatically generate a complete regular expression based on the extracted key-value pairs.
1. Enter a regular expression in the regular expression textbox.
2. Click Verify Extraction and the system will determine whether the log sample matches the regular expression.
Note:
Regardless of whether you use AI word mode, auto mode, or manual mode, after completing the definition and verification passes, the extraction result will display in "extraction result". If the result is not as expected, return to define regular expression to re-edit and perform re-verification.
You just need to define the key name for each set of key-value pairs, and this name can be used for log retrieval analysis.
More Logs Verification
1. When you have multiple complex log examples, you can set Match more logs to enable
and just verify the passing rate of your regular expression sample.
2. Input the log example to be verified, separate multiple data entries with line break, and click Verify. The system will verify the pass rate of the example. When
appears, it means verification passed, as shown below:
Configuring Custom Metadata
You can configure custom metadata to distinguish logs. The following metadata configurations are supported. For details, see Custom Metadata.
Machine group metadata: Use machine group metadata
Collection Path: Extract values in the collection path as metadata using regular expression.
Custom: Custom key-value as metadata
Note:
Custom metadata configuration is only supported in LogListener 2.8.7 and above versions.
Configuring Log Timestamp Source
You can choose log collection time or specify log fields as the timestamp.
Log Collection Time
Specify Log Fields
Use log collection time as log time.
Use the value of the specified field in the log as the log time.
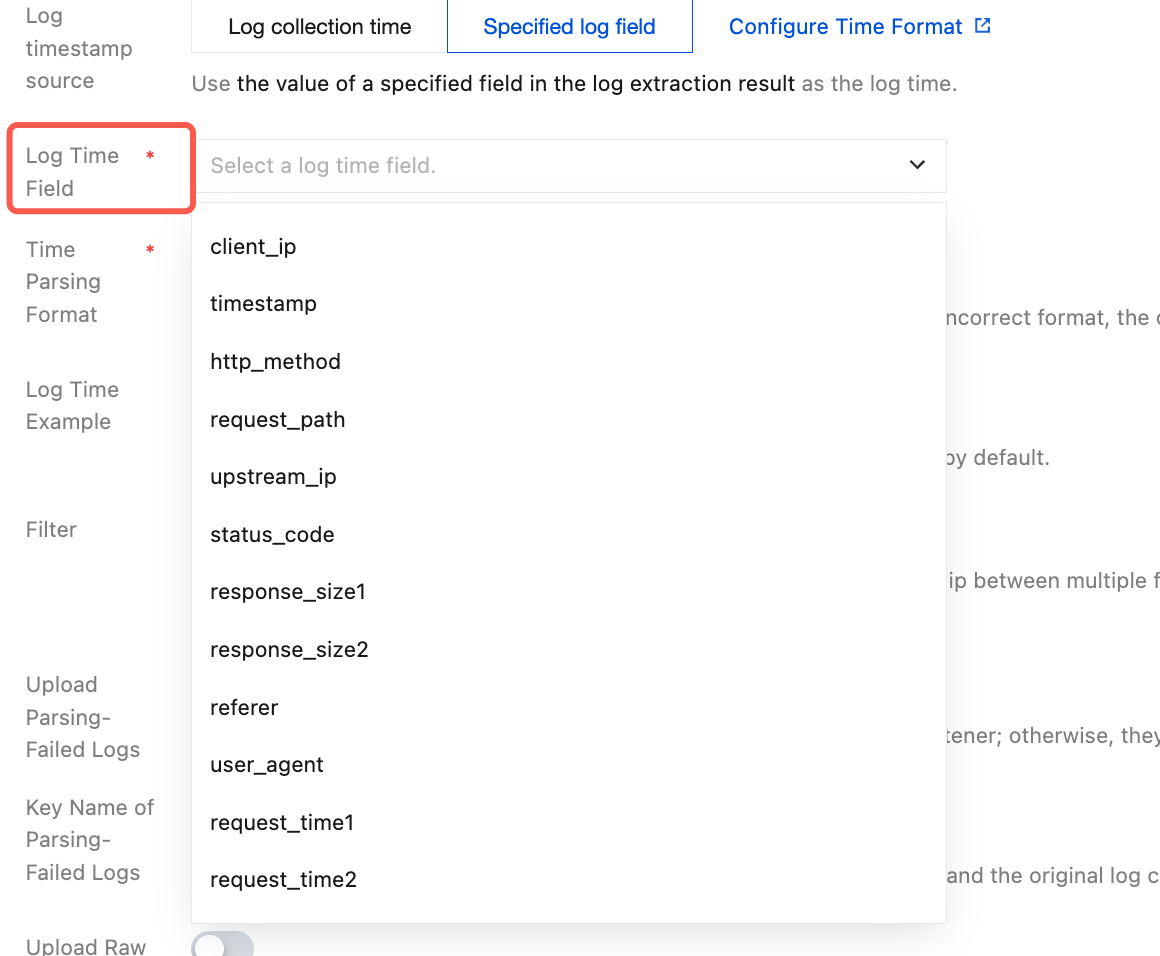
1. Select the extracted Value from Log Time Field as the log time.
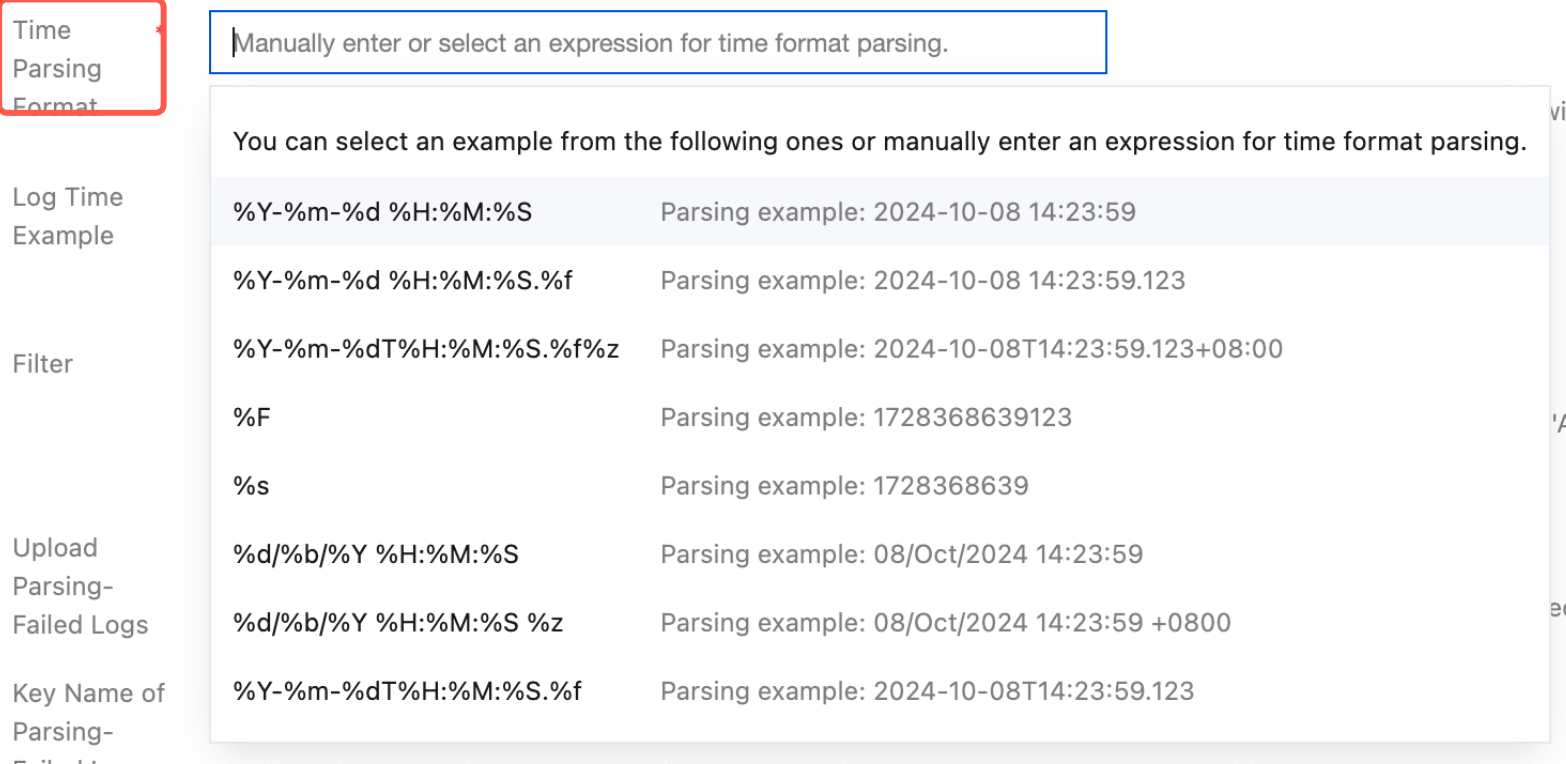
2. In Time Parsing Format, manually enter or select the corresponding parsing expression. For example: the value representing time in logs is 07/Jul/2025:19:19:30 +0800, and the parsing format is %d/%b/%Y:%H:%M:%S %z. For more details, please see configure time format.
3. Click Verify.
Note:
If the time format is incorrect, the log time will be subject to the collection time.
Configure Filter Conditions
The purpose of the filter is to add log collection and filtering rules according to business requirements, so as to help you screen out valuable log data.
During full regular expression collection, filtering conditions need to be configured according to the customized key-value pairs. The following filtering rules are supported:
Equal to: Only collect logs with specified field values matching the specified characters. Exact or regular matching is supported.
Not equal to: Only collect logs whose specified field values do not match the specified characters. Exact or regular matching is supported.
Field exists: Only logs where the specified field exists are collected.
Field does not exist: Only logs in which the specified field does not exist are collected.
For example, after the sample log is parsed in full regular expression mode, if you want all log data with status field of 400 or 500 to be collected, configure status at key, select equal to as filtering rule, and configure 400|500 at value.
Note:
Windows environments currently do not support custom metadata.
The filtering rules "Not equal to", "Field exists", and "Field does not exist" are only supported in LogListener 2.9.3 and later versions.
Multiple filtering conditions are in an AND relationship. If multiple filtering conditions are configured for the same key name, the rule will be overwritten.
Configure the Upload of Logs Failed to Be Parsed
It is recommended to enable upload parsing-failed logs. When enabled, LogListener will upload various logs failed to be parsed. If upload parsing-failed logs is disabled, the failed log will be discarded.
After this function is enabled, the key value (LogParseFailure by default) failed to be parsed needs to be configured. All logs failed to be parsed are uploaded with the input content as the key name (Key), and the original log content as the value (Value).
Upload Raw Logs
After being enabled, LogListener will upload raw logs and parsed logs together. All raw logs will be uploaded with the key name you specified, and the original log content will be used as the Value.
Advanced Configuration
Note:
Windows environments currently do not support custom metadata.
Select the advanced configuration you need to define by checking .
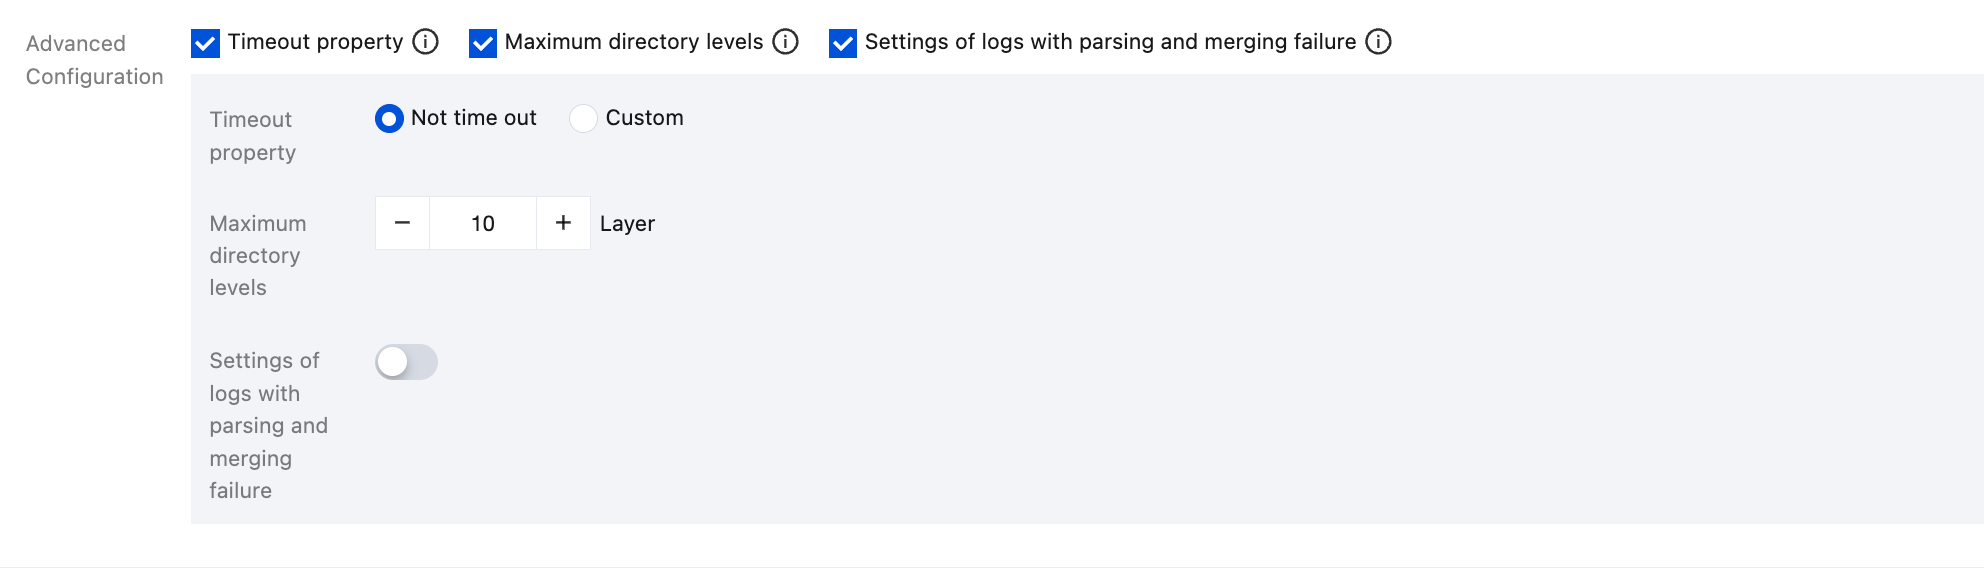
In the single-line full regular expression mode, you can configure the following advanced settings.
Name
Description
Configuration Item
Timeout property
This configuration controls the timeout period for the log file. If a log file has no updates within the specified time, it is timed out. LogListener will no longer collect the timed-out log file. When you have a large number of log files, recommend reducing timeout to avoid waste of LogListener performance.
No timeout: Log file never time out
Custom: The timeout for log files can be customized.
Maximum directory levels
The configuration controls the maximum directory depth for log collection. LogListener does not collect log files in directories that exceed the specified maximum directory depth. If your target collection path includes fuzzy matching, it is recommended to configure an appropriate maximum directory depth to avoid LogListener performance waste.
An integer greater than 0. 0 means no drilling down into subdirectories.
Step 4: Index Configuration
1. Click Next to enter the Index Configuration page.
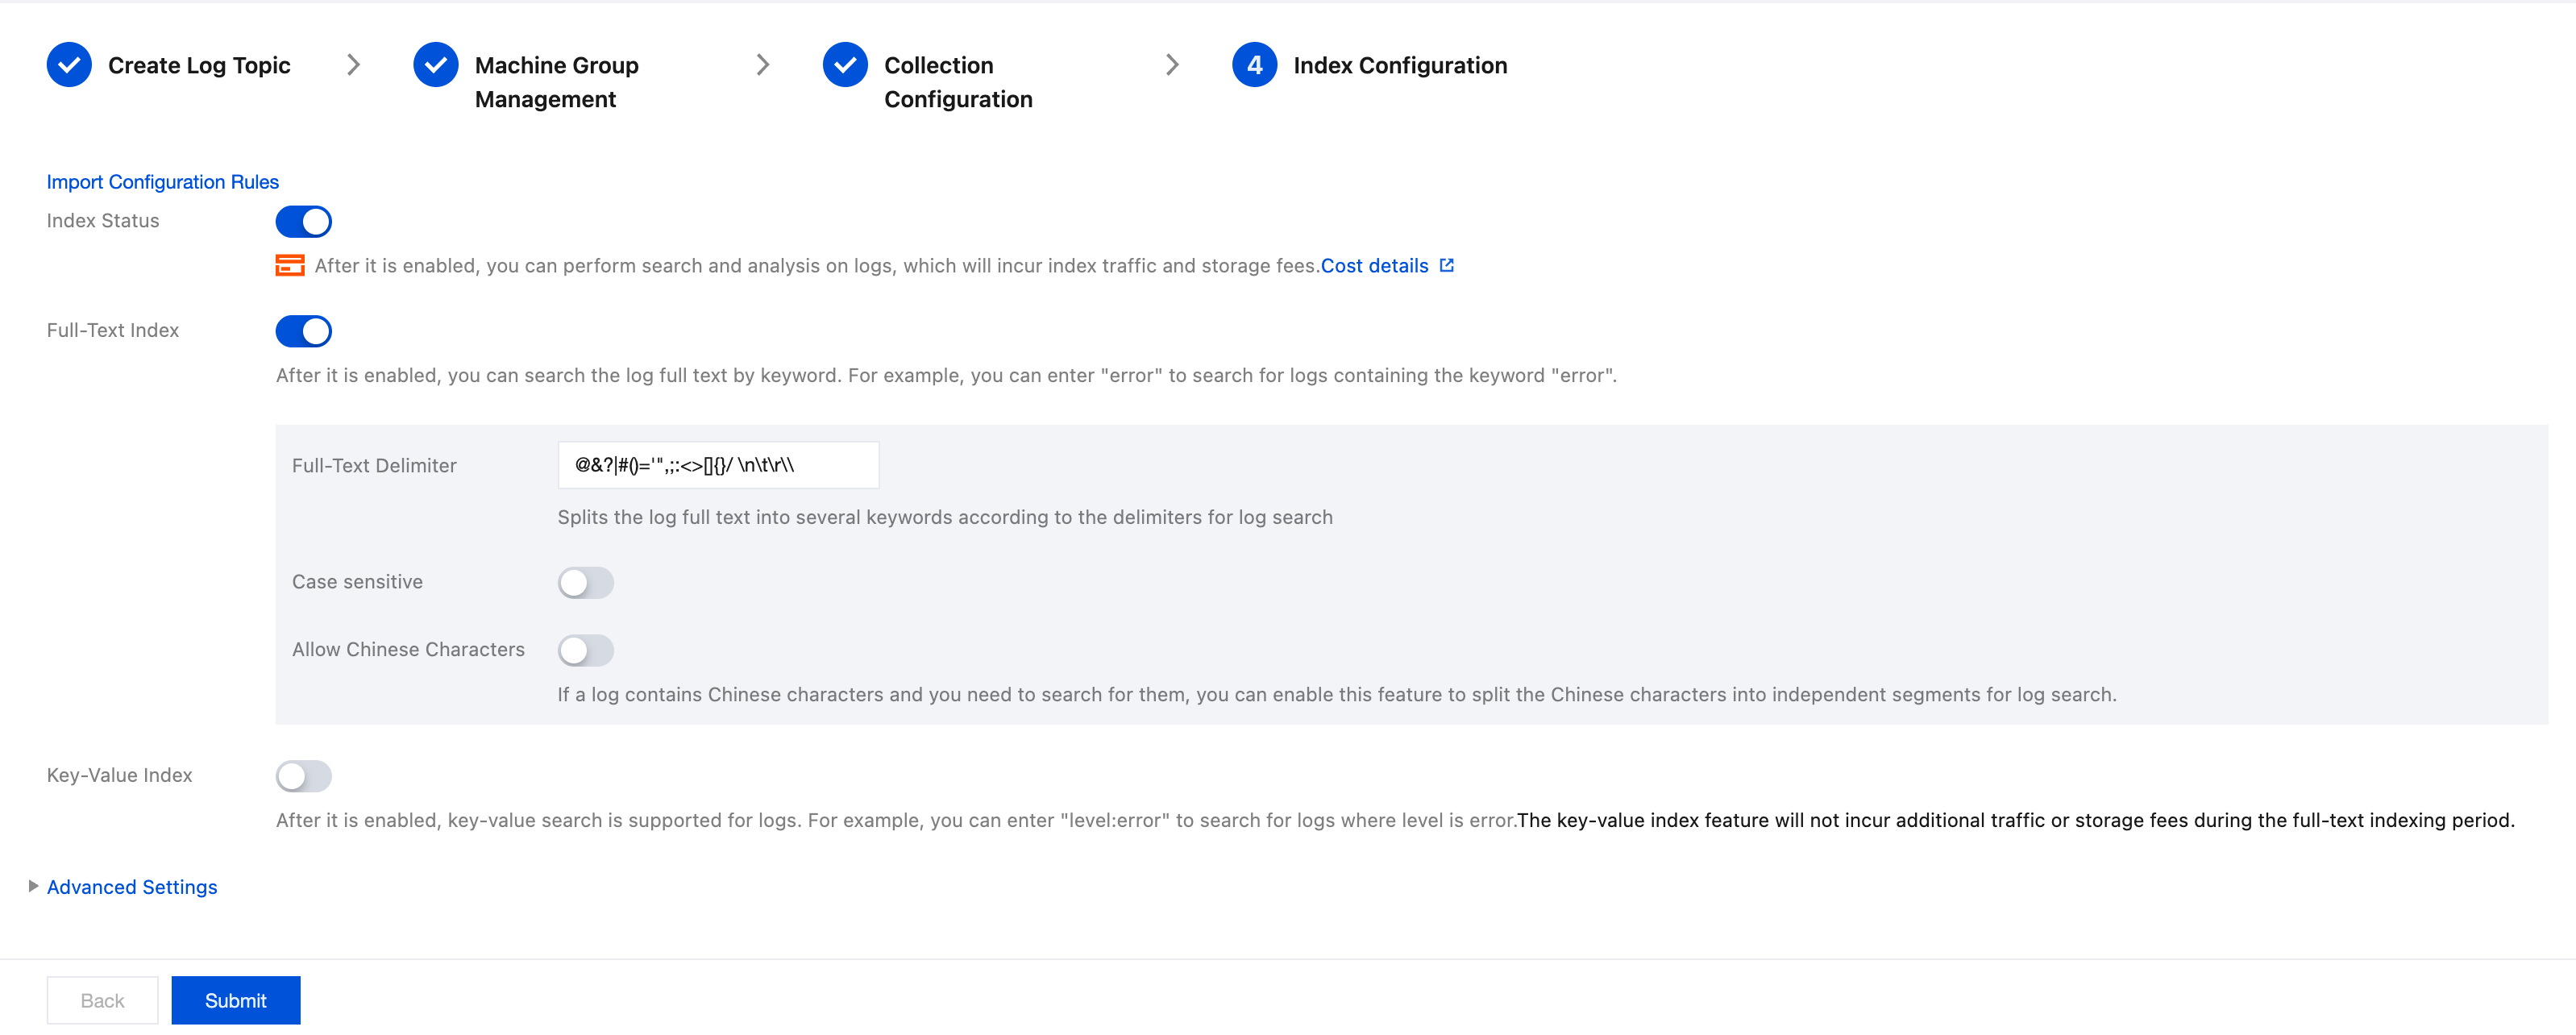
2. On the "Index Configuration" webpage, configure the following information. For configuration details, please see index configuration.
Note:
Index configuration must be enabled before you can perform searches.
3. Click Submit to enter the edit index configuration confirmation page.
If you want the index configuration you have set to take effect only for newly written logs, click Confirm. If you want this configuration to take effect for historical data, after clicking Confirm, for details, see Rebuilding an Index for further settings.
4. Operation succeeded. Complete the collection configuration.