Use the CFS File System on Linux Clients
Download
Mode fokus
Ukuran font
This document describes how to use CFS on a Linux client.
Prerequisites
Before a file system is created, ensure that available VPC and subnet exist. It is recommended to place the Linux CVM and CFS file system in the same VPC within the same AZ to reduce network latency and achieve a better user experience. If there is no VPC or subnet, see Quickly Configure a VPC for configuration.
Before a file system is created, ensure that an available Linux CVM exists. If there is no Linux CVM, see Quickly Configure a Linux CVM to purchase and configure it. To log in to the CVM, use the administrator account (root by default, ubuntu for Ubuntu systems) and the password set during purchase.
To create a CFS Turbo file system, see Using CFS Turbo File System on a Linux Client for configuration.
Operation Steps
Step 1: Creating a File System and Its Mount Point
Step 2: Connecting to an Instance
This section introduces common methods for logging in to Linux CVMs. It covers console login; for additional login methods, see Logging in to Linux Instances.
1. In the CVM list's operation column, click Login to connect to the Linux CVM via VNC.
2. Enter the username and password to log in. The login mode is exclusive, meaning only one user can log in via the console at a time.
Step 3: Verifying Network Communication
Before mounting, verify whether the network connectivity between the client and the file system is established. Use the telnet command to verify, for example, telnet 192.168.1.1 111. The ports that need to be opened for different file protocols are listed in the table below:
File System Protocol | Open Port | Check the Network Connectivity of a Specific Port |
NFS 3.0 | 111, 892, and 2049 | telnet <file system IP address> 111 telnet <file system IP address> 892 telnet <file system IP address> 2049 |
NFS 4.0 | 2049 | telnet <file system IP address> 2049 |
SMB/CIFS | 445 | telnet <file system IP address> 445 |
Note:
If the connection fails, check the client security group configuration to ensure that inbound and outbound traffic for the port corresponding to the file system IP address is allowed. For more information, see Adding Security Group Rules.
Step 4: Mounting a File System
Mounting an NFS File System
You can install the NFS client on the CVM and mount the corresponding file system through the CFS console. For specific steps, see Mounting File Systems Using the Console.
1. Install and start the NFS client. Depending on the operating system type, use the following commands to install
nfs-utils or nfs-common on the client.TencentOS, OpenCloudOS, and CentOS:
sudo yum install nfs-utils
Ubuntu and Debian:
sudo apt-get install nfs-common
2. Create the target directory to be mounted.
mkdir <destination mount directory># mkdir /localfolder/# mkdir -p /localfolder/test
3. Mount the file system. It is recommended to use the NFS 3.0 protocol for mounting to achieve better performance. If your application relies on file locking (that is, requiring multiple CVMs to edit the same file simultaneously), please use the NFS 4.0 protocol for mounting. For more information, see NFS Client Mount Parameter Specifications.
# Mount the root directory using NFS 3.0 (recommended):sudo mount -t nfs -o vers=3,nolock,proto=tcp,noresvport <mount target IP>:/<mount target ID>/ /localfolder# Mounting subdirectories using NFS 3.0:sudo mount -t nfs -o vers=3,nolock,proto=tcp,noresvport <mount target IP>:/<mount target ID>/subfolder /localfolder (recommended)# Mount the root directory using NFS 4.0:sudo mount -t nfs -o vers=4.0,noresvport <mount target IP>:/ /localfolder# Mounting subdirectories using NFS 4.0:sudo mount -t nfs -o vers=4.0,noresvport <mount target IP>:/subfolder /localfolder
Mount point IP: It is automatically generated when the file system is created.
"localfolder" refers to a directory created locally by the user; "subfolder" refers to a subdirectory created by the user in the CFS file system. If "subfolder" is not specified, the root directory of the file system
/ is mounted by default. After creating a subdirectory in the file system, you can mount that subdirectory.Note:
The mount command can be copied with one click by logging in to CFS Console > File System ID > File System Mount Point.
Since some older versions of the file system do not support the noresvport parameter, please refer to the console for the exact mount command. It is recommended to enable noresvport to use new TCP ports during network reconnections, ensuring uninterrupted connectivity between clients and the file system during network exceptions and recovery.
For older versions of the Linux kernel, use vers=4 for mounting. If abnormalities occur when vers=4.0 is used, try changing it to vers=4.
4. View mount target information. After mounting, use the
mount -l or df -h command to view the mounted file system:# List currently mounted file system informationmount -l# Use grep to filter corresponding file system typesmount -l | grep nfsmount -l | grep lustre# Check Disk Space Usagedf -h
Note:
To avoid misoperations, do not repeatedly mount a mounted CFS file system or file system directory unless it is necessary.
When the directories to be mounted have overlapping or inclusive relationships,
df -h cannot display all file system mounting results. It is recommended to use mount -l to view all mount target information.Mount SMB/CIFS file system
You can install the SMB/CIFS client on the CVM and mount the corresponding file system through the CFS console. For specific steps, see Mounting File Systems via the Console.
1. Install and start the CIFS client. Depending on the operating system type, use the following commands to install
cifs-utils or nfs-common on the client.TencentOS, OpenCloudOS, and CentOS:
sudo yum install cifs-utils -y
Ubuntu and Debian:
sudo apt-get install cifs-utils -y
2. Create the target directory to be mounted.
mkdir <destination mount directory># mkdir /localfolder/# mkdir -p /localfolder/test
3. Mount the file system. It is recommended to use the NFS 3.0 protocol for mounting to achieve better performance. If your application relies on file locking (that is, requiring multiple CVMs to edit the same file simultaneously), please use the NFS 4.0 protocol for mounting. For more information, see NFS Client Mount Parameter Specifications.
# Mount the root directory using NFS 3.0 (recommended):sudo mount -t nfs -o vers=3,nolock,proto=tcp,noresvport <mount target IP>:/<mount target ID>/ /localfolder# Mounting subdirectories using NFS 3.0:sudo mount -t nfs -o vers=3,nolock,proto=tcp,noresvport <mount target IP>:/<mount target ID>/subfolder /localfolder (recommended)# Mount the root directory using NFS 4.0:sudo mount -t nfs -o vers=4.0,noresvport <mount target IP>:/ /localfolder# Mounting subdirectories using NFS 4.0:sudo mount -t nfs -o vers=4.0,noresvport <mount target IP>:/subfolder /localfolder
Mount point IP: It is automatically generated when the file system is created.
"localfolder" refers to a directory created locally by the user; "subfolder" refers to a subdirectory created by the user within the CFS file system. If "subfolder" is not specified, the root directory
/ of the file system is mounted by default. After creating a subdirectory in the file system, you can mount that subdirectory.Note:
The mount command can be copied with one click by logging in to CFS Console > File System ID > File System Mount Point.
Since some older versions of the file system do not support the noresvport parameter, please refer to the console for the exact mount command. It is recommended to enable noresvport to use new TCP ports during network reconnections, ensuring uninterrupted connectivity between clients and the file system during network exceptions and recovery.
For older versions of the Linux kernel, use vers=4 for mounting. If abnormalities occur when vers=4.0 is used, try changing it to vers=4.
4. View mount target information. After mounting, use the
mount -l or df -h command to view the mounted file system:# List currently mounted file system informationmount -l# Use grep to filter corresponding file system typesmount -l | grep nfsmount -l | grep lustre# Check Disk Space Usagedf -h
Note:
To avoid misoperations, do not repeatedly mount a mounted CFS file system or file system directory unless it is necessary.
When the directories to be mounted have overlapping or inclusive relationships,
df -h cannot display all file system mounting results. It is recommended to use mount -l to view all mount target information.Step 5: Unmounting a Shared Directory
To unmount a shared directory when necessary, use the following command. Here, "localfolder" refers to the directory created locally by the user for mounting the CFS file system.
sudo umount /localfolder
Step 6: Delete Resources
Note:
Resources cannot be recovered from a deleted file system. Therefore, it is recommended to use the snapshot feature to back up all resources before deleting the file system.
You can delete file systems from the Tencent Cloud console. Go to the Tencent Cloud CFS console, select the file system that needs to be deleted, click Delete and Confirm to delete the file system.
CFS self-service detection
If you encounter a mount failure, follow the steps below to troubleshoot:
1. Log in to the CVM where the mount failed, execute
mount -l to confirm that the currently mounted file systems do not include the CFS file system to be mounted.2. When the error
mount.nfs: mount point /localfolder does not exist is reported, it indicates that the local directory does not exist. You can create the local directory and then re-run the mount command.3. When the error
mount.nfs: mounting 10.xxx.xxx.xxx:/abcdefgh/subfolder failed, reason given by server: No such file or directory is reported, it indicates that the specified subdirectory does not exist in the CFS file system. First mount the root directory /, create the subdirectory after successful mounting, and then remount the subdirectory.4. When the error
mount.nfs: Connection timed out is reported, you can use the CFS self-service detection feature in the console. Select the target CVM and corresponding CFS file system, execute the diagnosis, and troubleshoot the OS kernel, network, ports, permission group, and so on based on the diagnostic report. If you cannot resolve the issue independently, promptly submit feedback via the ticket system.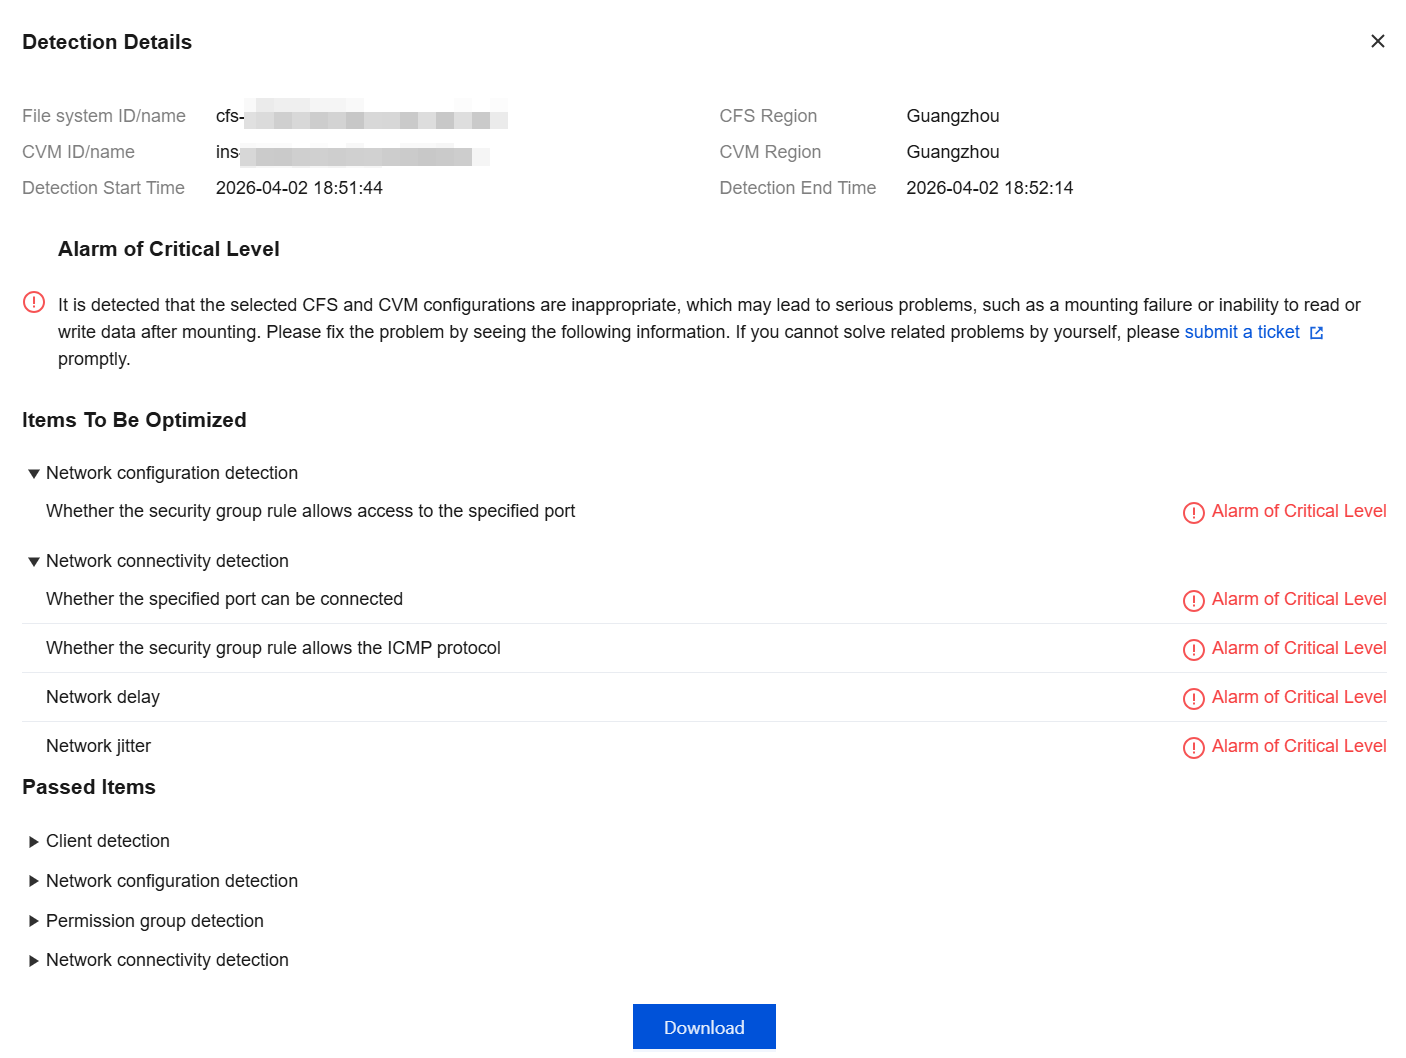
Bantuan dan Dukungan
Apakah halaman ini membantu?
Anda juga dapat Menghubungi Penjualan atau Mengirimkan Tiket untuk meminta bantuan.
masukan