APNs
Download
聚焦模式
字号
TUICallKit 组件支持通过接入推送插件,实现离线推送的功能。 TUICallKit 为您提供了两种集成方式:TIMPush 插件(付费)和 自集成推送(免费),我们更推荐您使用 TIMPush 推送插件来实现离线推送,TIMPush 推送插件有以下优势:
接入周期短,预计全厂商接入仅需要 30 分钟。
支持数据统计和链路追踪,方便您查看推送触达率、点击率和转化率等各类指标。
支持全员/标签推送,方便您将营销广告、通知、新闻资讯等内容推送给所有用户或指定群体。
支持 uni-app 和 Flutter 等跨平台框架。
注意:
为了有更好的音视频通话的通知效果,推荐您使用 TUIVoIPExtension 插件推送接入 VoIP 推送功能,中国大陆上架推荐您使用 TUIVoIPExtension/LiveCommunicationKit 接入,非中国大陆上架推荐您使用 TUIVoIPExtension/CallKit 接入。
集成效果
锁屏时的效果 | 在后台时的效果 |
 |  |
配置离线推送
1. 集成 TIMPush 组件。
2. 开启 App 远程推送。
3. 生成证书。
4. 上传证书到 IM 控制台。
5. 完成工程配置
6. 配置推送参数。
7. 拨打离线推送电话。
步骤1: 集成 TIMPush 组件
1. TIMPush 组件支持 CocoaPods 集成,您需要在 Podfile 中添加组件依赖。
target 'YourAppName' do# Uncommment the next line if you're using Swift or would like to use dynamic frameworksuse_frameworks!use_modular_headers!# Pods for Examplepod 'TIMPush', '7.9.5668'end
2. 执行以下命令,安装 TIMPush 组件。
pod install
# 如果无法安装 TUIKit 最新版本,执行以下命令更新本地的 CocoaPods 仓库列表。
pod repo update
步骤2: 开启 App 远程推送
1. 登录 苹果开发者中心 网站,单击 Certificates, IDs & Profiles 选项卡中的 Identifiers,进入 Certificates, Identifiers & Profiles 页面。

2. 单击 Identifiers 右侧的 “+”。
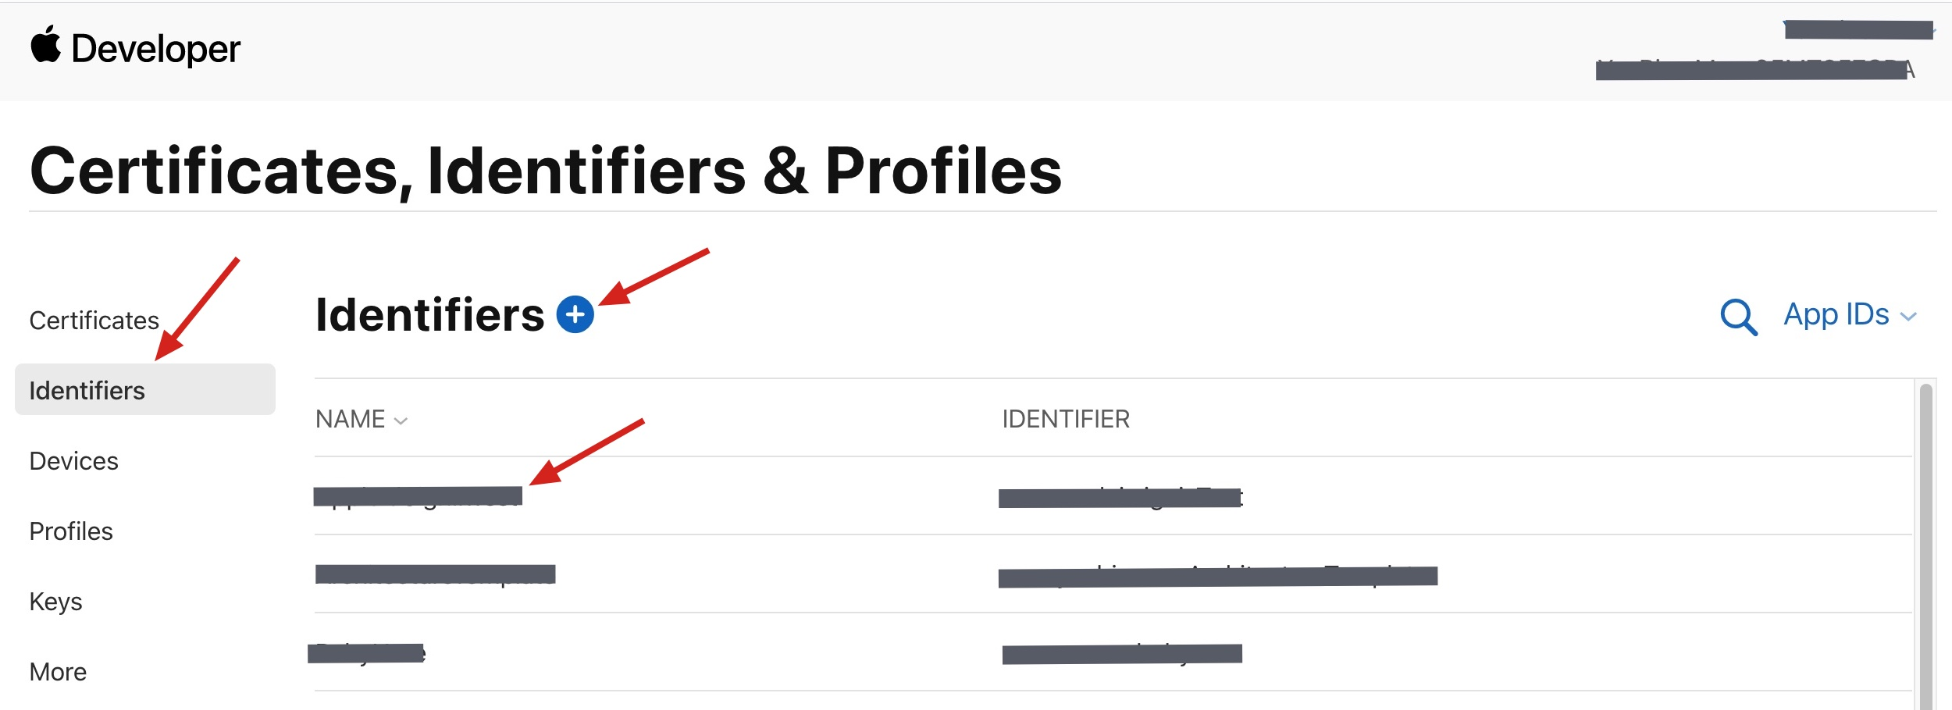
3. 您可以参考如下步骤新建一个 AppID,或者在您原有的 AppID 上增加
Push Notification 的 Service。说明:
需要注意的是,您 App 的
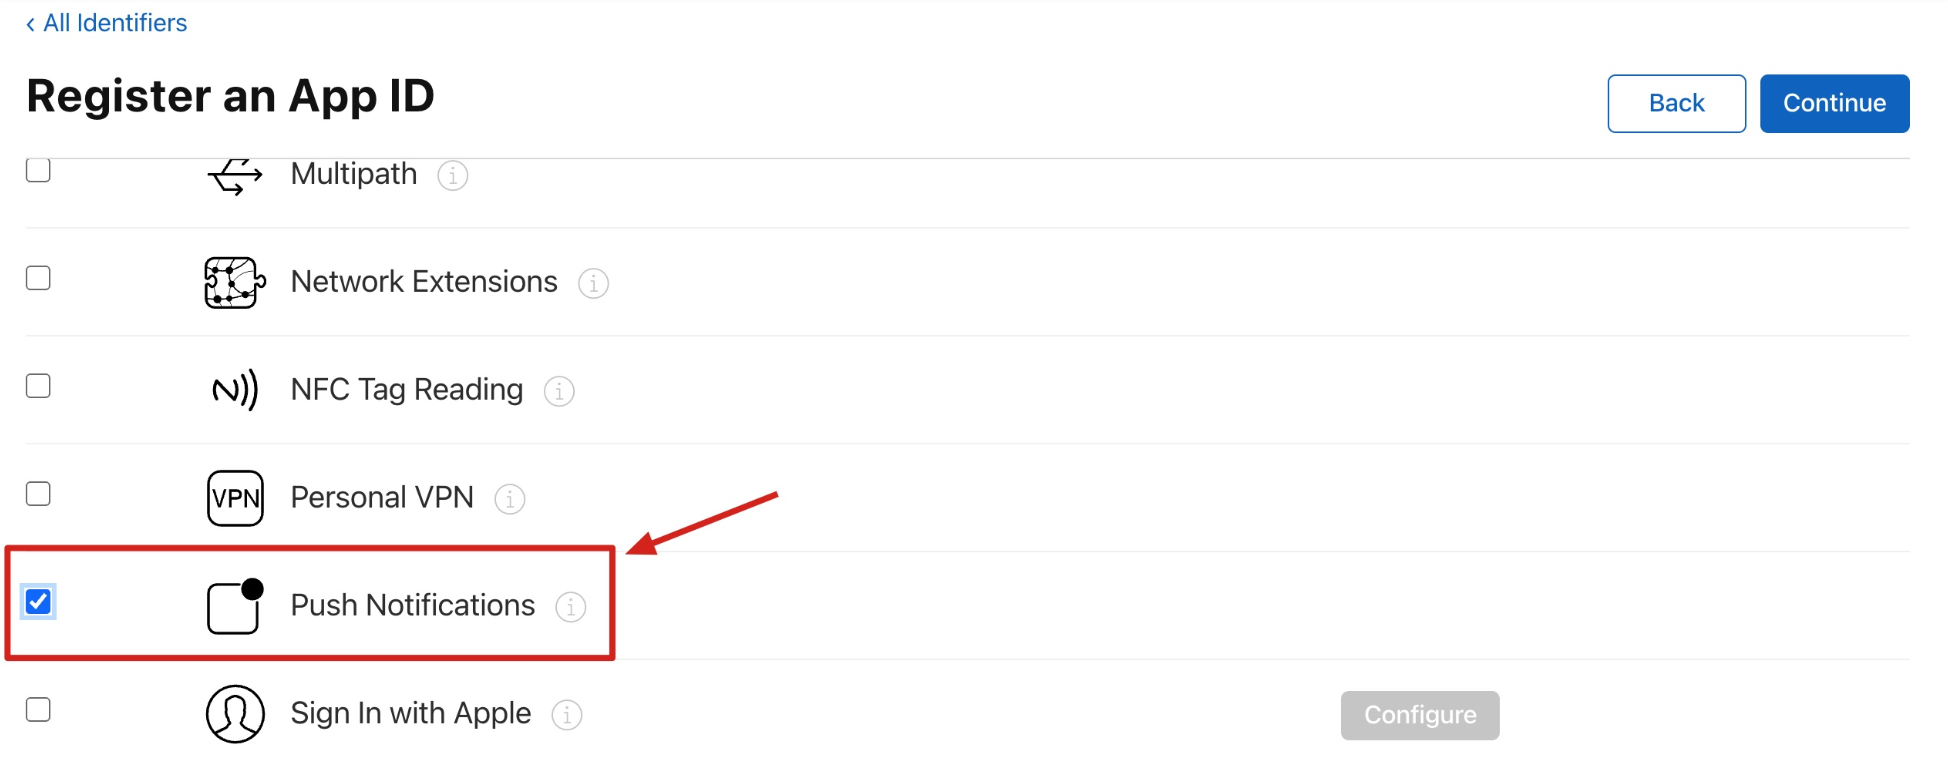
Bundle ID 不能使用通配符 *,否则将无法使用远程推送服务。4. 勾选 App IDs,单击 Continue 进行下一步。
5. 选择 App,单击 Continue 进行下一步。
6. 配置
Bundle ID等其他信息,单击 Continue 进行下一步。7. 勾选 Push Notifications,开启远程推送服务。
步骤3:生成证书
1. 选中您的 AppID,找到 Push Notifications 配置项,选择 Configure。
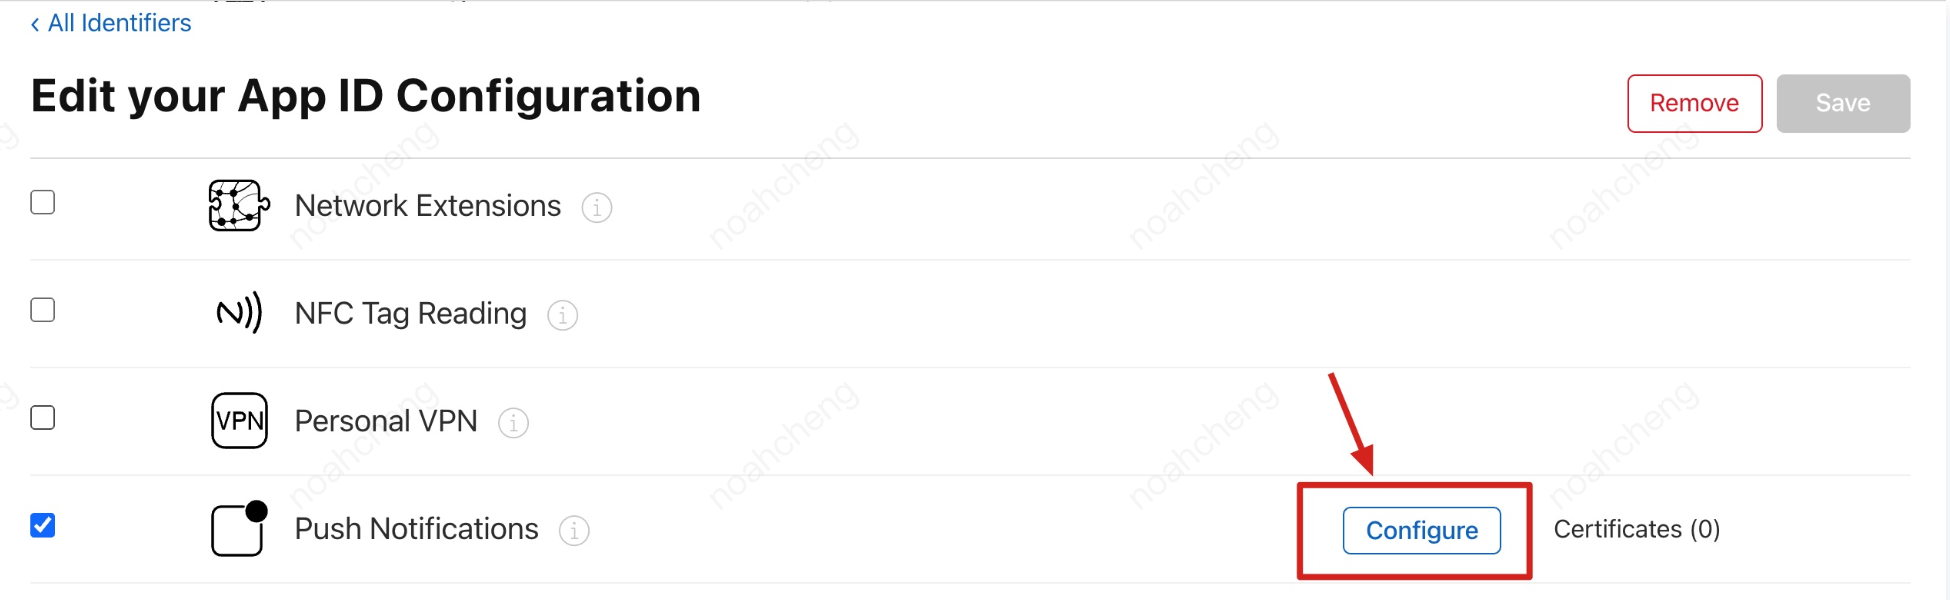
2. 可以看到在 Apple Push Notification service SSL Certificates 窗口中有两个
SSL Certificate ,分别用于开发环境(Development)和生产环境(Production)的远程推送证书。3. 我们先选择开发环境(
Development)的 Create Certificate,系统将提示我们需要一个Certificate Signing Request(CSR)。4. 在 Mac 上打开钥匙串访问工具(Keychain Access),在菜单中选择钥匙串访问 > 证书助理 > 从证书颁发机构请求证书(
Keychain Access > Certificate Assistant > Request a Certificate From a Certificate Authority)。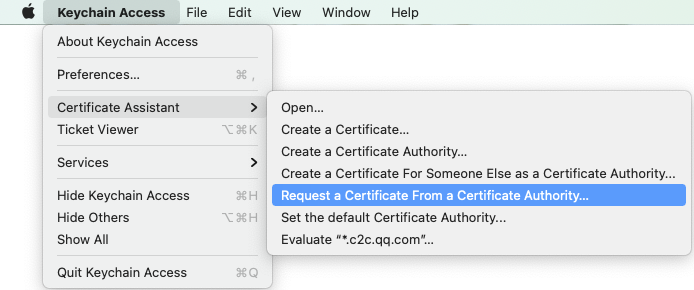
5. 输入用户电子邮件地址(您的邮箱)、常用名称(您的名称或公司名),选择 “存储到磁盘(Saved to disk)”,单击继续,系统将生成一个
*.certSigningRequest 文件。6. 返回上述
第3步 中 Apple Developer 网站刚才的页面,单击 “Choose File” 上传生成的*.certSigningRequest文件。
7. 单击 Continue,即可生成推送证书。
8. 单击 Download 下载开发环境的
Development SSL Certificate 到本地。9. 再次按照上述步骤1 - 8,将生产环境的
Production SSL Certificate 下载到本地。说明:
生产环境的证书实际是开发(
Sandbox)+生产(Production)的合并证书,可以同时作为开发环境和生产环境的证书使用。10. 双击打开下载的开发环境和生产环境的
SSL Certificate,系统会将其导入钥匙串中。11. 打开钥匙串应用,在“登录” > “我的证书”,右键分别导出刚创建的开发环境(
Apple Development iOS Push Service)和生产环境(Apple Push Services)的 P12 文件。说明:
保存
P12文件时,请务必要为其设置密码。步骤4:上传证书到 IM 控制台
1. 登录 即时通信 IM 控制台。
2. 单击目标应用卡片,进入应用的基础配置页面。
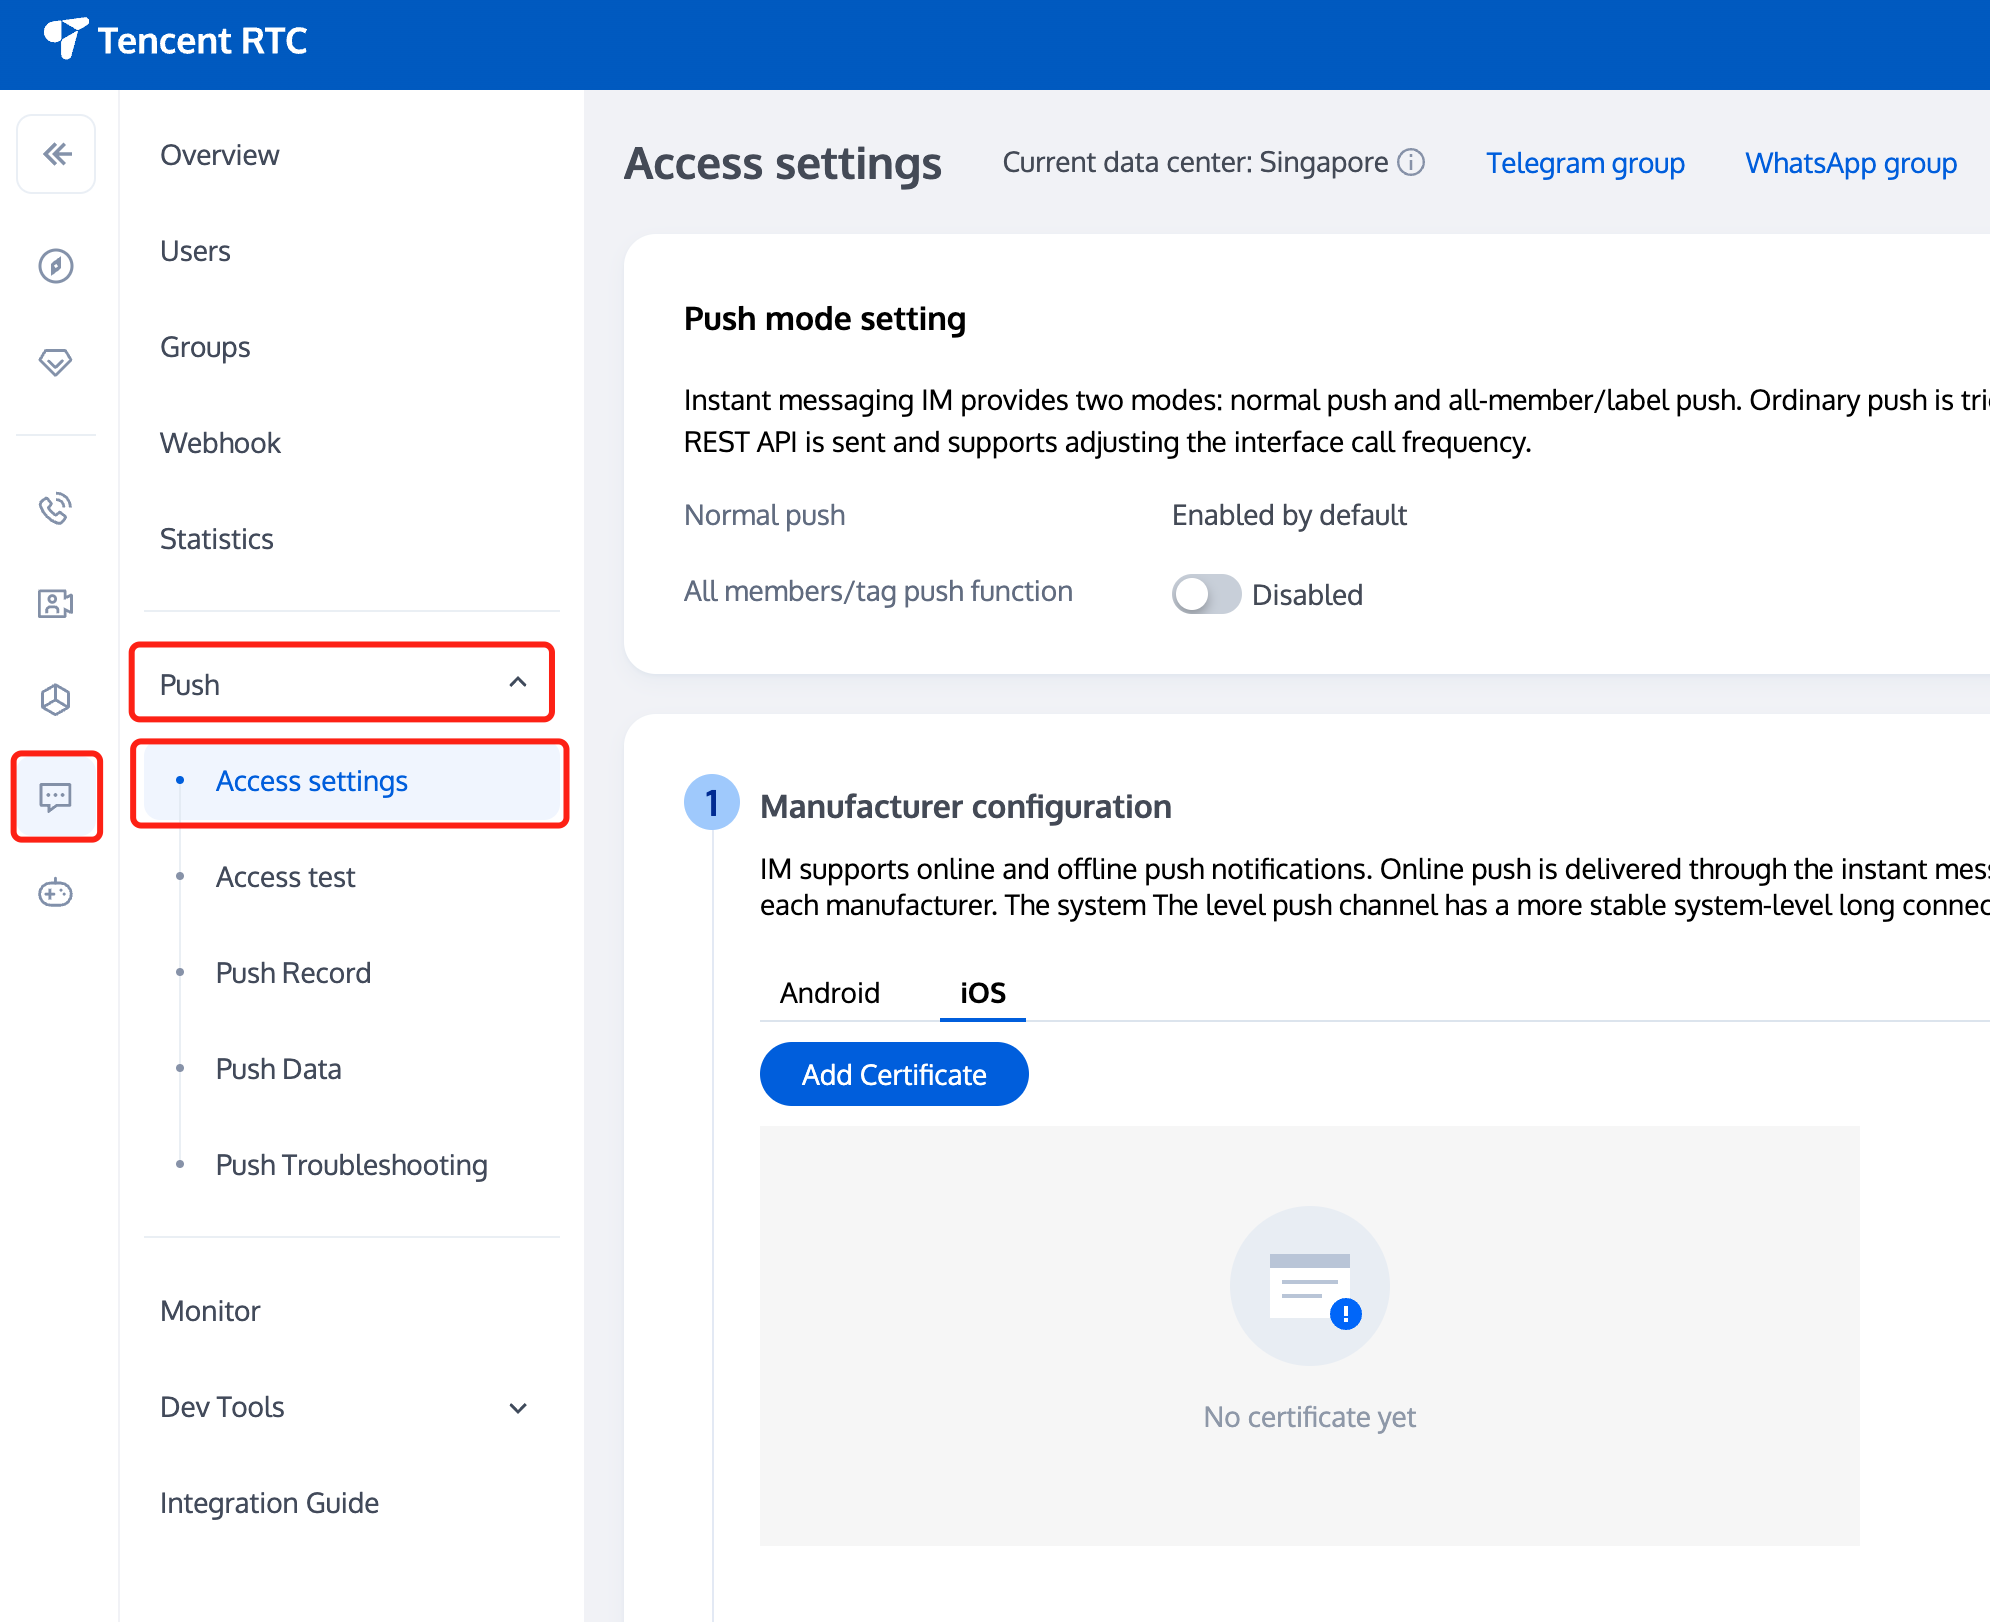
3. 单击 iOS 原生离线推送设置右侧的添加证书。
4. 选择证书类型,上传 iOS 证书(.p12),设置证书密码,单击确认。
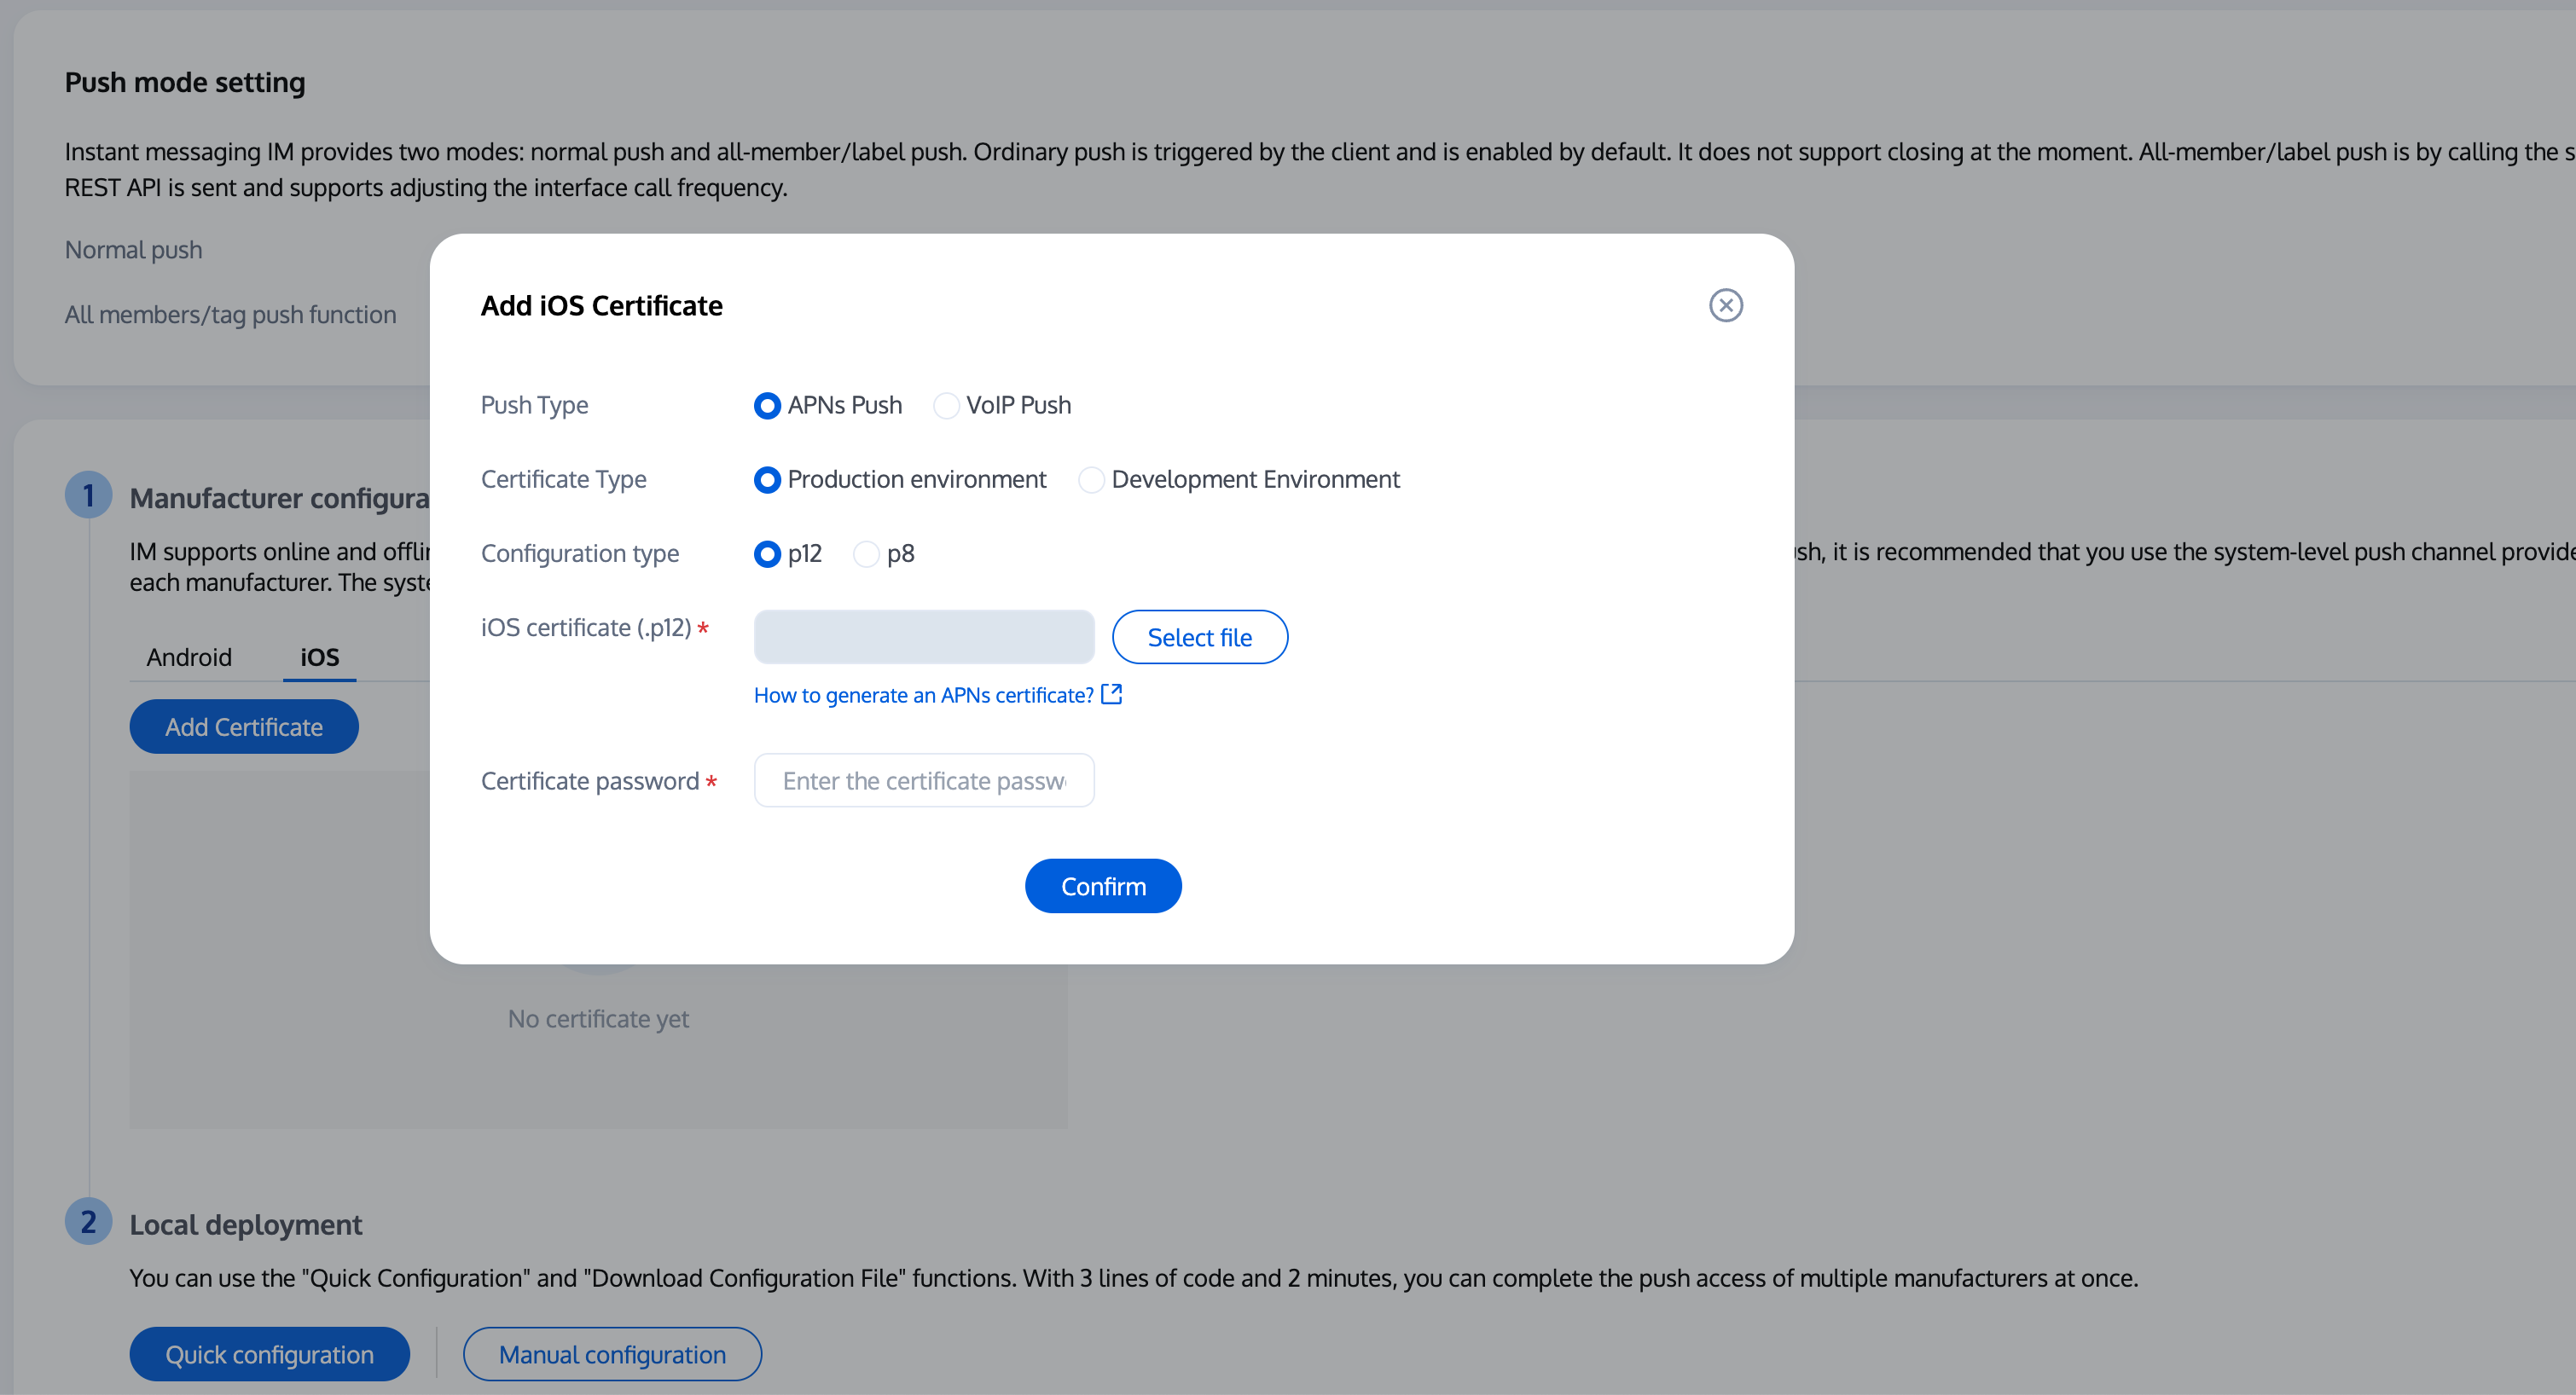
说明:
上传证书名最好使用全英文(尤其不能使用括号等特殊字符)。
上传证书需要设置密码,无密码收不到推送。
发布 App Store 的证书需要设置为生产环境,否则无法收到推送。
上传的 p12 证书必须是自己申请的真实有效的证书。
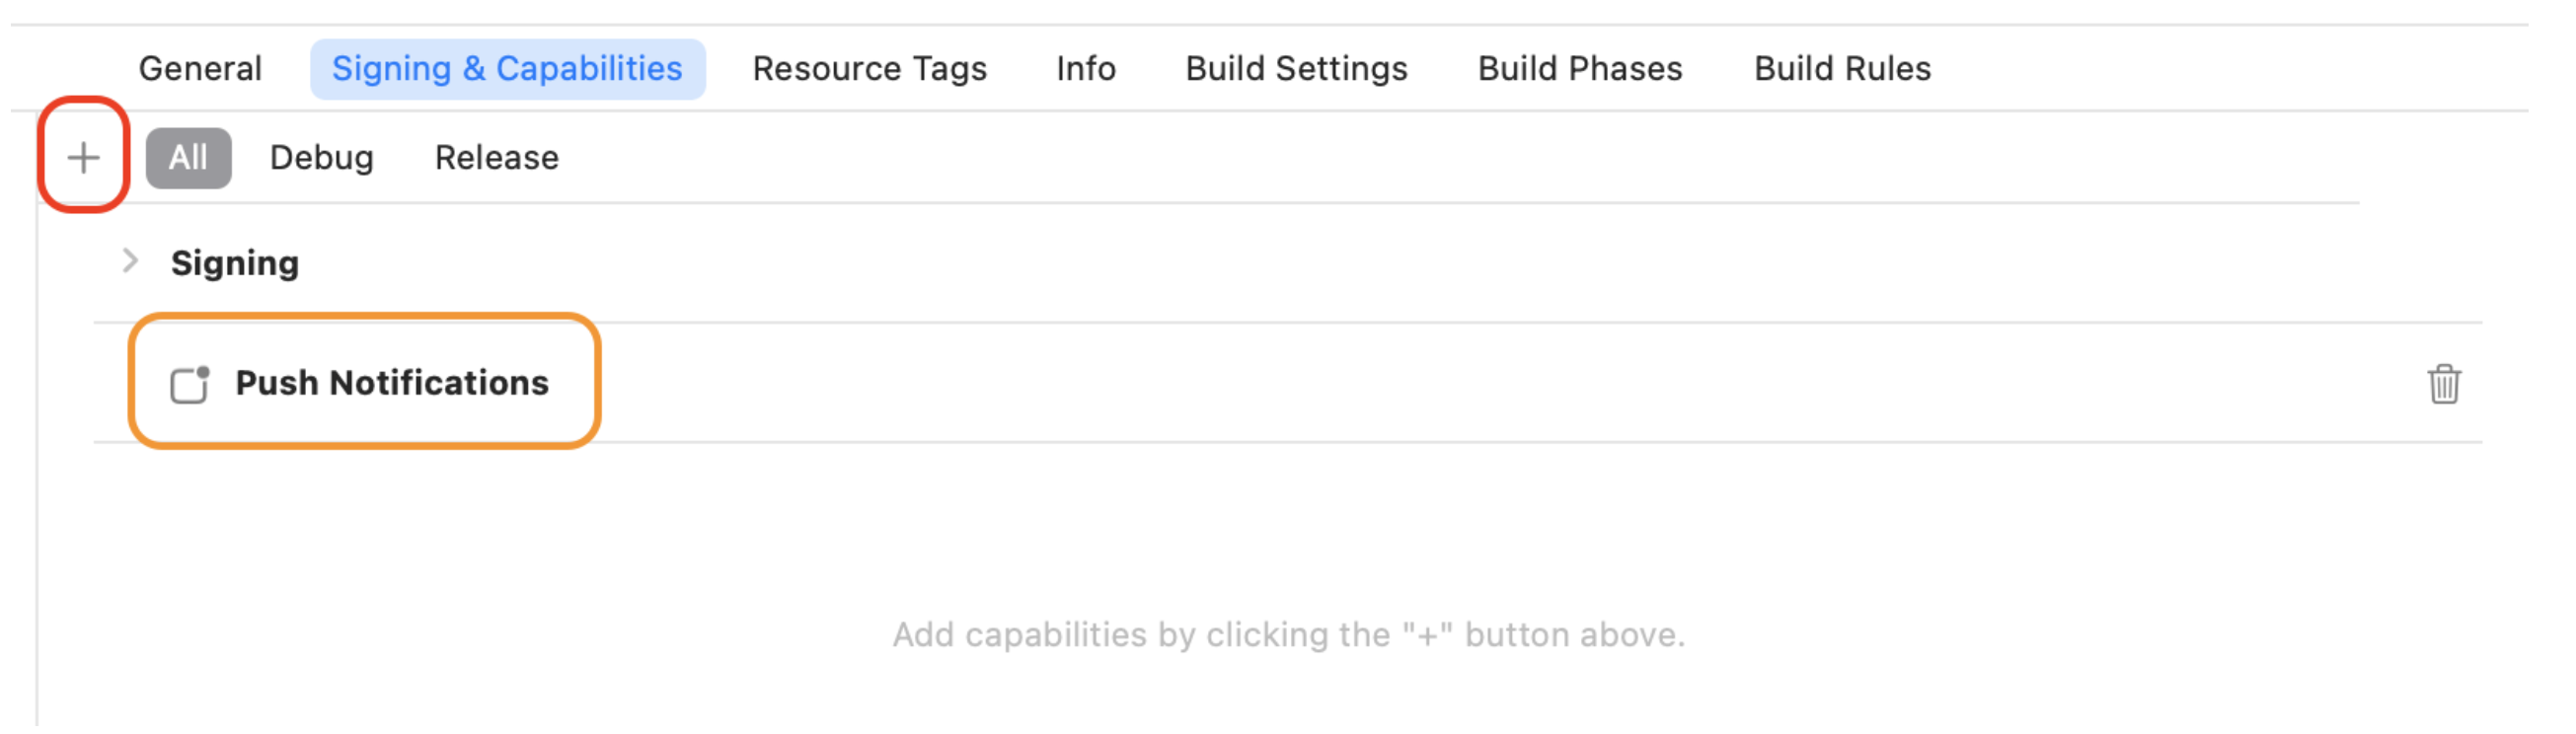
步骤5:完成工程配置
要在应用程序中添加所需的权限,请在 Xcode 项目中启用推送通知功能。
打开 Xcode 项目,在 Project > Target > Capabilities 页面中点击红框中的加号按钮,然后选择并添加 Push Notifications,添加后的结果如图中黄框所示:
步骤6:配置推送参数
1. 当您上传证书到 IM 控制台后,IM 控制台会为您分配一个证书 ID,见下图:

2. 您需要在 AppDelegate 中,实现
- businessID 协议方法返回证书 ID 即可。#pragma mark - TIMPush//Swift 务必携带 @objc 关键字@objc func businessID() -> Int32 {//上一步控制台给的证书IDreturn 0}@objc func applicationGroupID() -> String {//AppGroup IDreturn "group.com.yourcompony.pushkey"}@objc func onRemoteNotificationReceived(_ notice: String?) -> Bool {// custom navigatereturn false}
#pragma mark - TIMPush- (int)businessID {//上一步控制台给的证书ID,如 1234567int kBusinessID = 1234567;return kBusinessID;}- (NSString *)applicationGroupID {//AppGroup IDreturn kTIMPushAppGroupKey;}- (BOOL)onRemoteNotificationReceived:(NSString *)notice {// custom navigatereturn NO;}
步骤7:拨打离线推送电话
请在调用 calls 拨打电话的时候设置 params 的 offlinePushInfo 字段。
import TUICallKit_Swiftimport RTCRoomEnginelet pushInfo: TUIOfflinePushInfo = TUIOfflinePushInfo()pushInfo.title = ""pushInfo.desc = "您有一个新的通话"pushInfo.iOSPushType = .apnspushInfo.ignoreIOSBadge = falsepushInfo.iOSSound = "phone_ringing.mp3"pushInfo.androidSound = "phone_ringing"// OPPO必须设置ChannelID才可以收到推送消息,这个channelID需要和控制台一致// OPPO must set a ChannelID to receive push messages. This channelID needs to be the same as the console.pushInfo.androidOPPOChannelID = "tuikit"// FCM channel ID, you need change PrivateConstants.java and set "fcmPushChannelId"pushInfo.androidFCMChannelID = "fcm_push_channel"// VIVO message type: 0-push message, 1-System message(have a higher delivery rate)pushInfo.androidVIVOClassification = 1// HuaWei message type: https://developer.huawei.com/consumer/cn/doc/development/HMSCore-Guides/message-classification-0000001149358835pushInfo.androidHuaWeiCategory = "IM"let params = TUICallParams()params.userData = "User Data"params.timeout = 30params.offlinePushInfo = pushInfoTUICallKit.createInstance().calls(userIdList: ["123456"], callMediaType: .audio, params: params) {} fail: { code, message in}
#import <TUICallKit_Swift/TUICallKit_Swift-Swift.h>#import <RTCRoomEngine/TUICallEngine.h>- (TUICallParams *)getCallParams {TUIOfflinePushInfo *offlinePushInfo = [self createOfflinePushInfo];TUICallParams *callParams = [TUICallParams new];callParams.offlinePushInfo = offlinePushInfo;callParams.timeout = 30;return callParams;}- (TUIOfflinePushInfo *)createOfflinePushInfo {TUIOfflinePushInfo *pushInfo = [TUIOfflinePushInfo new];pushInfo.title = @"";pushInfo.desc = @"您有一个新的通话";pushInfo.iOSPushType = TUICallIOSOfflinePushTypeAPNs;pushInfo.ignoreIOSBadge = NO;pushInfo.iOSSound = @"phone_ringing.mp3";pushInfo.AndroidSound = @"phone_ringing";// OPPO必须设置ChannelID才可以收到推送消息,这个channelID需要和控制台一致// OPPO must set a ChannelID to receive push messages. This channelID needs to be the same as the console.pushInfo.AndroidOPPOChannelID = @"tuikit";// FCM channel ID, you need change PrivateConstants.java and set "fcmPushChannelId"pushInfo.AndroidFCMChannelID = @"fcm_push_channel";// VIVO message type: 0-push message, 1-System message(have a higher delivery rate)pushInfo.AndroidVIVOClassification = 1;// HuaWei message type: https://developer.huawei.com/consumer/cn/doc/development/HMSCore-Guides/message-classification-0000001149358835pushInfo.AndroidHuaWeiCategory = @"IM";return pushInfo;}[[TUICallKit createInstance] calls:@[@"123456"]callMediaType:TUICallMediaTypeAudioparams:[self getCallParams] succ:^{} fail:^(int code, NSString * _Nullable errMsg) {}];
高级功能:持续震动、响铃
APNs(Apple Push Notification service)推送可以指定推送声音文件等功能,却并不能持续的震动、响铃,通知持续时间较短,在音视频通话场景下容易错过来电信息。 您可以使用我们的 Demo 体验 APNs 持续震动和响铃功能。
1. 响铃
APNs 推送可以在调用 call、calls、groupCall 接口拨打电话时设置 params 的 TUIOfflinePushInfo 中的 iOSSound 字段, iOSSound 传语音文件名。
注意:
如果要自定义 iOSSound,需要先把语音文件链接进 Xcode 工程,然后把语音文件名(带后缀名)设置给 iOSSound。
铃声时长应小于30s。
[[TUICallKit createInstance] call:@"mike 的 id" params:[self getCallParams] callMediaType:TUICallMediaTypeVideo];- (TUICallParams *)getCallParams {TUIOfflinePushInfo *offlinePushInfo = [self createOfflinePushInfo];TUICallParams *callParams = [TUICallParams new];callParams.offlinePushInfo = offlinePushInfo;callParams.timeout = 30;return callParams;}+ (TUIOfflinePushInfo *)createOfflinePushInfo {TUIOfflinePushInfo *pushInfo = [TUIOfflinePushInfo new];pushInfo.title = @"";pushInfo.desc = TUICallingLocalize(@"TUICallKit.have.new.invitation");pushInfo.iOSPushType = TUICallIOSOfflinePushTypeAPNs;pushInfo.ignoreIOSBadge = NO;pushInfo.iOSSound = @"phone_ringing.mp3";pushInfo.AndroidSound = @"phone_ringing";// OPPO必须设置ChannelID才可以收到推送消息,这个channelID需要和控制台一致// OPPO must set a ChannelID to receive push messages. This channelID needs to be the same as the console.pushInfo.AndroidOPPOChannelID = @"tuikit";// FCM channel ID, you need change PrivateConstants.java and set "fcmPushChannelId"pushInfo.AndroidFCMChannelID = @"fcm_push_channel";// VIVO message type: 0-push message, 1-System message(have a higher delivery rate)pushInfo.AndroidVIVOClassification = 1;// HuaWei message type: https://developer.huawei.com/consumer/cn/doc/development/HMSCore-Guides/message-classification-0000001149358835pushInfo.AndroidHuaWeiCategory = @"IM";return pushInfo;}
let params = TUICallParams()let pushInfo: TUIOfflinePushInfo = TUIOfflinePushInfo()pushInfo.title = "TUICallKit"pushInfo.desc = "TUICallKit.have.new.invitation"pushInfo.iOSPushType = .apnspushInfo.ignoreIOSBadge = falsepushInfo.iOSSound = "phone_ringing.mp3"pushInfo.androidSound = "phone_ringing"// OPPO必须设置ChannelID才可以收到推送消息,这个channelID需要和控制台一致// OPPO must set a ChannelID to receive push messages. This channelID needs to be the same as the console.pushInfo.androidOPPOChannelID = "tuikit"// FCM channel ID, you need change PrivateConstants.java and set "fcmPushChannelId"pushInfo.androidFCMChannelID = "fcm_push_channel"// VIVO message type: 0-push message, 1-System message(have a higher delivery rate)pushInfo.androidVIVOClassification = 1// HuaWei message type: https://developer.huawei.com/consumer/cn/doc/development/HMSCore-Guides/message-classification-0000001149358835pushInfo.androidHuaWeiCategory = "IM"params.userData = "User Data"params.timeout = 30params.offlinePushInfo = pushInfoTUICallKit.createInstance().call(userId: "123456", callMediaType: .audio, params: params) {} fail: {code, message in}
2. 持续震动
Notification Service Extension(简称为 Extension)是 iOS 中用于拦截、修改推送通知内容的 Extension,可以借助 Extension 实现长时间震动。
主应用和 Extension 两独立的进程, 当收到 APNs 推送后主应用不会激活,Extension 会被激活,在 Extension 开启持续震动,当应用切到前台后需要使用进程间通信的方式告知 Extension,关闭震动和铃声。
2.1 开启 mutable-content
使用
Notification Service Extension实现持续的震动,首先需要在控制台开启 mutable-content 开关。
2.2 创建 Extension 工程
在 Xcode 项目中,选择
Editor > Add Target > Notification Service Extension 来创建一个 Extension。新创建的 Extension Target 需要配置 Apple 证书,具体方法可以 参考这里。新建的 Extension 包含名为 NotificationService 的源码文件,内容如下:
// NotificationService.swiftimport UserNotificationsclass NotificationService: UNNotificationServiceExtension {var contentHandler: ((UNNotificationContent) -> Void)?var bestAttemptContent: UNMutableNotificationContent?override func didReceive(_ request: UNNotificationRequest, withContentHandler contentHandler: @escaping (UNNotificationContent) -> Void) {self.contentHandler = contentHandlerbestAttemptContent = (request.content.mutableCopy() as? UNMutableNotificationContent)if let bestAttemptContent = bestAttemptContent {// Modify the notification content here...bestAttemptContent.title = "\\(bestAttemptContent.title) [modified]"contentHandler(bestAttemptContent)}}override func serviceExtensionTimeWillExpire() {// Called just before the extension will be terminated by the system.// Use this as an opportunity to deliver your "best attempt" at modified content, otherwise the original push payload will be used.if let contentHandler = contentHandler, let bestAttemptContent = bestAttemptContent {contentHandler(bestAttemptContent)}}}
didReceive: 当收到推送后 Extension 被激活,执行 didReceive 回调, 用户可以在 didReceive 中完成修改推送信息的工作, 当完成修改后调用 contentHandler() 方法, Extension 执行结束。
serviceExtensionTimeWillExpire: 当收到推送后 Extension 被激活, Extension 超过30s没有响应(没有执行 contentHandler() 方法),serviceExtensionTimeWillExpire 回调方法会被调用, 并在该方法内调用 contentHandler() 方法, Extension 执行结束。
2.3 收到推送开启震动
1. 当收到推送后 Extension 被激活,执行 didReceive 回调时,开启震动。
2. 当收到 serviceExtensionTimeWillExpire 后需要关闭震动铃声。
修改后的代码如下:
// NotificationService.swiftimport UserNotificationsclass NotificationService: UNNotificationServiceExtension {var contentHandler: ((UNNotificationContent) -> Void)?var bestAttemptContent: UNMutableNotificationContent?override func didReceive(_ request: UNNotificationRequest, withContentHandler contentHandler: @escaping (UNNotificationContent) -> Void) {self.contentHandler = contentHandlerbestAttemptContent = (request.content.mutableCopy() as? UNMutableNotificationContent)if let bestAttemptContent = bestAttemptContent {contentHandler(bestAttemptContent)}// start ringing, VibratorFeature.start() needs to be implemented by yourselfVibratorFeature.start()}override func serviceExtensionTimeWillExpire() {if let contentHandler = contentHandler, let bestAttemptContent = bestAttemptContent {/// If there is no response for more than 30 seconds, the vibration and ringing function will be turned off.// stop ringing, RingingFeature.shared.stop() needs to be implemented by yourselfVibratorFeature.stop()contentHandler(bestAttemptContent)}}}
注意:
上述代码中使用的开启震动的方法
VibratorFeature.start()、VibratorFeature.stop()需要客户自行实现。2.4 在主应用中关闭震动
收到推送,开始震动和响铃,当用户进入到 APP 后应该关闭 Extension 中的震动。主应用和 Extension 分别是两个独立的进程,可以使用 CFNotificationCenterGetDarwinNotifyCenter 发送传递信息。 当 APP 进入前台时, 主应用向 Extension 发送一个通知,Extension 监听通知, 当 Extension 收到通知后关闭震动。
修改后的代码如下:
// iOS 13 之前的版本通过 AppDelegate applicationWillEnterForeground 监测前后台状态// AppDelegate.swiftclass AppDelegate: UIResponder, UIApplicationDelegate {func applicationWillEnterForeground(_ application: UIApplication) {……sendStopRingingToExtension()}func sendStopRingingToExtension() {CFNotificationCenterPostNotification(CFNotificationCenterGetDarwinNotifyCenter(),CFNotificationName("APNsStopRinging" as CFString), nil, nil, true)}}// iOS 13 及以后版本通过 SceneDelegate sceneWillEnterForeground 监测前后台状态// SceneDelegate.swiftclass SceneDelegate: UIResponder, UIWindowSceneDelegate {func sceneWillEnterForeground(_ scene: UIScene) {……sendStopRingingToExtension()}func sendStopRingingToExtension() {CFNotificationCenterPostNotification(CFNotificationCenterGetDarwinNotifyCenter(),CFNotificationName("APNsStopRinging" as CFString), nil, nil, true)}}
// NotificationService.swiftimport UserNotificationsclass NotificationService: UNNotificationServiceExtension {var contentHandler: ((UNNotificationContent) -> Void)?var bestAttemptContent: UNMutableNotificationContent?override func didReceive(_ request: UNNotificationRequest, withContentHandler contentHandler: @escaping (UNNotificationContent) -> Void) {self.contentHandler = contentHandlerbestAttemptContent = (request.content.mutableCopy() as? UNMutableNotificationContent)if let bestAttemptContent = bestAttemptContent {contentHandler(bestAttemptContent)}// start ringing, VibratorFeature.start() needs to be implemented by yourselfVibratorFeature.start()registerObserver()}override func serviceExtensionTimeWillExpire() {if let contentHandler = contentHandler, let bestAttemptContent = bestAttemptContent {/// If there is no response for more than 30 seconds, the vibration and ringing function will be turned off.// stop ringing, RingingFeature.shared.stop() needs to be implemented by yourselfVibratorFeature.stop()contentHandler(bestAttemptContent)}}private func registerObserver() {CFNotificationCenterAddObserver(CFNotificationCenterGetDarwinNotifyCenter(),Unmanaged.passUnretained(self).toOpaque(), { center, pointer, name, _, userInfo inVibratorFeature.stop()}, "APNsStopRinging" as CFString, nil, .deliverImmediately)}}
常见问题
1. 收不到推送,且后台报错 bad deviceToken?
Apple 的 deviceToken 与当前编译环境有关,请检查:
控制台创建证书检查:
生产环境证书:上传的证书类型为 Apple Push Notification Service SSL (Sandbox & Production),并在 Archive 出 Release 包后进行测试。注意:不可在Xcode 测试。
开发环境证书:您需要 Archive 出 Release 包后进行测试,创建选择正确证书即可。
2. iOS 开发环境下,注册偶现不返回 deviceToken 或提示 APNs 请求 token 失败?
此问题现象是由于 APNs 服务不稳定导致的,可尝试通过以下方式解决:
1. 给手机插入 SIM 卡后使用 4G 网络测试。
2. 卸载重装、重启 App、关机重启后测试。
3. 打生产环境的包测试。
4. 更换其它 iOS 系统的手机测试。
文档反馈