Sound Effects (React Native)
다운로드
포커스 모드
폰트 크기
This guide shows you how to use the
AudioEffectState and DeviceState modules from the AtomicXCore framework to quickly add audio effect controls to your live streaming application. You’ll learn how to manage microphone volume, enable ear monitoring, and apply fun voice changer and reverb effects.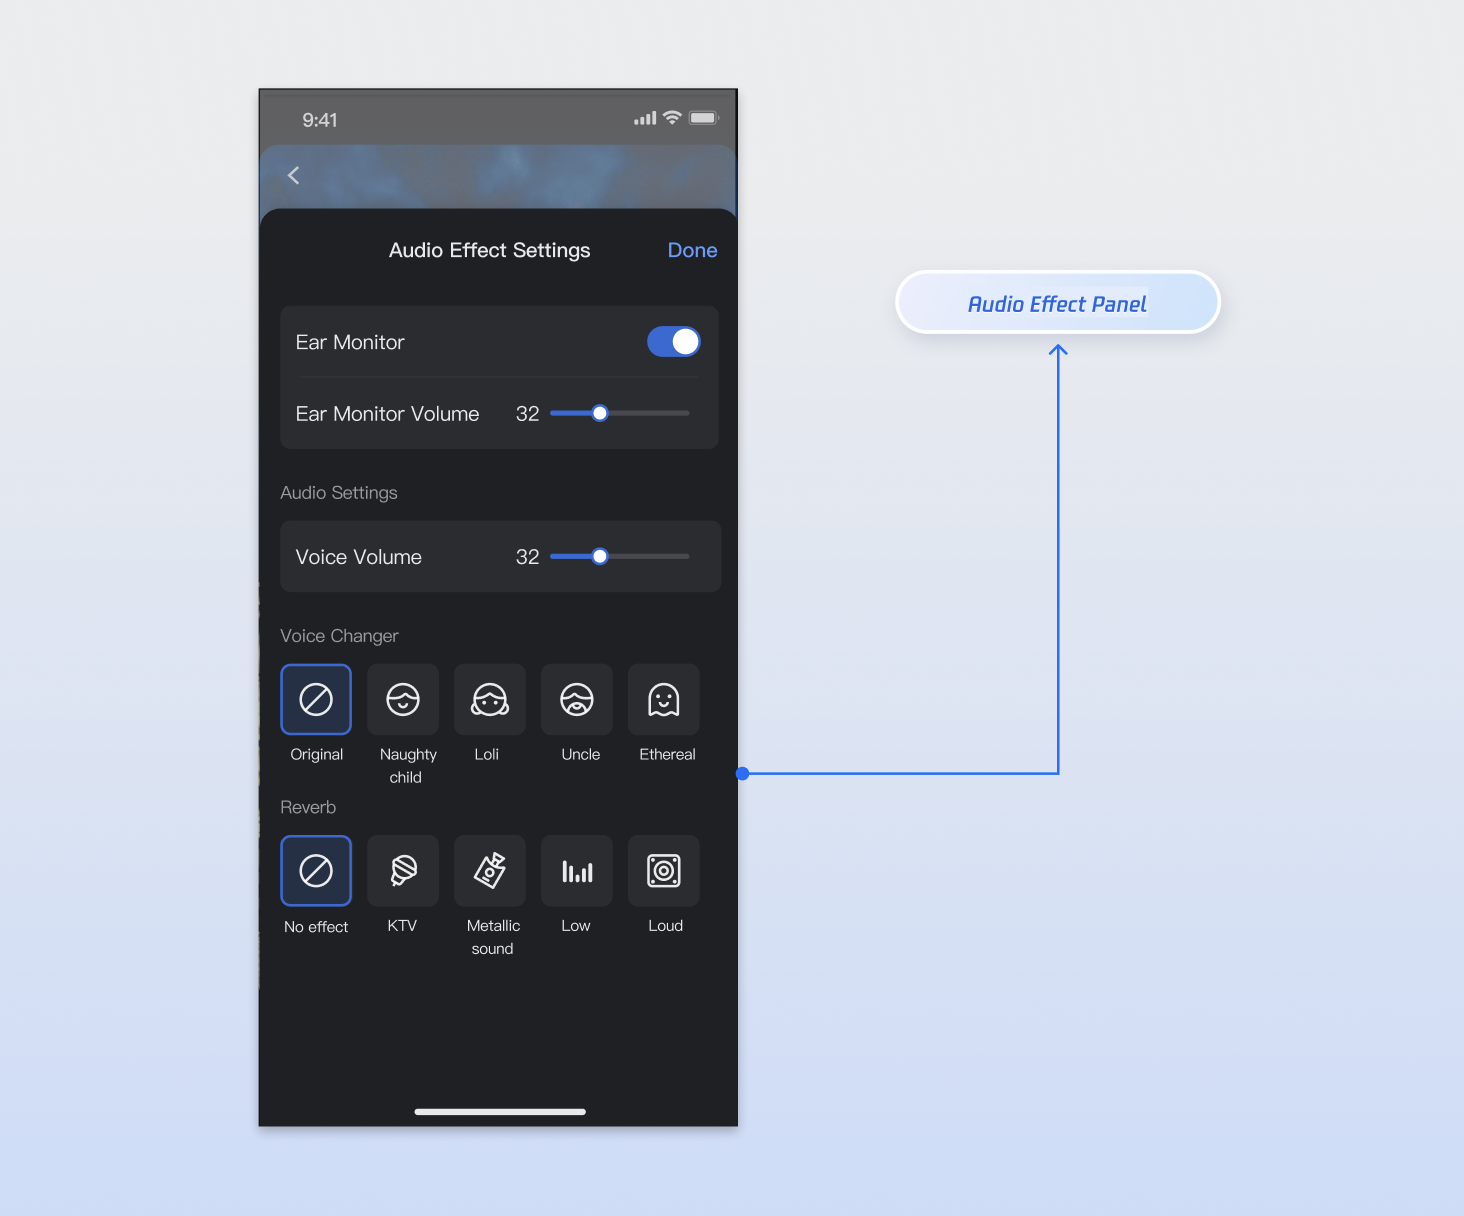
Core Features
By combining
AudioEffectState and DeviceState, you can implement the following core features:Voice Volume Adjustment: Control the local capturing volume, which determines the volume your audience hears.
Ear Monitoring: Enable hosts or co-hosts to monitor their microphone input in real time through headphones, helping with pronunciation and performance.
Voice Changer Effects: Apply a variety of entertaining voice changer effects, such as child, deep male, mischievous kid, and more.
Reverb Effects: Simulate different acoustic environments including KTV, metallic, deep, loud, and more.
Implementation Steps
Step 1: Component Integration
Step 2: Obtain State Instances
AudioEffectState and DeviceState are singleton objects. You can access their instances from anywhere in your project.import { useAudioEffectState } from 'react-native-tuikit-atomic-x/lib/module/atomic-x/state/AudioEffectState';import { useDeviceState } from 'react-native-tuikit-atomic-x/lib/module/atomic-x/state/DeviceState';// Get state instancesconst audioEffect = useAudioEffectState();const deviceState = useDeviceState();
Step 3: Enable In-Ear Monitoring
Ear monitoring lets users hear their microphone input in real time. Manage ear monitoring using the interfaces described below.
Note:
Ear monitoring requires headphones for proper operation.
Implementation:
1. Toggle In-Ear Monitoring: Add a switch or toggle in your UI to turn ear monitoring on or off.
2. Set In-Ear Monitoring Volume: Add a slider to your UI for volume adjustment. Map your UI values to the
[0, 100] range and call setVoiceEarMonitorVolume.3. Subscribe to State Updates: Listen for real-time ear monitoring state changes to update your UI.
Code Example:
import { useEffect } from 'react';import { useAudioEffectState } from 'react-native-tuikit-atomic-x/lib/module/atomic-x/state/AudioEffectState';// Access state instanceconst { setVoiceEarMonitorEnable, setVoiceEarMonitorVolume, earMonitorVolume } = useAudioEffectState();// 1. Toggle ear monitoringconst handleSetVoiceEarMonitorEnable = (enable) => {setVoiceEarMonitorEnable({ enable });};// 2. Adjust ear monitoring volumeconst handleSetVoiceEarMonitorVolume = (volume) => {setVoiceEarMonitorVolume({ volume });};// 3. Listen for volume changesuseEffect(() => {console.log('Ear monitoring volume:', earMonitorVolume);}, [earMonitorVolume]);
setVoiceEarMonitorEnable Parameters
Parameter Name | Type | Description |
enable | boolean | Enable ear monitoring. true: Enable false: Disable |
setVoiceEarMonitorVolume Parameters
Parameter Name | Type | Description |
volume | number | Ear monitoring volume. Range: [0, 100] Default: 100 |
Step 4: Adjust Voice Volume
To let the host adjust their uplink capturing volume, call the
setCaptureVolume method from DeviceState with the desired value.Implementation:
1. Set Capturing Volume: Add a volume slider to your UI, map the UI value to the
[0, 100] range, and call setCaptureVolume.2. Subscribe to State Updates: Listen for real-time volume changes to keep your UI in sync.
Example Code:
import { useEffect } from 'react';import { useDeviceState } from 'react-native-tuikit-atomic-x/lib/module/atomic-x/state/DeviceState';// Access state instanceconst { setCaptureVolume, captureVolume } = useDeviceState();// 1. Adjust capturing volumeconst handleSetCaptureVolume = (volume) => {setCaptureVolume({ volume });};// 2. Listen for volume changesuseEffect(() => {console.log('Capturing volume:', captureVolume);}, [captureVolume]);
setCaptureVolume Parameters
Parameter Name | Type | Description |
volume | number | Capturing volume. Range: [0, 100] Default: 100 |
Step 5: Apply Voice Changer Effects
To change the host's voice, call
setAudioChangerType and pass the desired enum value.Example Code:
import { useAudioEffectState } from 'react-native-tuikit-atomic-x/lib/module/atomic-x/state/AudioEffectState';// Access state instanceconst { setAudioChangerType } = useAudioEffectState();// Set voice changer effectconst handleSetAudioChangerType = (changerType) => {setAudioChangerType({ changerType });};
setAudioChangerType Parameters
Parameter Name | Type | Description |
changerType | string | Voice changer effect, available options: NONE: Disable voice changer.CHILD: Mischievous kid, lively tone.LITTLE_GIRL: Child, sweet and crisp.MAN: Deep male, powerful tone.HEAVY_METAL: Heavy metal, metallic, rugged.COLD: Nasal, cold-like tone.FOREIGNER: Foreign accent.TRAPPED_BEAST: Deep, roaring tone.FATSO: Thick, humorous, full-bodied.STRONG_CURRENT: Sci-fi, electric interference.HEAVY_MACHINERY: Mechanical echo, industrial style.ETHEREAL: Airy, transparent, fairy-like. |
Step 6: Apply Reverb Effects
To add reverb effects to the host’s voice, call
setAudioReverbType with the desired enum value.import { useAudioEffectState } from 'react-native-tuikit-atomic-x/lib/module/atomic-x/state/AudioEffectState';// Access state instanceconst { setAudioReverbType } = useAudioEffectState;// Set reverb effectconst handleSetAudioReverbType = (reverbType) => {setAudioReverbType({ reverbType });};
setAudioReverbType Parameters
Parameter Name | Type | Description |
reverbType | string | Reverb effect, available options: NONE: Disable reverb.KTV: Simulates KTV private room, moderate echo, suited for singing.SMALL_ROOM: Compact spatial feel.AUDITORIUM: Wide echo, strong spatial presence.DEEP: Low-frequency, deep sound.LOUD: Increases loudness, fuller sound.METALLIC: Crisp, metallic reverb.MAGNETIC: Soft, warm, magnetic tone. |
API Documentation
For full details on all public interfaces and properties of AudioEffectState and DeviceState, see the official API documentation for AtomicXCore.
State | Feature Description | API Documentation |
AudioEffectState | Manage audio effects: configure effects and get real-time status. | |
DeviceState | Manage devices: operate camera and microphone, get real-time status. |
FAQs
Are there any restrictions on when to call audio effect and device interfaces?
No restrictions. Settings for
AudioEffectState and DeviceState are global. You can call these interfaces (such as setting voice changer, reverb, or ear monitoring) at any time—before or after entering the live room. Changes take effect immediately and persist.What is the difference between "Voice Volume" and "Ear Monitoring Volume"?
This distinction is important and often misunderstood:
Voice Volume (CaptureVolume): Set via
setCaptureVolume. This is what your audience hears.Ear Monitoring Volume (EarMonitorVolume): Set via
setVoiceEarMonitorVolume. This only affects your own monitoring headphones and does not impact audience volume.Why does a newly created live room have audio effects already enabled, or the volume is unexpectedly loud or quiet?
Since
AudioEffectState and DeviceState are singletons, their settings apply globally. If you see unexpected effects or volumes, it’s likely due to previous settings that were not reset. Make sure to reset these values when appropriate.Why can't I hear my own voice after enabling "Ear Monitoring"?
Check the following:
1. Headphones connected: Ear monitoring requires headphones. Ensure you are using wired or Bluetooth headphones.
2. Volume setting: Make sure "Ear Monitoring Volume" is not set to 0.
3. Microphone enabled: Confirm that the microphone in
DeviceState is enabled (call openLocalMicrophone).Can voice changer and reverb effects be enabled simultaneously?
Yes. You can apply both
AudioChangerType and AudioReverbType at the same time. For example, you can use the 'LITTLE_GIRL' voice changer together with the 'KTV' reverb.피드백