Live Battles (React Native)
다운로드
포커스 모드
폰트 크기
AtomicXCore provides the
CoHostState module for managing host co-hosting workflows. This guide walks you through integrating and using CoHostState to enable full co-hosting functionality in a live streaming environment.Core Scenario
A typical host co-hosting session involves two main stages. The overall workflow is illustrated below:
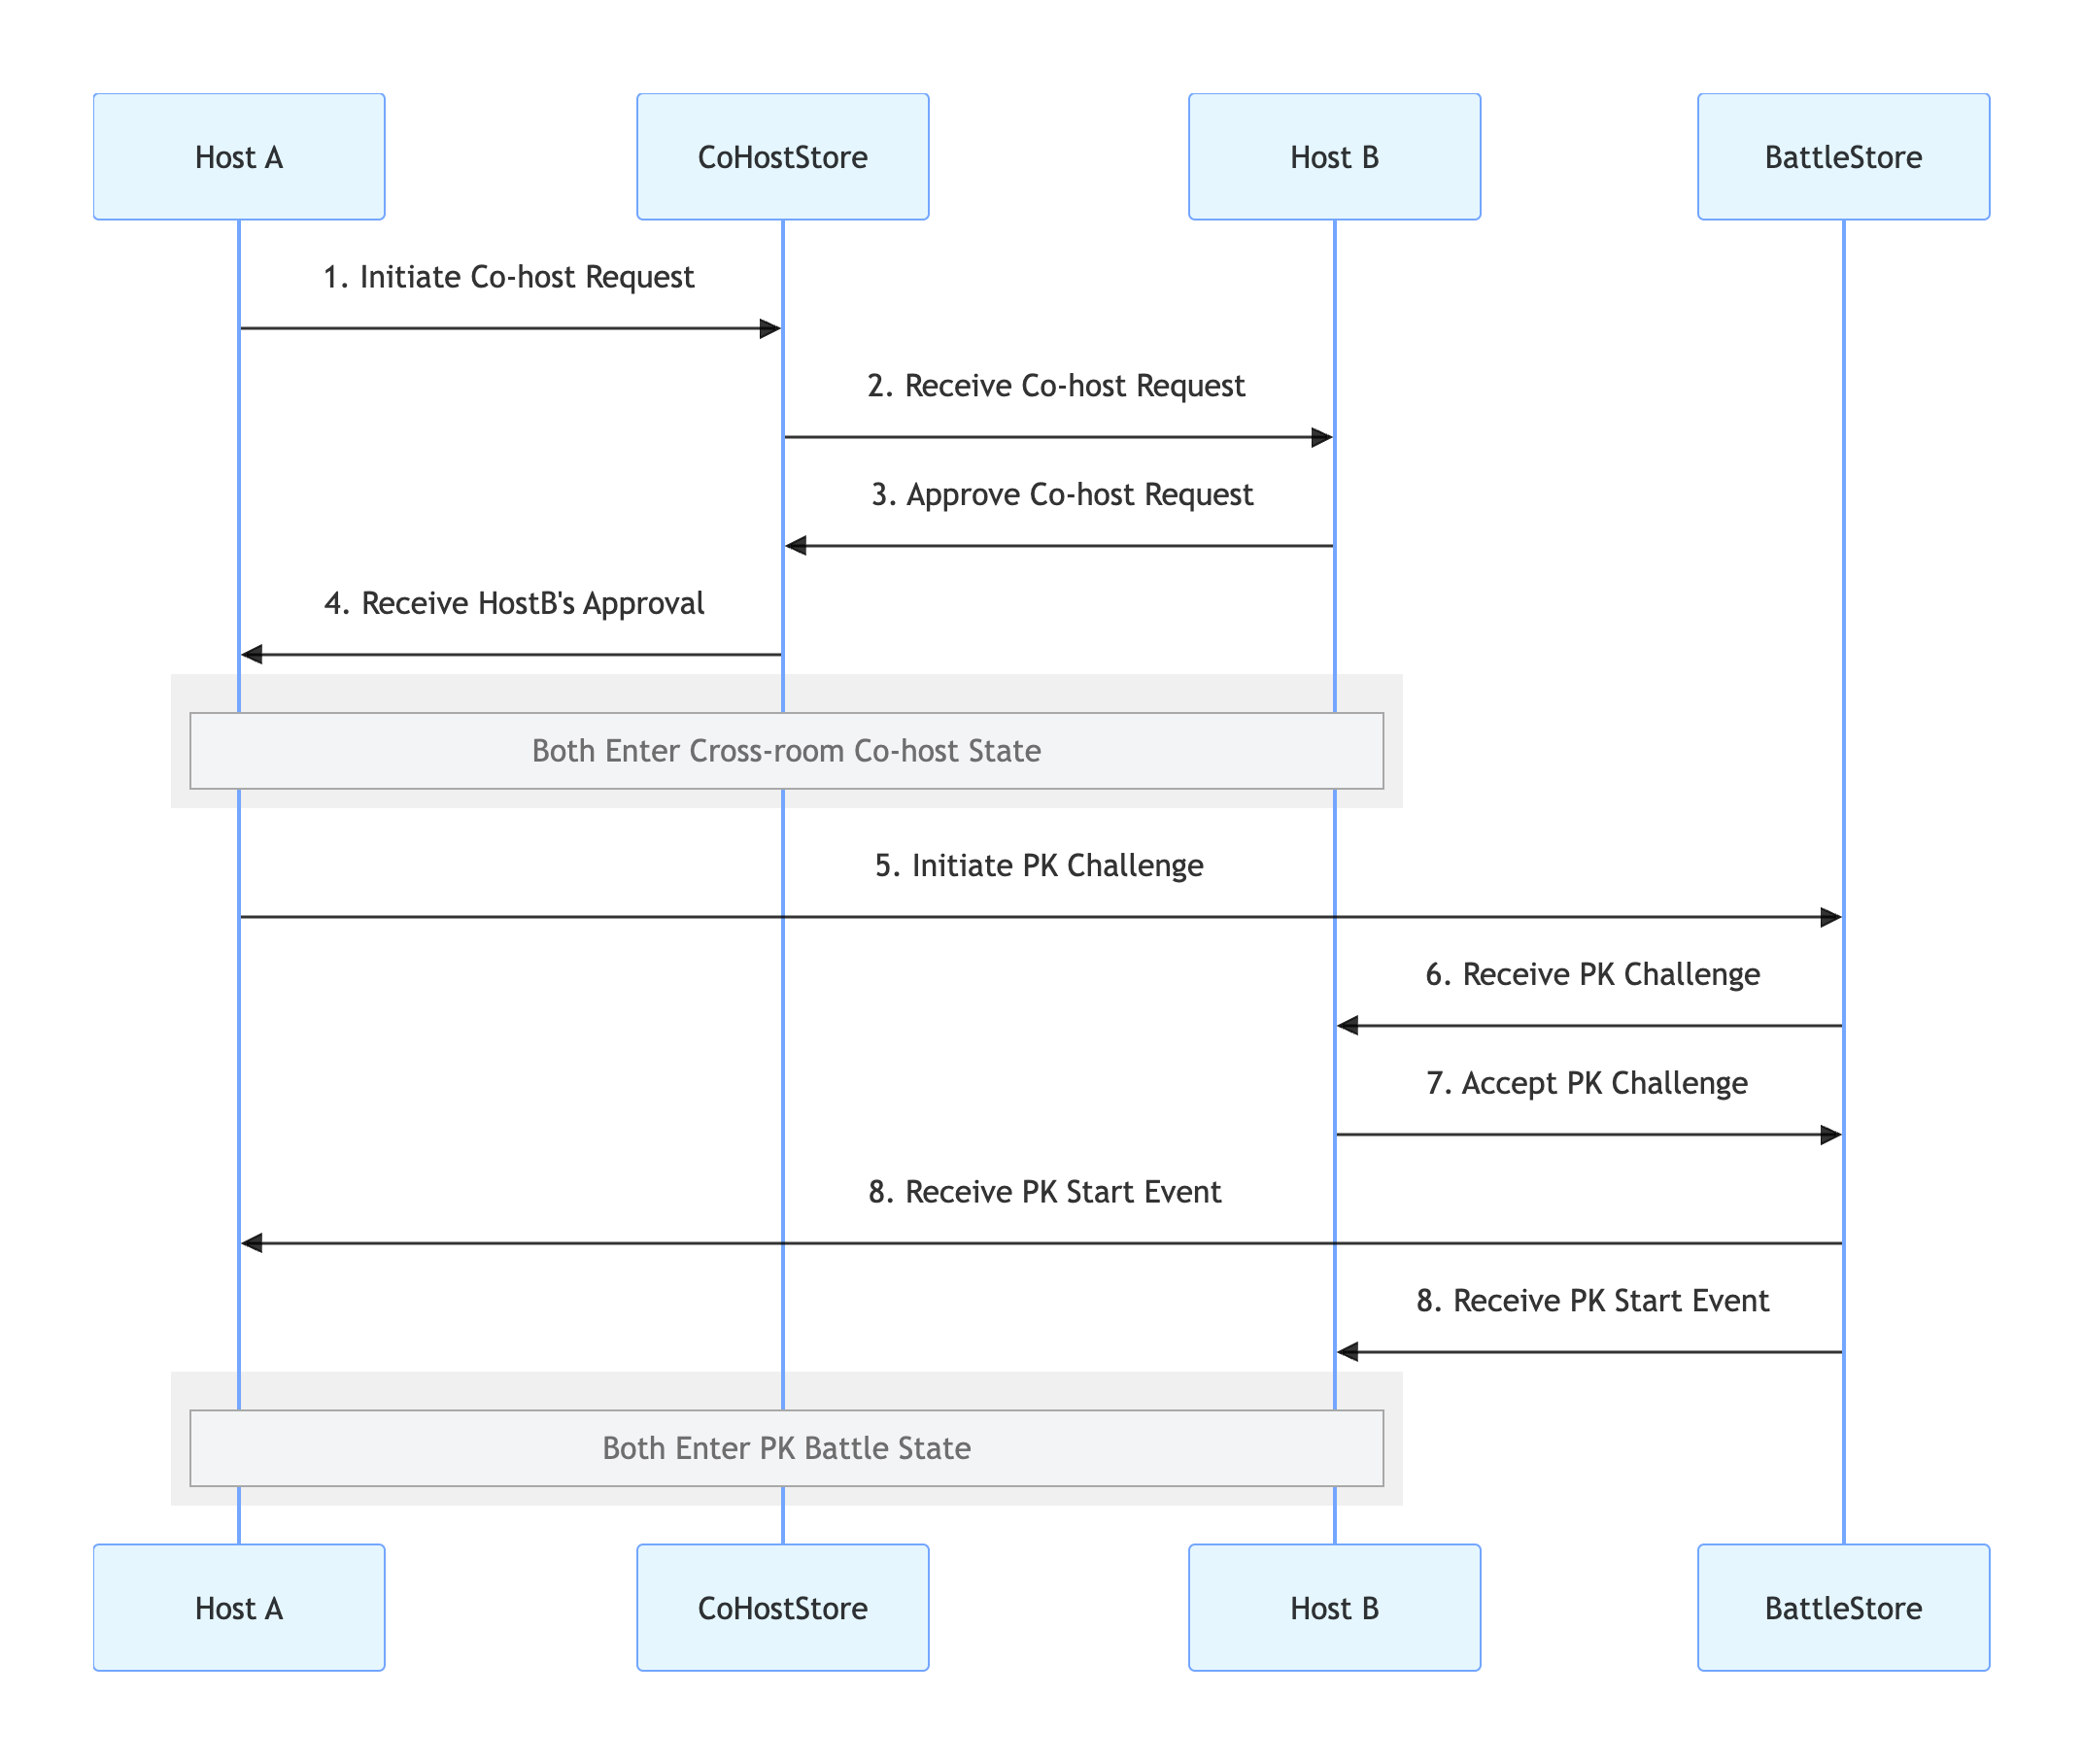
Implementation Steps
Step 1: Integrate the Components
Step 2: Enable Host Co-hosting
The objective is to display both hosts’ video streams within the same view. Use
CoHostState to handle the co-hosting logic.Initiator (Host A) Implementation
1. Sending a Co-host Invitation
When Host A selects Host B in the UI and initiates a co-hosting request, invoke the
requestHostConnection method.import { useCoHostState } from 'react-native-tuikit-atomic-x/lib/module/atomic-x/state/CoHostState';const liveID = 'xxx'; // Host A's room ID// Acquire the CoHostState instance for the current liveIDconst { requestHostConnection } = useCoHostState(liveID);// Triggered when user clicks "Co-host" and selects Host Bconst handleRequestHostConnection = (targetHostLiveID) => {requestHostConnection({liveID, // Host A's room IDtargetHostLiveID, // Host B's room IDlayoutTemplate: 'HOST_DYNAMIC_GRID', // Layout template selectiontimeout: 30, // Invitation timeout in secondsonSuccess: () => { console.log('Co-host invitation sent, awaiting response...'); },onError: (error) => { console.log('Failed to send invitation', error); },});};
2. Listening for Invitation Responses
Subscribe to events with
addCoHostListener to handle Host B’s response.import { useEffect } from 'react';import { useCoHostState } from 'react-native-tuikit-atomic-x/lib/module/atomic-x/state/CoHostState';const liveID = 'xxx'; // Host A's room ID// Acquire the CoHostState instance for the current liveIDconst { addCoHostListener, removeCoHostListener } = useCoHostState(liveID);useEffect(() => {const onCoHostRequestAccepted = (event) => {console.log('Host accepted your co-host invitation', event);};const onCoHostRequestRejected = (event) => {console.log('Host rejected your co-host invitation', event);};const onCoHostRequestTimeout = () => {console.log('Invitation timed out, no response');};addCoHostListener('onCoHostRequestAccepted', onCoHostRequestAccepted);addCoHostListener('onCoHostRequestRejected', onCoHostRequestRejected);addCoHostListener('onCoHostRequestTimeout', onCoHostRequestTimeout);return () => {removeCoHostListener('onCoHostRequestAccepted', onCoHostRequestAccepted);removeCoHostListener('onCoHostRequestRejected', onCoHostRequestRejected);removeCoHostListener('onCoHostRequestTimeout', onCoHostRequestTimeout);};}, []);
Recipient (Host B) Implementation
1. Receiving a Co-host Invitation
Subscribe to the
onCoHostRequestReceived event using addCoHostListener so Host B can listen for incoming invitations from Host A.import { useEffect } from 'react';import { useCoHostState } from 'react-native-tuikit-atomic-x/lib/module/atomic-x/state/CoHostState';const liveID = 'xxx'; // Host B's room ID// Acquire the CoHostState instance for the current liveIDconst { addCoHostListener, removeCoHostListener } = useCoHostState(liveID);useEffect(() => {const onCoHostRequestReceived = (event) => {const inviterData = JSON.parse(event.inviter);console.log('Received co-host invitation', inviterData);// Display a popup prompt here if needed};addCoHostListener('onCoHostRequestReceived', onCoHostRequestReceived);return () => {removeCoHostListener('onCoHostRequestReceived', onCoHostRequestReceived);};}, []);
2. Responding to a Co-host Invitation
When Host B responds via the popup dialog, call the appropriate method.
import { useCoHostState } from 'react-native-tuikit-atomic-x/lib/module/atomic-x/state/CoHostState';const liveID = 'xxx'; // Host B's room ID// Acquire the CoHostState instance for the current liveIDconst { acceptHostConnection, rejectHostConnection } = useCoHostState(liveID);// Host B accepts the co-host invitationconst handleAcceptHostConnection = (fromHostLiveID) => {acceptHostConnection({liveID,fromHostLiveID, // Retrieved from onCoHostRequestReceived eventonSuccess: () => { console.log('Co-host invitation accepted'); },onError: (error) => { console.log('Failed to accept co-host invitation', error); },});};// Host B rejects the co-host invitationconst handleRejectHostConnection = (fromHostLiveID) => {rejectHostConnection({liveID,fromHostLiveID, // Retrieved from onCoHostRequestReceived eventonSuccess: () => { console.log('Co-host invitation rejected'); },onError: (error) => { console.log('Failed to reject co-host invitation', error); },});};
Demo Effect
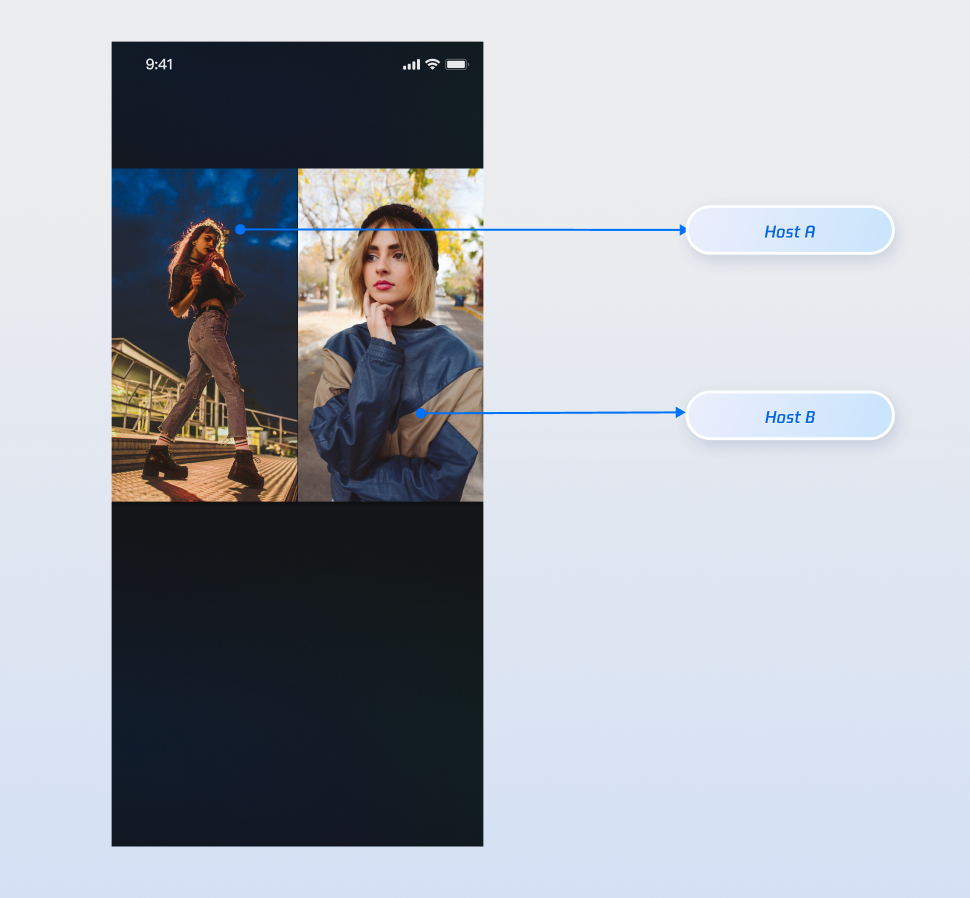
Once the above features are integrated, operate as Host A and Host B respectively. The demo effect is shown below. Refer to the next section, Enhancing UI Details, to customize your UI logic as desired.
Enhance UI Details
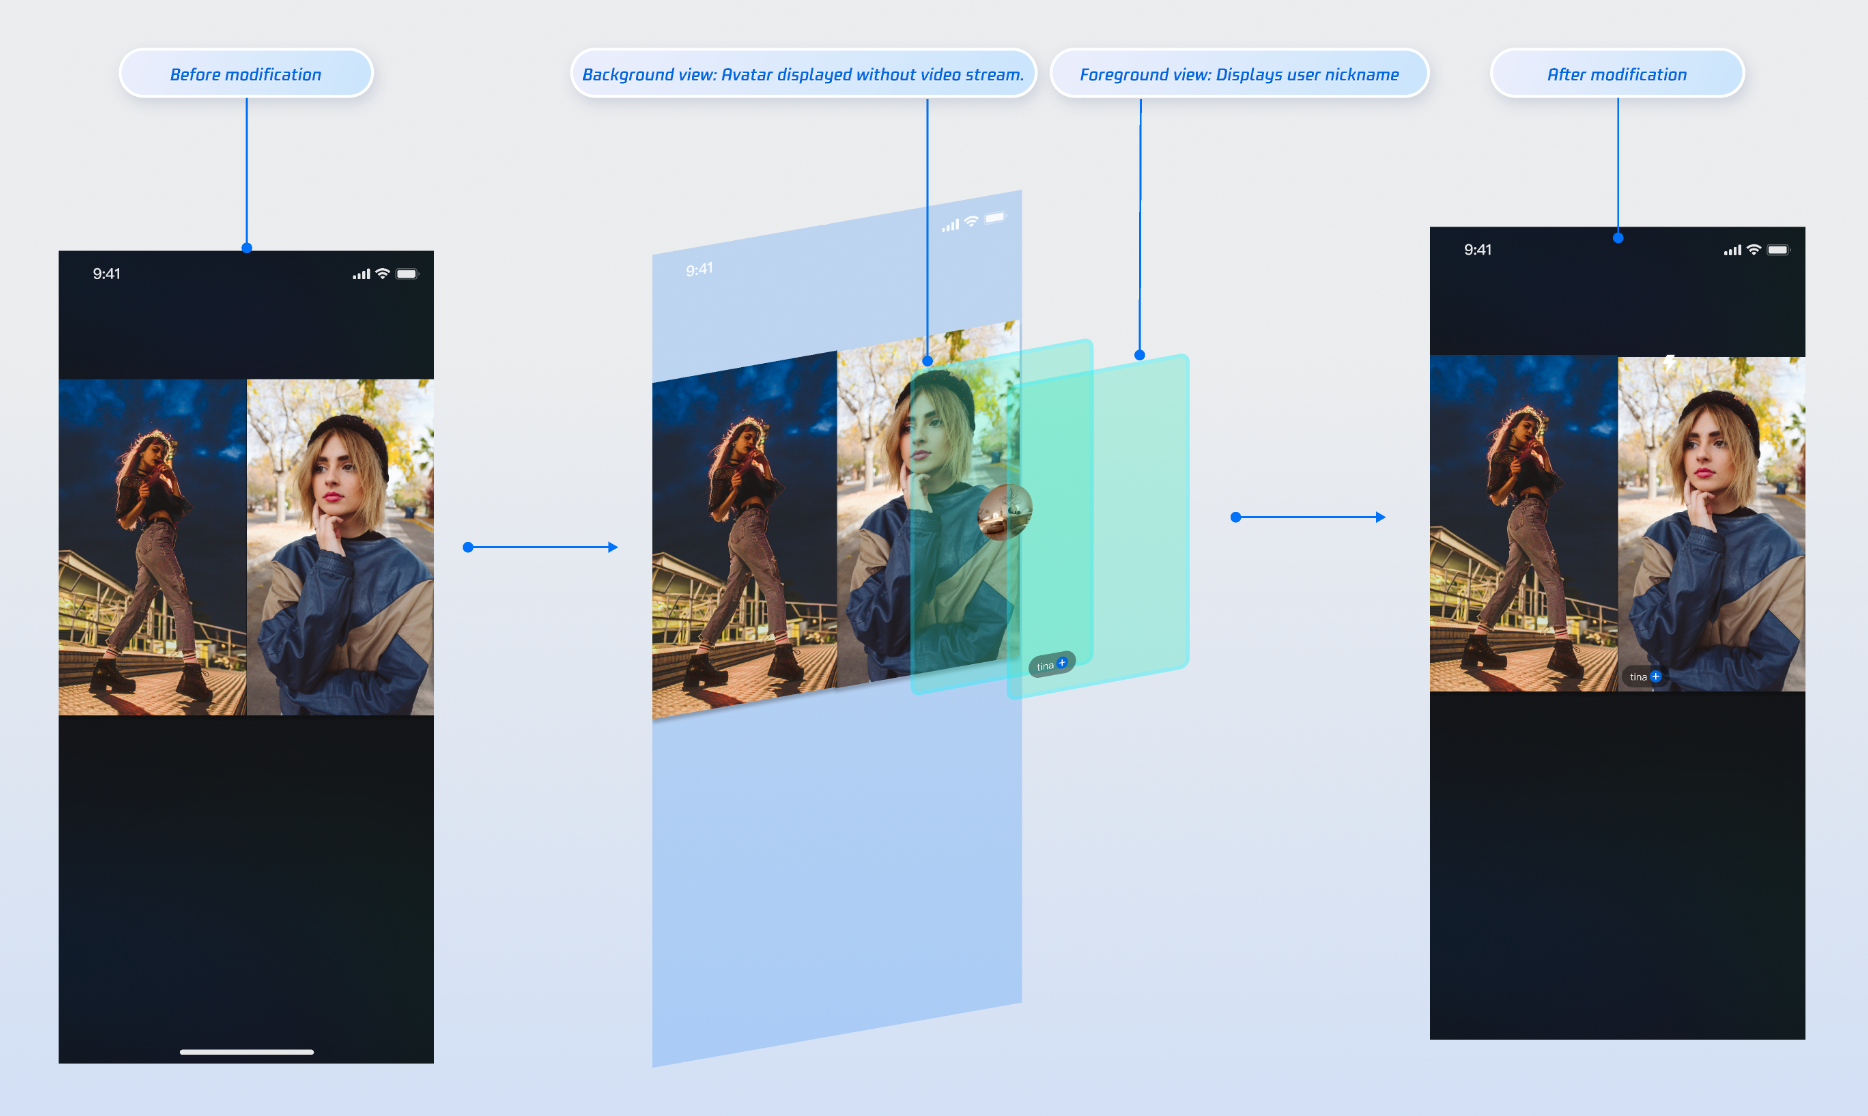
You can add custom overlays to co-host video streams to display nicknames, avatars, and other participant information, or show placeholder images when the camera is off to improve the overall visual experience.
Display Nicknames on Video Streams
Effect
Implementation
Step 1: Create a custom UI overlay component (ParticipantOverlay.js)
This component acts as a "UI sticker"—it renders UI elements based on data but does not handle video rendering. In your components directory, create a new file named ParticipantOverlay.js and add the following code.
Note: In React Native, region coordinates are based on the canvas provided by the SDK (server-side canvas dimensions). Calculate the scaling ratio using canvas.w / canvas.h and the screen width, rather than a fixed design width.
import React, { useMemo } from 'react';import { View, Text, Image, StyleSheet, Dimensions } from 'react-native';const DEFAULT_AVATAR = 'https://liteav-test-1252463788.cos.ap-guangzhou.myqcloud.com/voice_room/voice_room_cover1.png';const { width: SCREEN_WIDTH } = Dimensions.get('window');// Receives core data from parent: seatList and canvasexport default function ParticipantOverlay({ seatList, canvas }) {if (!seatList || seatList.length === 0) return null;// Calculate scaling ratio based on canvasconst scale = useMemo(() => {if (!canvas?.w || !canvas?.h) return { scaleX: 1, scaleY: 1 };const displayWidth = SCREEN_WIDTH;const displayHeight = SCREEN_WIDTH * (canvas.h / canvas.w);return {scaleX: displayWidth / canvas.w,scaleY: displayHeight / canvas.h,};}, [canvas]);// Calculate precise position and size for each participant's overlayconst getParticipantStyle = (participant) => {if (!participant?.region) return {};return {position: 'absolute',left: participant.region.x * scale.scaleX,top: participant.region.y * scale.scaleY,width: participant.region.w * scale.scaleX,height: participant.region.h * scale.scaleY,};};return (// overlay-container<View style={styles.overlayContainer} pointerEvents="none">{/* Iterate seatList: create overlay for each participant */}{seatList.map((participant) => {if (!participant?.userInfo?.userID) return null;const isCameraOff = participant.userInfo.cameraStatus === 'OFF';return (// participant-ui-container<View key={participant.userInfo.userID} style={getParticipantStyle(participant)}>{/* Conditional rendering: UI varies with camera status */}{isCameraOff ? (// 1. If camera is off, show centered avatar and nickname<View style={styles.avatarPlaceholder}><Imagestyle={styles.avatarImage}source={{ uri: participant.userInfo.userAvatar || DEFAULT_AVATAR }}/><Text style={styles.avatarName}>{participant.userInfo.userName || participant.userInfo.userID}</Text></View>) : (// 2. If camera is on, show nickname bar at bottom left<View style={styles.nicknameBar}><Text style={styles.nicknameText}>{participant.userInfo.userName || participant.userInfo.userID}</Text></View>)}</View>);})}</View>);}const styles = StyleSheet.create({overlayContainer: {position: 'absolute',top: 0,left: 0,right: 0,bottom: 0,},avatarPlaceholder: {flex: 1,backgroundColor: '#2E323A',justifyContent: 'center',alignItems: 'center',},avatarImage: {width: 60,height: 60,borderRadius: 30,},avatarName: {marginTop: 8,fontSize: 13,color: '#fff',},nicknameBar: {position: 'absolute',left: 6,bottom: 6,backgroundColor: 'rgba(0, 0, 0, 0.5)',paddingHorizontal: 8,paddingVertical: 3,borderRadius: 10,},nicknameText: {color: '#fff',fontSize: 11,},});
Step 2: Integrate components on the live room page
This step stacks the video and UI overlay layers. Open your live room page file and update it as shown below:
import React from 'react';import { StyleSheet, View } from 'react-native';import { LiveCoreView } from 'react-native-tuikit-atomic-x/lib/module/components/LiveCoreView';import { useLiveSeatState } from 'react-native-tuikit-atomic-x/lib/module/atomic-x/state/LiveSeatState';import ParticipantOverlay from '../../components/ParticipantOverlay';export default function YourAnchorScreen({ route, navigation }) {const { liveID } = route.params || {};const { seatList, canvas } = useLiveSeatState(liveID);return (// page-container<View style={styles.pageContainer}>{/* live-container */}<View style={styles.liveContainer}>{/* Video rendering layer (bottom) */}<LiveCoreViewliveID={liveID}coreViewType="pushView" // Host: pushView; Audience: playViewstyle={styles.videoLayer}/>{/* Custom UI overlay layer (top) */}<ParticipantOverlay seatList={seatList} canvas={canvas} /></View>{/* Additional UI elements, such as bottom control bar */}{/* <View style={styles.bottomControls}>...</View> */}</View>);}const styles = StyleSheet.create({pageContainer: {flex: 1,backgroundColor: '#000',},liveContainer: {flex: 1,},videoLayer: {flex: 1,},});
API Documentation
For detailed information about all public interfaces, properties, and methods in CoHostState and related classes, refer to the official AtomicXCore API documentation. The relevant Stores used in this guide are listed below:
State | Function Description | API Documentation |
DeviceState | Audio/Video device control: microphone (on/off / volume), camera (on/off / switch / quality), screen sharing, real-time device status monitoring. | |
CoHostState | Host co-hosting: supports multiple layout templates (dynamic grid, etc.), initiate / accept / reject co-hosting, co-host interaction management. |
FAQs
Why didn't the recipient receive the co-host invitation after it was sent?
Verify that
targetHostLiveID is correct and that the recipient's live room is actively streaming.Ensure the network connection is stable. The invitation signaling has a default timeout of 30 seconds.
피드백