Data Lake Paimon
Download
포커스 모드
폰트 크기
Introduction
Apache Paimon is a unified streaming and batch data lake storage format. It innovatively combines lakehouse formats with LSM-tree structures, introducing real-time streaming updates into the lakehouse architecture.
Application Scope
Supported Type | Source and Sink |
Running Mode | Stream, Batch |
API Type | SQL |
Write Mode | append / upsert |
Version Description
Flink Version | Whether Supported | Paimon Community Version |
1.13 | Not supported. | - |
1.14 | Not supported. | - |
1.16 | Supported | 0.9 |
1.18 | Supported | 0.9 |
1.20 | Supported | 1.4 |
Creating a Paimon Catalog
The Paimon Catalog on Oceanus currently supports two types of metastores:
Filesystem: The default type. Both metadata and table files are stored in the file system.
Hive: This type additionally stores metadata in the Hive Metastore, allowing users to access tables directly from Hive.
FileSystem Metastore
The following SQL creates a Paimon Catalog named my_catalog, with metadata and table files stored under hdfs://HDFS14979/usr/hive/warehouse.
CREATE CATALOG my_catalog WITH ('type' = 'paimon','warehouse' = 'hdfs://HDFS14979/usr/hive/warehouse');
Note:
Hive Metastore
The following SQL registers and uses a Paimon Catalog named my_hive.
CREATE CATALOG my_hive WITH ('type' = 'paimon','metastore' = 'hive',-- 'uri' = 'thrift://<hive-metastore-host-name>:<port>', -- Uses the 'hive.metastore.uris' in HiveConf by default.-- 'warehouse' = 'hdfs://HDFS14979/usr/hive/warehouse', -- Uses the 'hive.metastore.warehouse.dir' in HiveConf by default.);
Note:
Creating a Paimon Table
After using the Paimon Catalog, you can create and drop tables. Tables created in the Paimon Catalog are managed by the Catalog, and their files are also deleted when the tables are dropped.
DDL Definition
-- Create a primary key tableCREATE TABLE my_table (user_id BIGINT,item_id BIGINT,behavior STRING,dt STRING,hh STRING,PRIMARY KEY (dt, hh, user_id) NOT ENFORCED) WITH ('bucket' = '10',-- Other with parameters);-- Create a partitioned tableCREATE TABLE my_table (user_id BIGINT,item_id BIGINT,behavior STRING,dt STRING,hh STRING,PRIMARY KEY (dt, hh, user_id) NOT ENFORCED) PARTITIONED BY (dt, hh) WITH ('bucket' = '10',-- Other with parameters);
WITH Parameters
Parameter | Data Type | Required | Default Value | Description |
bucket | Integer | No | -1 | The number of buckets for a Paimon table. Available values are as follows: -1: Dynamic bucketing mode Greater than 0: Fixed bucketing mode |
bucket-key | String | No | None | Specifies the column(s) used for data bucketing. Data is distributed to each bucket based on the hash value of the bucket key. If multiple fields are specified, separate them with commas. If not specified, the primary key is used. If there is no primary key, the entire row is used. |
changelog-producer | Enum | No | none | changelog generation mechanism. Available values are as follows: none: Does not generate a changelog. input: Duplicates the input data stream into changelog files, which serve as the changelog. full-compaction: Generates a changelog each time a full compaction is performed. lookup: Generates a changelog through the lookup method. |
merge-engine | Enum | No | deduplicate | The merge mechanism for data with the same primary key. Available values are as follows: deduplicate: Deduplicates and retains the last row. partial-update: Partially updates non-null fields. aggregation: Aggregates fields that share the same primary key. first-row: Deduplicates and retains the first row. |
snapshot.num-retained.max | Integer | No | 2147483647 | The maximum number of the latest Snapshots to retain without expiration. Must be greater than or equal to snapshot.num-retained.min. |
snapshot.num-retained.min | Integer | No | 10 | The minimum number of the latest Snapshots to retain without expiration. Must be greater than or equal to 1. |
snapshot.time-retained | Duration | No | 1h | The duration after which a Snapshot expires. |
Paimon Source Example
-- Create a logger sinkCREATE TABLE logger_sink (id BIGINT,name STRING) WITH ('connector' = 'logger','print-identifier' = 'DebugData');-- Create a paimon catalogCREATE CATALOG paimon_catalog WITH ('type' = 'paimon','warehouse' = 'hdfs://HDFS14979/usr/hive/warehouse');-- Read data from paimon and write it to a logger sinkINSERT INTO logger_sinkSELECT * FROM paimon_catalog.test_db.user_info;
Paimon Sink Example
-- Create a datagen sourceCREATE TABLE datagen_source (id BIGINT,name STRING) WITH ('connector' = 'datagen','rows-per-second' = '10');-- Create a paimon catalogCREATE CATALOG paimon_catalog WITH ('type' = 'paimon','warehouse' = 'hdfs://HDFS14979/usr/hive/warehouse');-- Create a paimon database and table (skip if they already exist)CREATE DATABASE IF NOT EXISTS paimon_catalog.test_db;CREATE TABLE IF NOT EXISTS paimon_catalog.test_db.user_info (id BIGINT,name STRING,PRIMARY KEY (id) NOT ENFORCED) WITH ('bucket' = '2');-- Generate data with datagen and write it to a paimon tableINSERT INTO paimon_catalog.test_db.user_infoSELECT * FROM datagen_source;
Upstream and Downstream Configuration
COS Configuration
When COS storage is used, no additional configuration is required. Simply set the warehouse to the corresponding cosn path.
COS Bucket Configuration with Metadata Acceleration
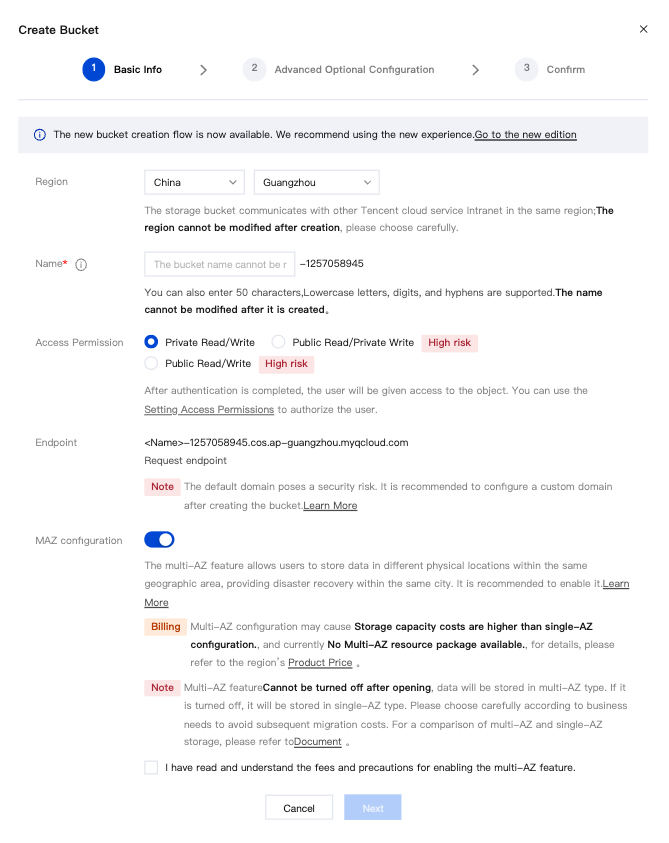
1. Enable metadata acceleration when creating a bucket.
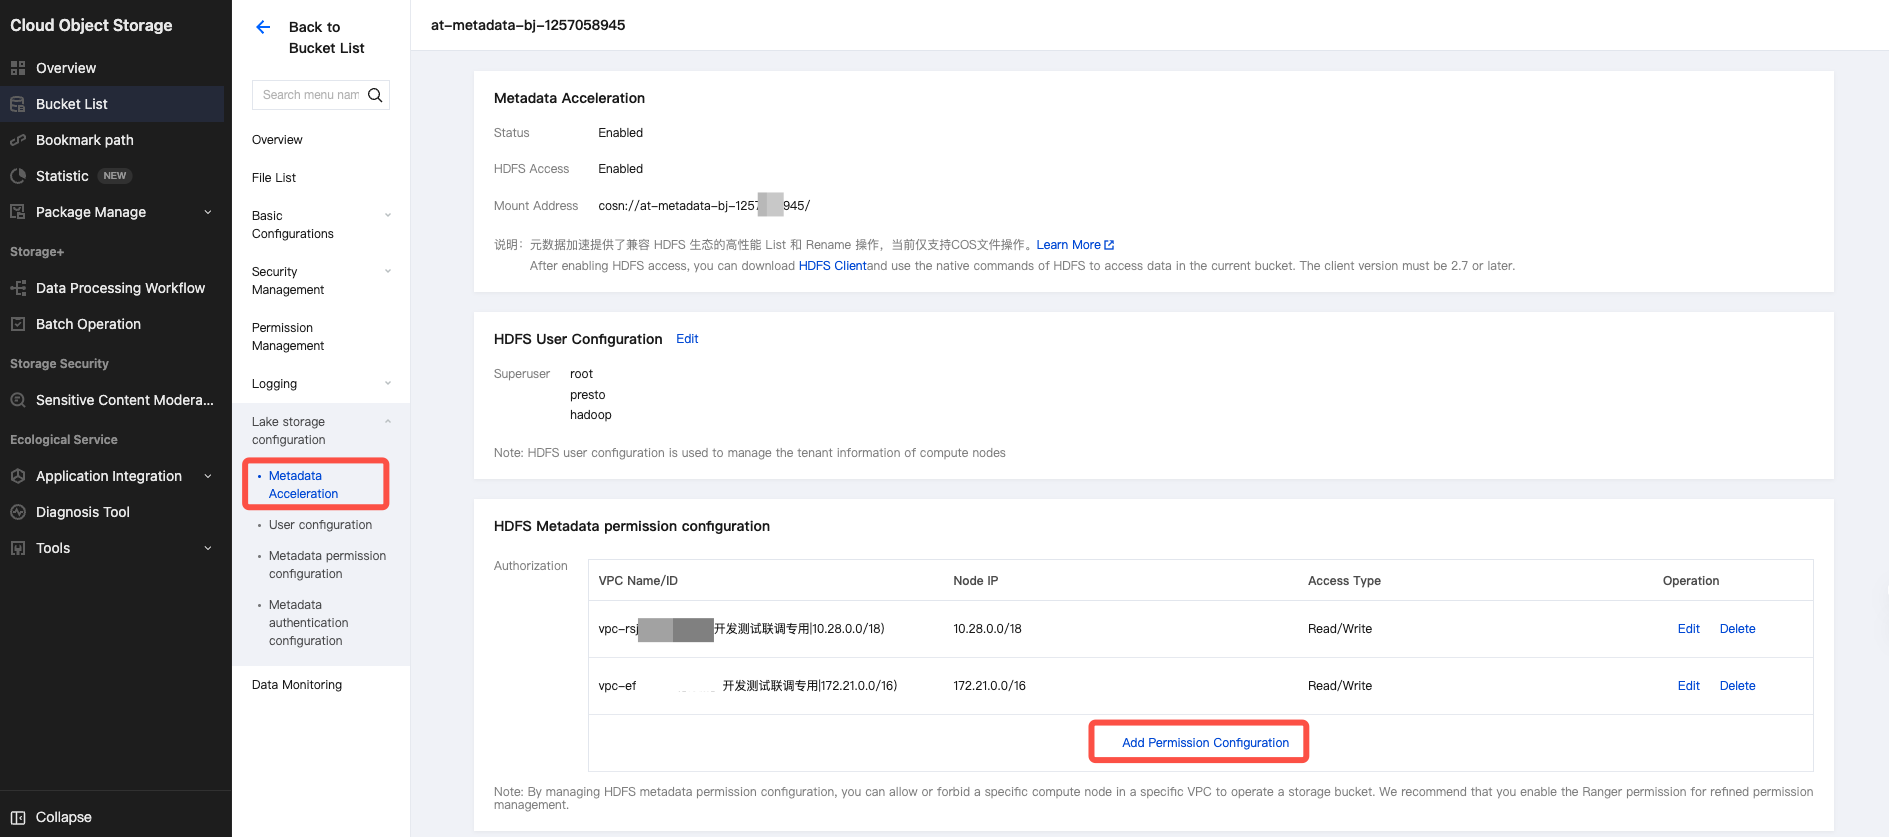
2. Configure HDFS metadata permissions in the Metadata Acceleration Capability Tag, and add the corresponding VPC permissions.
3. Add the following advanced parameters in the job's advanced parameters section:
containerized.taskmanager.env.HADOOP_USER_NAME: hadoopcontainerized.master.env.HADOOP_USER_NAME: hadoop
HDFS configuration
Obtaining HDFS Connections: Configuring JARs
When using HDFS storage, you need a jar package containing HDFS configuration information to connect to the HDFS cluster. The specific steps to obtain the connection configuration jar and use it are as follows:
1. Log in to the corresponding HDFS cluster node using ssh.
2. Obtain the hdfs-site.xml file. The configuration file in the EMR cluster is located at the following path.
/usr/local/service/hadoop/etc/hadoop/hdfs-site.xml
3. Package the obtained configuration files in a JAR package.
jar -cvf hdfs-xxx.jar hdfs-site.xml
4. Check the JAR structure (run the vi command). The JAR file includes the following information. Make sure no file is missing and the structure is correct.
vi hdfs-xxx.jar
META-INF/META-INF/MANIFEST.MFhdfs-site.xml
Using Configuration JARs in Tasks
Select the HDFS connection configuration jar package in the referenced program packages. This jar package is the hdfs-xxx.jar obtained in the "Obtain HDFS Connection Configuration jar Package" section. You must upload it to dependency management before using it.
Setting the HDFS user
Note:
By default, Flink jobs operate on HDFS using the flink user. If write permissions for the HDFS path are lacking, you can configure a user with permissions or the superuser Hadoop through the Job Advanced Parameters.
containerized.taskmanager.env.HADOOP_USER_NAME: hadoopcontainerized.master.env.HADOOP_USER_NAME: hadoop
Hive Configurations
Obtaining Hive Connection Configuration JARs
When using Hive Metastore, you need a jar package containing Hive and HDFS configuration information to connect to the Hive cluster. The specific steps to obtain the connection configuration jar and use it are as follows:
1. Log in to the respective Hive cluster node using SSH.
2. Obtain the hive-site.xml and hdfs-site.xml files. The configuration files in the EMR cluster are located at the following path.
/usr/local/service/hive/conf/hive-site.xml/usr/local/service/hadoop/etc/hadoop/hdfs-site.xml
3. Modify the hive-site.xml file.
Add the following configuration to hive-site.xml. Set the value for 'ip' to the value of 'hive.server2.thrift.bind.host' in the configuration file.<property><name>hive.metastore.uris</name><value>thrift://ip:7004</value></property>
4. Obtain the hivemetastore-site.xml and hiveserver2-site.xml files. Click the file names to download them.
5. Package the obtained configuration files in a JAR package.
jar -cvf hive-xxx.jar hive-site.xml hdfs-site.xml hivemetastore-site.xml hiveserver2-site.xml
6. Check the jar structure (run the vi command
vi hive-xxx.jar). The jar file includes the following information. Make sure no file is missing and the structure is correct.META-INF/META-INF/MANIFEST.MFhive-site.xmlhdfs-site.xmlhivemetastore-site.xmlhiveserver2-site.xml
Using Configuration JARs in Tasks
Select the Hive connection configuration jar package in the referenced program packages. This jar package is the hive-xxx.jar obtained in the "Obtain Hive Connection Configuration jar Package" section. You must upload it to dependency management before using it.
Kerberos authentication
1. Log in to the cluster master node to get the files krb5.conf, emr.keytab, core-site.xml, and hdfs-site.xml in the following paths.
/etc/krb5.conf/var/krb5kdc/emr.keytab/usr/local/service/hadoop/etc/hadoop/core-site.xml/usr/local/service/hadoop/etc/hadoop/hdfs-site.xml/usr/local/service/hive/conf/hive-site.xml
2. Modify the hive-site.xml file. Add the following configuration to hive-site.xml. Set the value for 'IP' to the value of
hive.server2.thrift.bind.host in the configuration file.<property><name>hive.metastore.uris</name><value>thrift://ip:7004</value></property>
3. Obtain the hivemetastore-site.xml and hiveserver2-site.xml files. Click the file names to download them.
4. Package the obtained configuration files in a JAR package.
jar cvf hive-xxx.jar krb5.conf emr.keytab core-site.xml hdfs-site.xml hive-site.xml hivemetastore-site.xml hiveserver2-site.xml
5. Check the JAR structure (run the vim command vim hdfs-xxx.jar). The JAR file includes the following information. Make sure no file is missing and the structure is correct.
META-INF/META-INF/MANIFEST.MFemr.keytabkrb5.confhdfs-site.xmlcore-site.xmlhive-site.xmlhivemetastore-site.xmlhiveserver2-site.xml
6. Upload the jar package on the Program Package Management page. Then, reference this program package in the job parameter configuration.
7. Obtain the kerberos principal for configuring the Job Advanced Parameters.
klist -kt /var/krb5kdc/emr.keytab# The output is as follows. Select the first one: hadoop/172.28.28.51@EMR-OQPO48B9KVNO Timestamp Principal---- ------------------- ------------------------------------------------------2 08/09/2021 15:34:40 hadoop/172.28.28.51@EMR-OQPO48B92 08/09/2021 15:34:40 HTTP/172.28.28.51@EMR-OQPO48B92 08/09/2021 15:34:40 hadoop/VM-28-51-centos@EMR-OQPO48B92 08/09/2021 15:34:40 HTTP/VM-28-51-centos@EMR-OQPO48B9
8. Job Advanced Parameters configuration.
containerized.taskmanager.env.HADOOP_USER_NAME: hadoopcontainerized.master.env.HADOOP_USER_NAME: hadoopsecurity.kerberos.login.principal: hadoop/172.28.28.51@EMR-OQPO48B9security.kerberos.login.keytab: emr.keytabsecurity.kerberos.login.conf: krb5.conf
Note:
The values of security.kerberos.login.keytab and security.kerberos.login.conf are the respective file names.
피드백