Users can choose to install via a package, install by extracting an archive, or use directly in a browser without installation, depending on the platform.
Note:
To start the client on CentOS, you need to execute ./cosbrowser.AppImage --no-sandbox in the terminal.
Software Login
COSBrowser desktop client supports multiple login methods: secret key login, Tencent Cloud account login, shared link login, and authorization code login. It also supports multi-device, multi-point login for the same account.
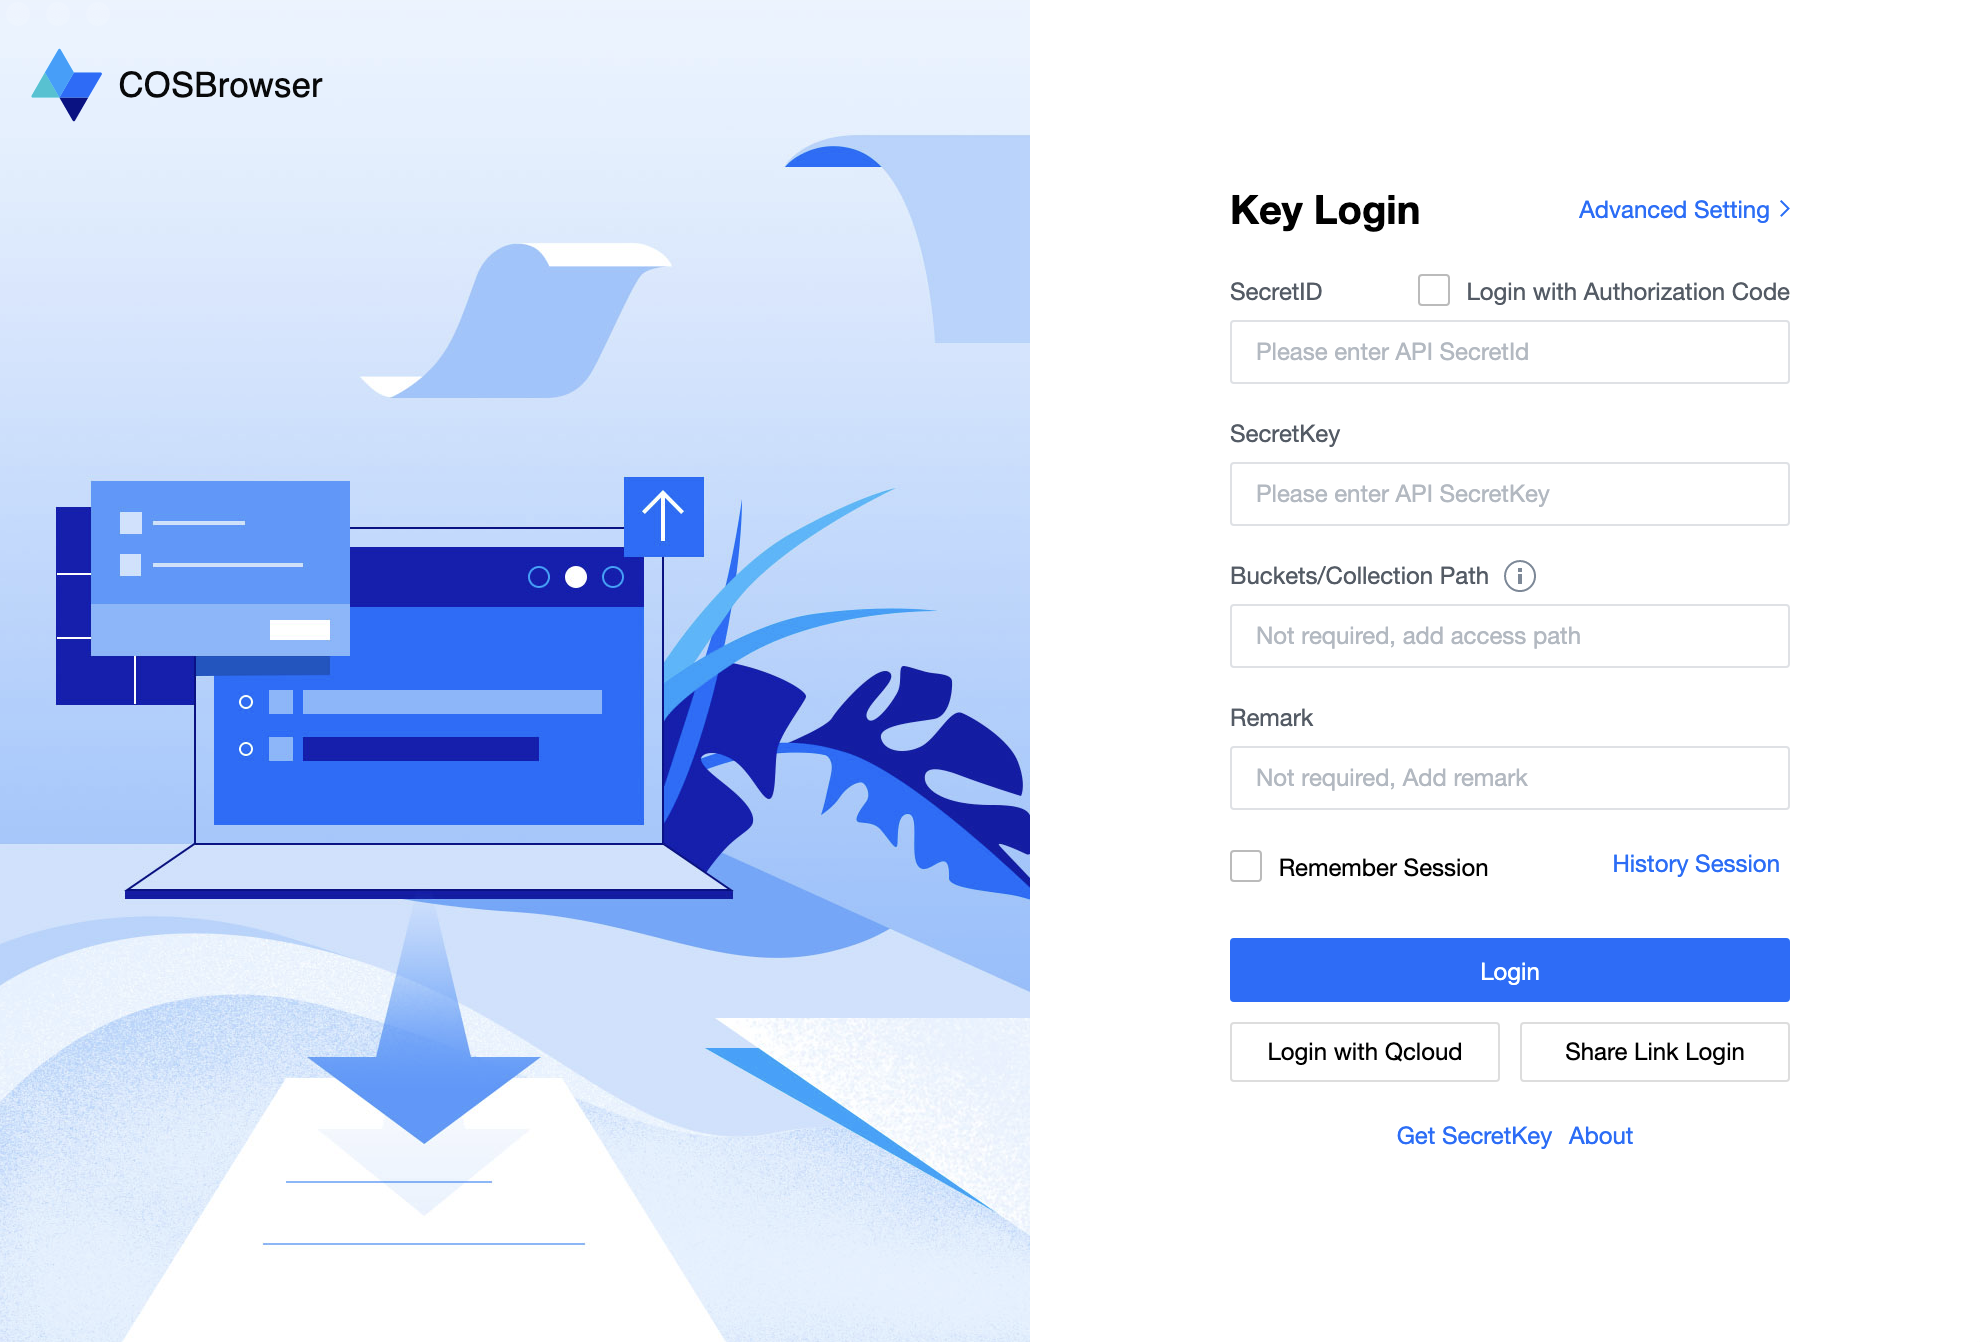
Login via key
Logging in to a Tencent Cloud Account
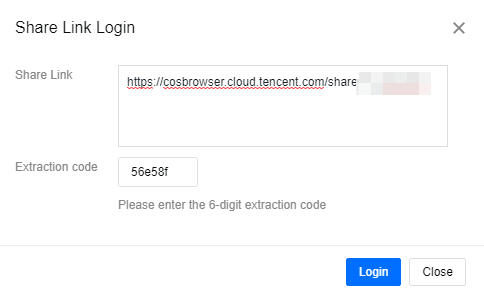
Logging in via a Shared Link
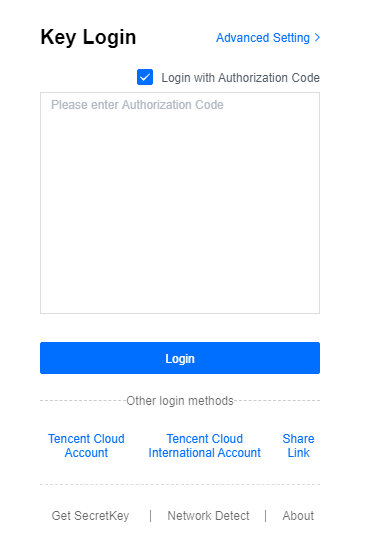
Logging in via Authorization Code
COSBrowser supports logging in with a permanent key (that is, a TencentCloud API key). The configuration items are described as follows:
SecretID and SecretKey: These are TencentCloud API keys. They can be created and obtained on the API Key Management page in the CAM console.
Bucket/Favorite Path: If the key you are currently using only allows access to a specified resource scope and does not allow access to the bucket list, such as a specified bucket or a specific path within a bucket, you can fill in this field to quickly go to the corresponding bucket or file path. The format is: Bucket or Bucket/Object-prefix. For example, if the key you are using is only allowed to access the doc folder in the bucket examplebucket-1250000000, fill in examplebucket-1250000000/doc. For operational guidance, see Add Favorite Path.
Remarks: You can add remarks for the currently entered permanent key, such as the operator or purpose. In Historical Sessions, these remarks can be used to distinguish between different SecretIDs.
Remember Session:
If you do not select this option, the login is valid only for the current session. When you log out, the entered TencentCloud API key will be cleared (if the current key is already saved in the historical sessions, it will be removed from the historical sessions).
If you select this option, the entered TencentCloud API key information will be remembered after a successful login, making it convenient for you to use it next time. You can manage the saved key information in Historical Sessions.
Note:
COSBrowser does not support logging in with a project key.
To further enhance account and data security, the secret key login method has been removed from COSBrowser Web. Please use the Tencent Cloud account login method. Alternatively, we recommend using the COSBrowser PC client for better security and a superior experience.
Click Tencent Cloud Account Login and log in to the COSBrowser desktop client using your Tencent Cloud account in the pop-up window. Tencent Cloud accounts support login via WeChat, email, QQ, WeChat Official Account, WeCom, and sub-user login. For detailed instructions, see Account-related Documentation.
Note:
The Tencent Cloud account login method is subject to session timeout limits, which can cause login status to become invalid. For scenarios involving large file uploads, it is recommended to use the key-based method for uploading.
You can temporarily log in to the COSBrowser desktop client using a shared link and extraction code forwarded or shared by others. For feature details, see Share Files/Folders.
You can temporarily log in to the COSBrowser desktop client using an authorization code generated by others. For feature details, see Generate Authorization Code.
Bucket Management
Note:
The feature descriptions here are based on the Windows version v2.11.17. For differences in other versions, see Update Log.
Creating/Deleting Buckets
Function
Description
How it Works
Create a bucket.
You can create a bucket directly through the client
1. In the bucket list, click the Create Bucket button in the upper-left corner.
2. Correctly enter the bucket name, select the region and access permissions, and optionally set bucket Tags based on user requirements.
3. Click OK to complete the creation.
Deleting a Bucket
Before deleting a bucket, make sure that the data in the bucket has been cleared.
1. In the bucket list, click the More button to the right of the target bucket -> Delete.
2. Confirm that all data in the bucket has been cleared, then click OK to delete it.
Viewing/Configuring Buckets
You can view the bucket name, region, and bucket domain name, and configure bucket access permissions, Multi-AZ feature, Intelligent Tiering, Image Extreme Compression, versioning, and global acceleration by clicking the Details icon to the right of the bucket list.
You can quickly locate a bucket by entering its name or Tag in the search box on the right side of the window.
Viewing Statistics
You can view bucket statistics by clicking the More button to the right of the bucket list > Statistics. Bucket data includes storage usage and object count.
Setting Bucket Access Permissions
COSBrowser supports managing bucket access permissions. The methods are as follows:
Bucket Permission Management: You can set the bucket's public permissions and user permissions by clicking the More button in the operation column to the right of the bucket list > Permission Management.
Quick Authorization: You can grant user permissions by clicking Quick Authorization in the operation column to the right of the bucket list.
Note:
For information about COS permissions, see ACL Overview.
Setting Bucket Tags
You can view, edit, or delete bucket Tags by clicking the More button to the right of the bucket list > Tag Management.
Setting Upload/Download Domains for a Bucket
You can specify the upload and download domains by clicking the More button to the right of the bucket list > Transfer Management. For example, in a bucket where the global acceleration feature is enabled, you can set both the upload and download domains to the global acceleration domain. After this configuration, your uploads and downloads will use the global acceleration domain for accelerated transfer.
Viewing Domains
You can view the domain name configuration of the current bucket, such as custom CDN acceleration domains and custom origin domains, by clicking the More button to the right of the bucket list > View Domains.
Setting Versioning
You can enable versioning by clicking Details in the operation column to the right of the bucket list, then clicking the versioning edit icon in the bucket details pop-up window, and changing the current status to Enabled. After versioning is enabled, you can view and manage all versions of files with the same name. For details, see View Historical Versions or File Fragments.
Enabling Global Acceleration
You can enable global acceleration and set the bucket's upload/download domain to the global acceleration domain by clicking Details in the operation column to the right of the bucket list, then clicking the global acceleration edit icon in the bucket details pop-up window, and changing the current status to Enabled. For details, see Set the Upload/Download Domain for a Bucket.
Adding a Favorite Path
If you log in using a sub-account (or secret key) that does not have permission to access the bucket list, you can quickly access authorized bucket resources by adding a favorite path. COSBrowser provides two methods for adding favorite paths:
On the software login page, you can directly add a favorite path using the secret key login method. After you are logged in, you can then manage resources.
After logging in with a sub-account, click Favorite Path > Add Path in the upper-left corner of the bucket list page, configure the specified path and region, and then go to the bucket to manage resources.
Note:
If a path authorized by a CAM policy contains /, you must also include / when adding a favorite path in COSBrowser.
Generating an Authorization Code
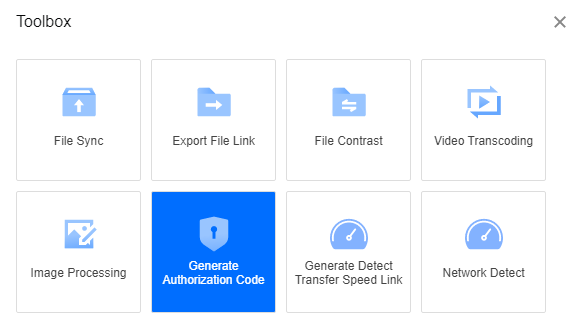
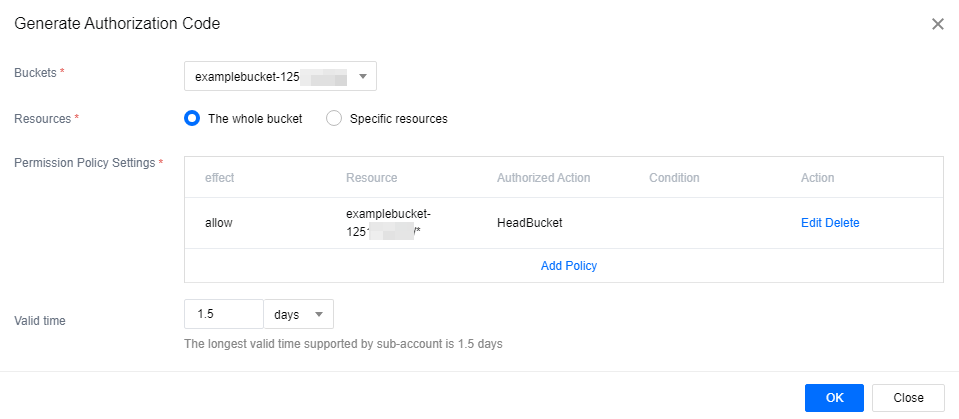
The authorization code generation feature enables temporary authorization for specified buckets, resources under buckets, and operations. It is more flexible than the folder sharing feature, as it allows granting custom operation permissions and access to specific directories. By generating temporary SecretId, SecretKey, Token, and authorization codes, you can achieve temporary client login.
Operation instructions:
Click the Toolbox icon in the upper-right corner of the tool interface. In the toolbox pop-up window, select Generate Authorization Code. Then, select the bucket for which you want to generate the authorization code and the authorized resource scope. In the policy permission settings, select the authorized operations (for example, read and write permissions) and set the validity period for the authorization code (up to 1.5 days for permanent key login, and up to 2 hours for Tencent Cloud account login). Finally, click OK.
Object Management
Uploading Files/Folders
Upload Feature
Description
How it Works
Uploads files.
COSBrowser supports multiple upload methods, including single or batch upload.
There are several ways to upload files, in a specified bucket or path:
1. Click Upload, select the file, and then upload it directly.
2. Right-click a blank area in the file list and select Upload File to upload it.
3. Drag the file to the file list window to upload it.
Uploading folders and their files
If a file or folder with the same name exists in the bucket or path, it will be overwritten by default.
There are several ways to upload a folder, within a specified bucket or path:
1. Click Upload, select a folder, and then upload the folder directly.
2. Right-click a blank area in the file list and select Upload Folder to upload it.
3. You can upload the folder by dragging it to the file list window.
Incremental upload
Incremental upload means that before performing the upload operation, the uploaded file is compared with the existing objects in the bucket. If an object with the same name exists, the file is skipped and the upload operation is not performed.
The incremental upload operation steps are as follows, within the specified bucket or path:
1. Use Folder Upload and click Next.
2. Select Skip for the storage method. After you click Upload, the incremental upload is completed.
Note:
If you need to upload files in large batches, we recommend a computer configuration of 4 cores and 16 GB of RAM (supporting a maximum of 300,000 files in a single upload).
COSBrowser supports multiple downloading methods, including single or batch downloading of files.
There are several ways to download files:
1. Select the file you want to download, click Download on the page, and the file will be downloaded.
2. Select the file, right-click it, and then click Download.
3. Drag the file to your local computer to download it.
Downloading a folder and files contained
If a file or folder with the same name already exists locally, it will be renamed by default.
There are several ways to download a folder and its files:
1. Select the folder you want to download, click Download on the page, and the folder will be downloaded.
2. Right-click the folder and select Download to download it directly.
3. Drag the folder to your local computer to download it.
Incremental download
Incremental download means that before executing the download operation, the downloaded object is compared with the local file. If an object with the same name exists, the object is skipped and the download operation is not executed.
The incremental download operation steps are as follows:
1. Select the file/folder you want to download, and then right-click.
2. Click Advanced Download in the menu, and then select Skip in the pop-up window.
3. Then, click Download Now to complete the incremental download of non-duplicate files/folders.
Note:
If you need to download files in large batches, we recommend a computer configuration of 4 cores and 16 GB of RAM (supporting a maximum of 300,000 files in a single download).
Deleting Files/Folders
Note:
Once a file/folder is deleted, its corresponding data will no longer be accessible. Please proceed with caution.
Select the file/folder you want to delete. You can then delete it by clicking Delete under More at the top of the page, or by right-clicking and selecting Delete. Batch deletion is supported.
File Synchronization
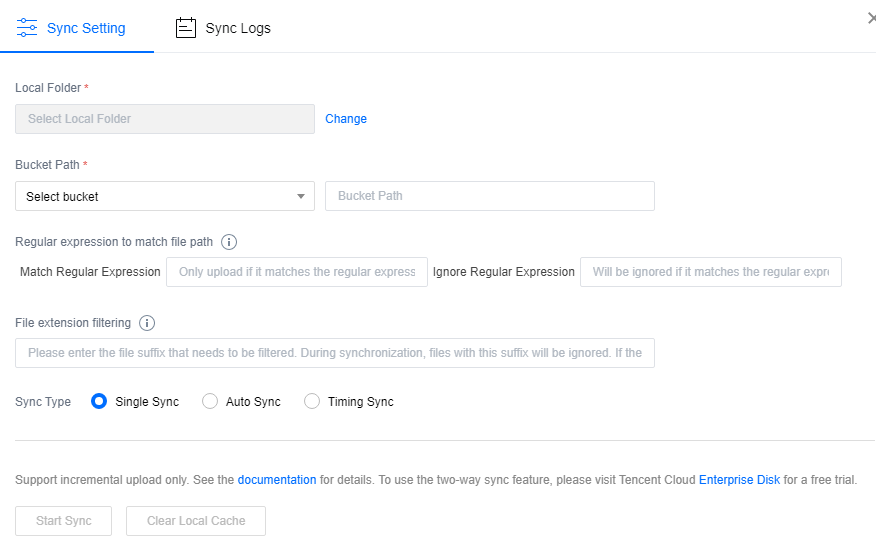
Users can use the file synchronization feature to synchronize and upload files from a specified local folder to a bucket. This feature supports manual, automatic, and scheduled synchronization.
Note:
File synchronization means that when uploading files, the system automatically identifies whether the same files exist between the local directory and the bucket. When the synchronization feature is used, only files that are not present in the bucket or have been modified are uploaded.
Currently, the synchronization feature does not synchronize deletion actions. This means that if you delete a local file, the corresponding file in the COS bucket will not be deleted.
Currently, only local files can be uploaded to the storage bucket synchronously, and the reverse operation is not supported.
The directions are as follows:
1. Click Toolbox > File Synchronization in the upper-right corner of the page.
2. Configure the following information in the pop-up window:
Local Folder: Specify the local folder whose contents are to be synchronized and uploaded.
Bucket Directory: The directory in the COS bucket to which files are uploaded.
File Extension Filter: The file extensions to be filtered. During synchronization, files with these extensions are ignored. If multiple extensions are specified, separate them with an English semicolon ;.
Synchronization Type: Select Single Sync, Auto Sync, or Scheduled Sync. Then, click Start Sync to enable the file synchronization feature.
Single Sync: This is a manual synchronization. When you click Start Sync, a synchronization operation is performed immediately.
Auto Sync: When files are changed or new files appear in the local directory, the system automatically synchronizes and uploads the corresponding files to the specified bucket.
Scheduled Sync: Users can pre-configure specific time points (for example, a specific time each day or week). This enables the system to perform file synchronization operations at the scheduled times, ensuring that files remain synchronized.
3. Click Sync Log to view the file synchronization history.
Copying and Pasting Files
Within the specified bucket or path, select the file/folder you want to copy. You can then copy it by clicking Copy under More at the top of the page, or by right-clicking and selecting Copy. After a successful copy, you can paste it into another bucket or path. Batch copy and paste is supported.
Note:
For copied files or folders, if the destination path to which they are pasted contains files with the same name, they are overwritten by default.
Renaming a File
To rename a file, select it, then right-click and choose Rename, or click Rename under More Actions on the right side of the file. Enter the new file name and save to complete the renaming.
Note:
The folder cannot be renamed.
New folder
Within the specified bucket or path, click New > New Folder within the page, or right-click on a blank area within the bucket and select New Folder. Then, enter the folder name, confirm, and the folder creation is completed.
Note:
A folder name cannot exceed 255 characters.
A combination of numbers, letters, and visible characters is allowed.
Use / to separate path components for quickly creating subdirectories.
A folder name cannot start with / or contain two or more consecutive / characters.
Folder names cannot be left empty.
A folder name cannot use .. directly.
Folders cannot be renamed, be careful when naming them.
Viewing File Details
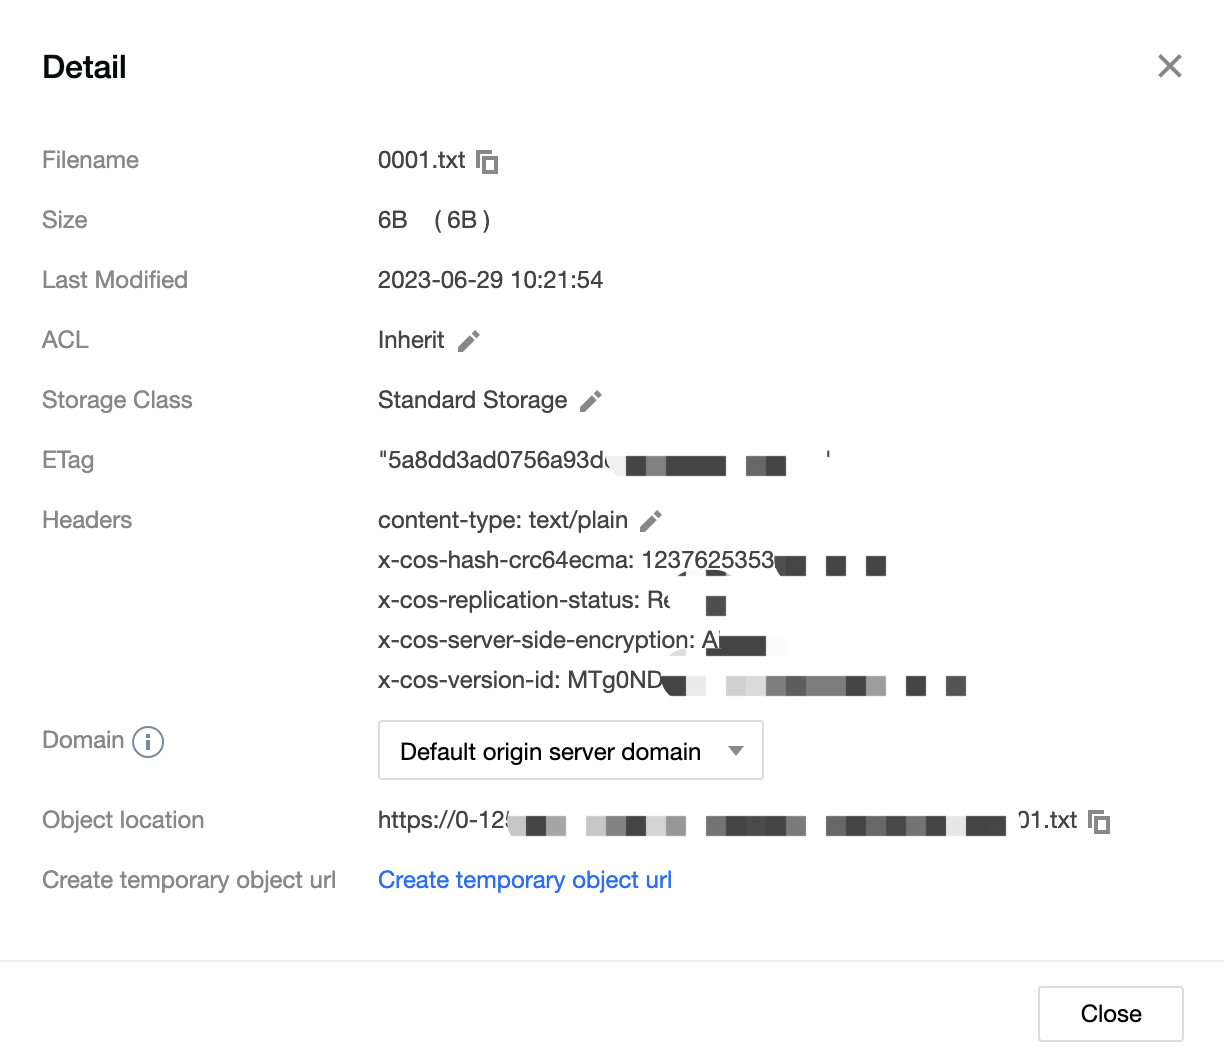
To view file details, click the file name or right-click and select Details from the menu. The detailed information includes the file name, file size, modification time, access permissions, storage type, ETag, Headers, specified domain, object address, and temporary link creation.
Generating a File Link
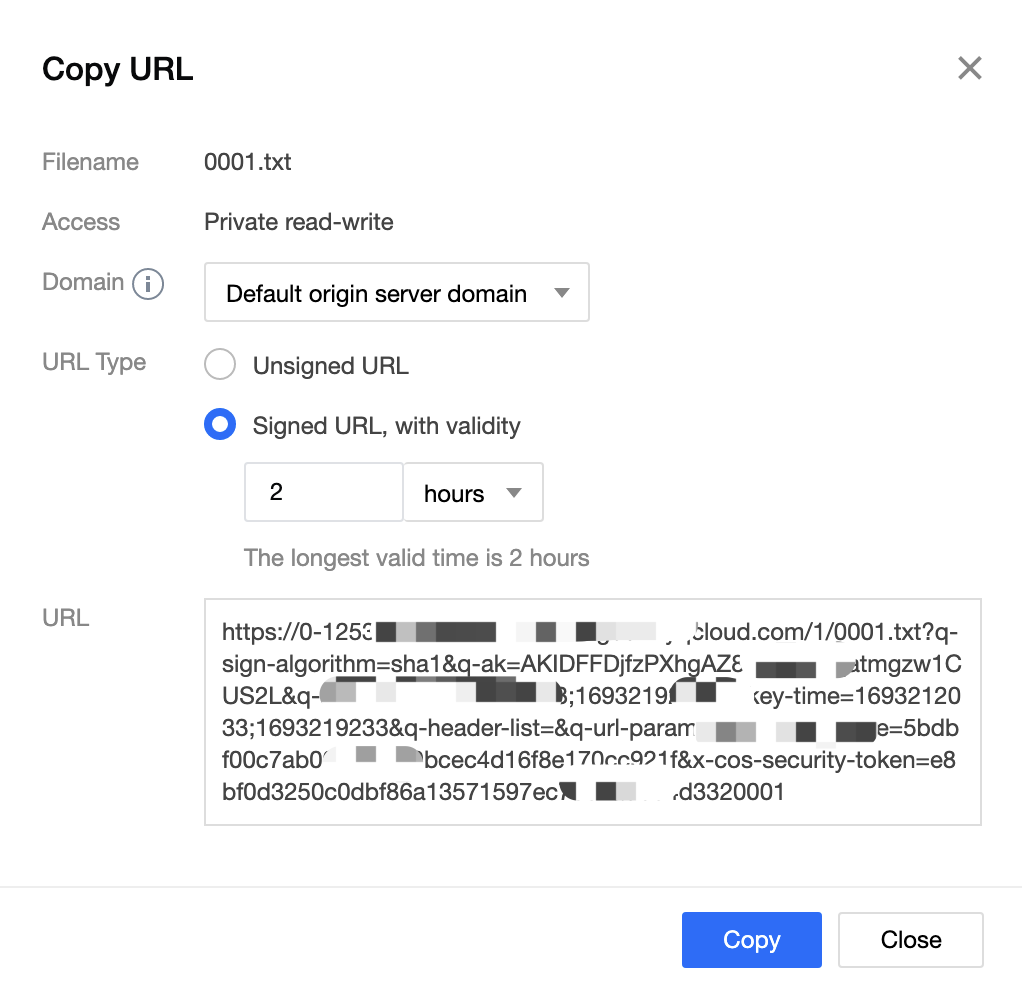
Each file stored in COS can be accessed through a specific URL. If a file is private-read, you can request a temporary signature to generate a temporary access URL with a certain validity period.
You can generate a file link in the following ways:
In table view, click the share icon to the right of a file to generate and copy a link with one click. If the file has public-read permission, the link is unsigned and permanently valid. If the file has private-read permission, the link is signed and valid for 2 hours.
After a file is selected, right-click and choose Copy Link to generate and copy a link with one click. If the file has public-read permission, the link is unsigned and permanently valid. If the file has private-read permission, the link is signed and valid for 2 hours.
In the file details, click Create Temporary Link to configure a temporary link with a specified domain name (for example, if a custom CDN acceleration domain name is enabled), link type, and validity period.
Note:
If you are using a sub-account and need to switch to another domain name (for example, a custom CDN acceleration domain name), ensure that the root account has granted the DescribeDomains permission to the sub-account before you proceed.
Sharing Files/Folders
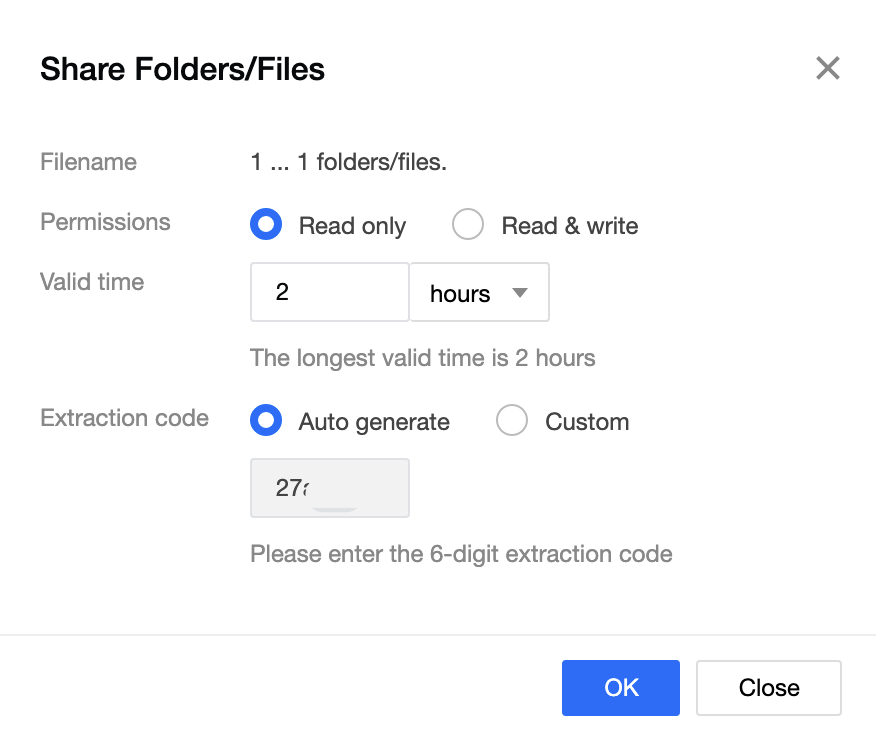
To share a single file, click the Share icon in the operation bar. To share a single folder, right-click the folder and select Share from the context menu. You can also set a validity period for the share.
Note:
Only sharing of a single folder is supported; sharing of files in batches is not supported.
When multiple users share files, file version confusion can easily occur. We recommend that you enable the versioning feature for your bucket, which allows you to revert to historical versions of files.
Parameter
Description
Permission
You can set the access permissions for shared folders.
Read-only: By accessing the link, you can retrieve the folder list and download files within the folder.
Read-write: By accessing the link, you can retrieve the folder list, download files within the folder, upload files to the shared folder, and create new folders.
Valid time.
The unit is minute, hour, or day.
Log in to the client using a key: The validity period for a root account can be set from 1 minute to 2 hours, while the validity period for a sub-account can be set from 1 minute to 30 days.
Log in to the client using a Tencent Cloud account: The maximum share time that can be set is 2 hours. The default value is the maximum validity period allowed for the current account.
Access Code
It is 6 digits long, generated automatically by the system by default, and can be customized by users. It supports the input of numbers, letters, and symbols.
Note:
During the link's validity period, any user who receives the share link and access code can access the folder via that link.
Exporting File Links
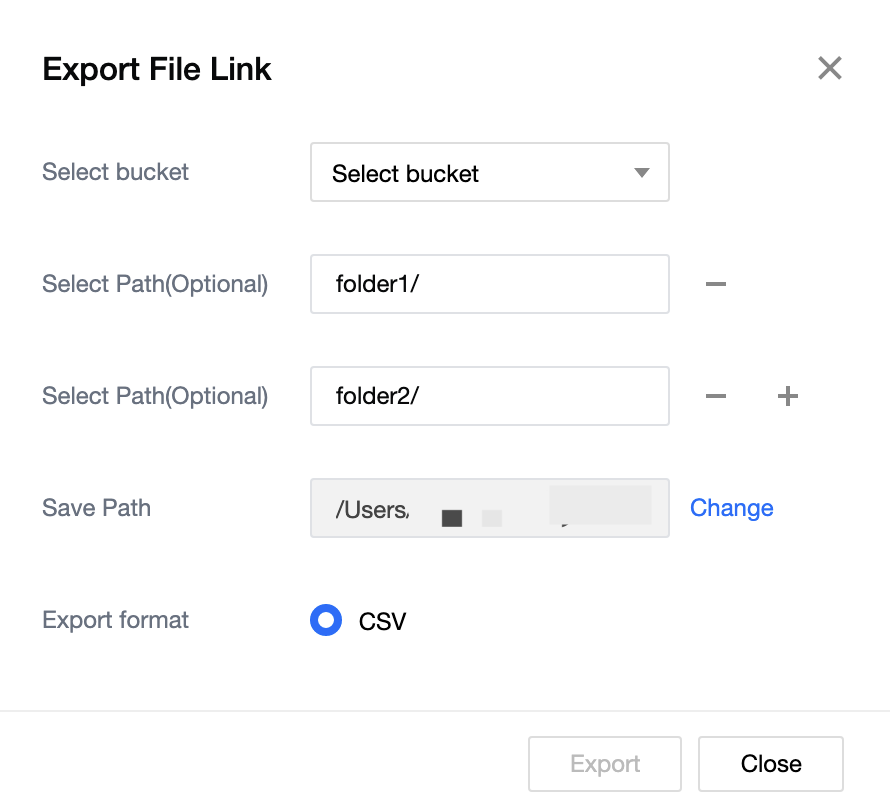
COSBrowser supports exporting file links. To do this, click the toolbox icon in the upper right corner of the tool interface. In the toolbox pop-up window, select Export File Links. Then, select the bucket where the file is located, the folder path to export (for example, to export the folder named "folder" under the root path, enter folder/), and the save path. Finally, click Export.
File Preview
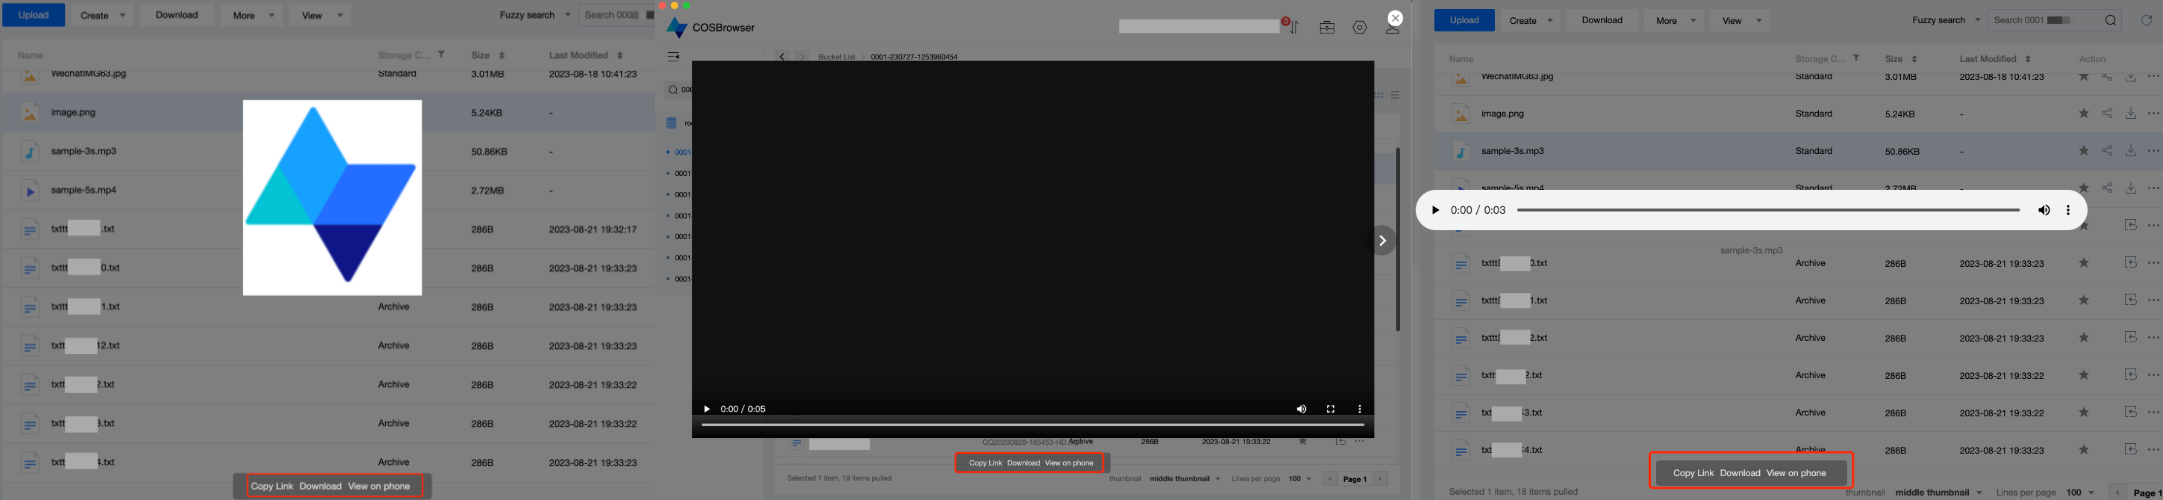
COSBrowser supports previewing media files, including images, videos, and audio. You can open the file preview interface by double-clicking a media file or by selecting the Preview or Play option from the right-click menu. On the file preview or playback interface, you can choose to:
Copy Link : Generate a file access link and copy it.
Download : Download the file to the local computer. If a file with the same name exists locally, it will be overwritten by default.
View on phone: Generates a QR code for file access on the preview interface. You can directly view the file on your phone if you scan this code on your phone.
Note:
The preview supports most image formats, the video format only supports mp4 and webm, and the audio format only supports mp3 and wav.
File preview will generate downstream traffic, use it at your discretion.
Searching for Files
You can search for files by entering the file name in the search box in the upper right corner of the bucket. COSBrowser supports file name prefix search and file fuzzy search.
Viewing Historical Versions or File Fragments
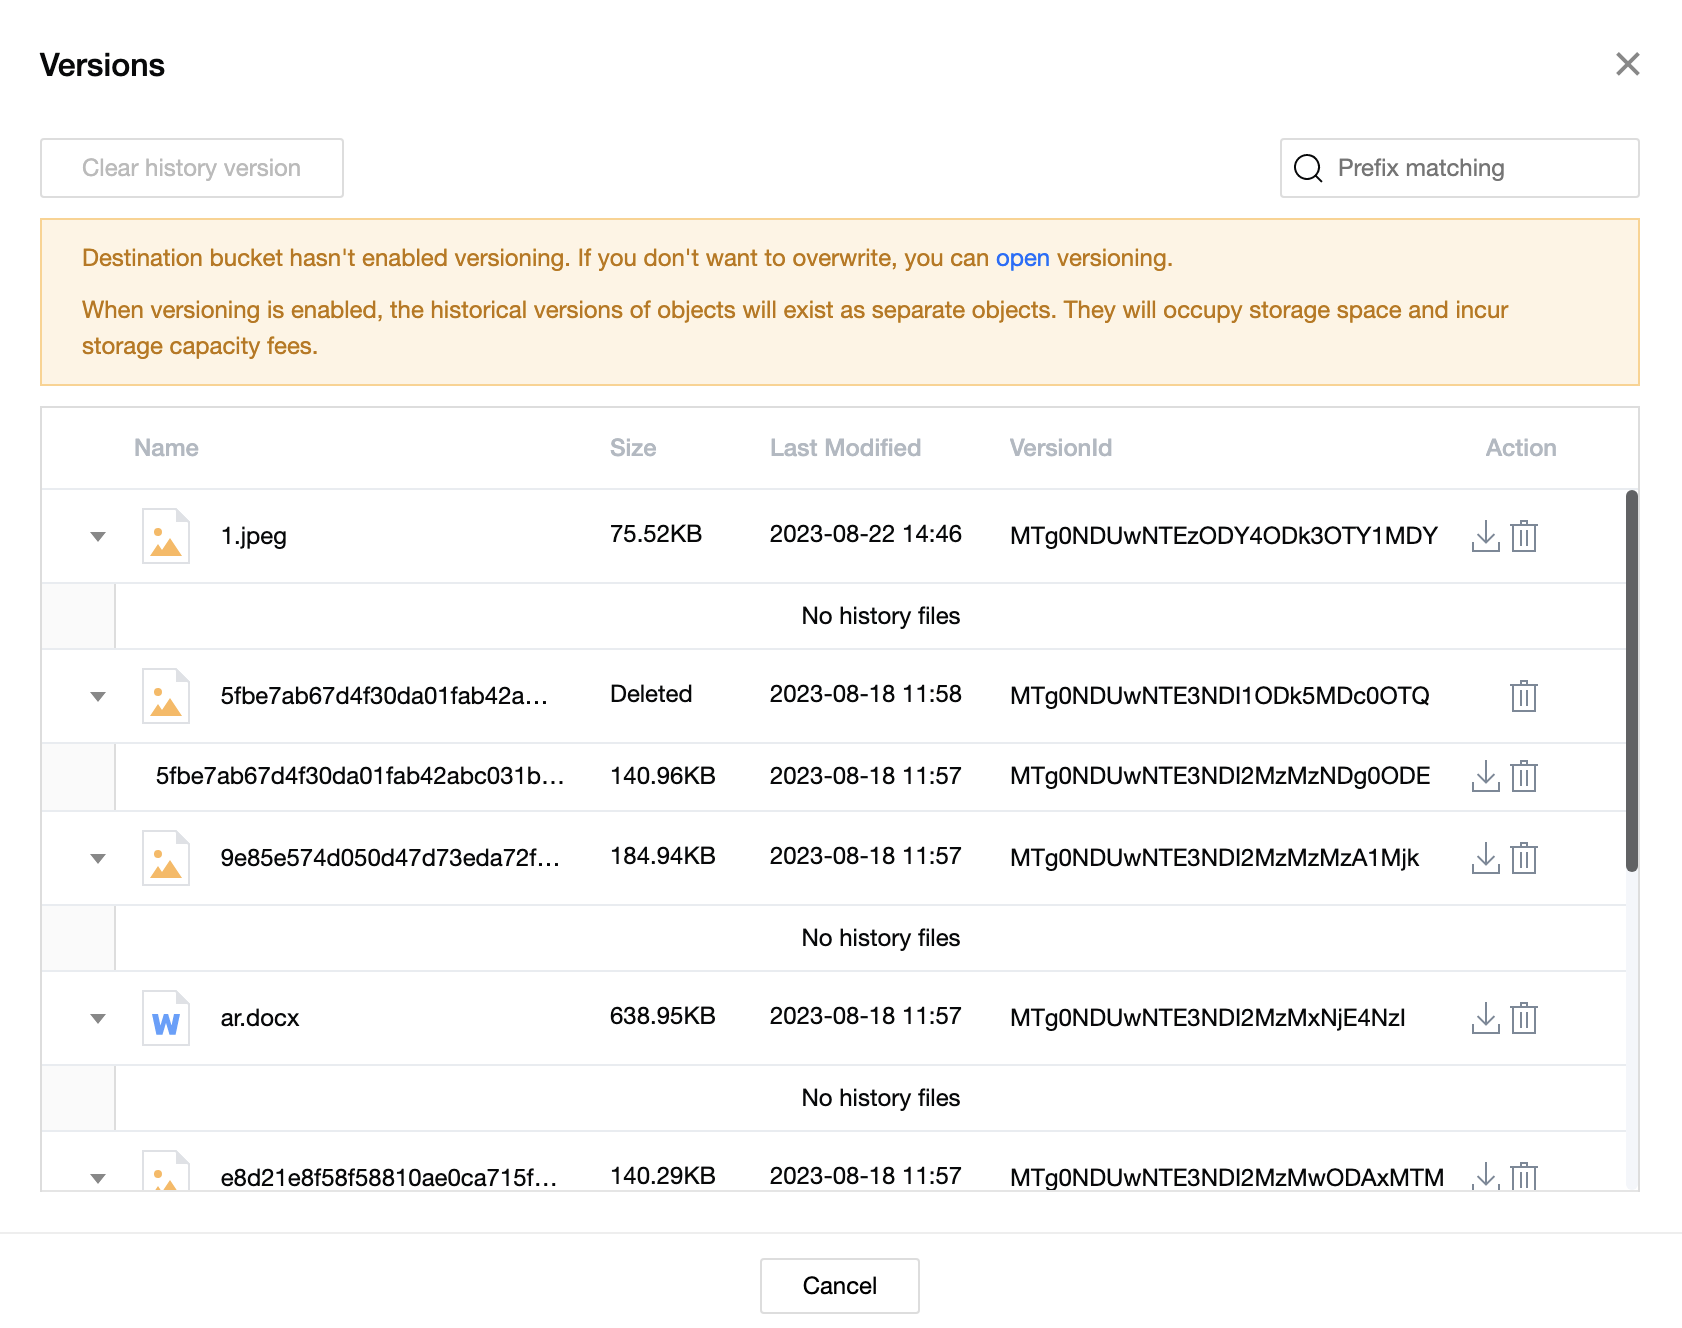
After you enable versioning for your bucket, you can click View > Historical Versions above the file list to view the historical versions of a file. In the historical versions list, you can search by prefix and clear all historical versions (only the latest version is retained).
File fragments may be generated when you pause or cancel an object upload. You can view file fragments by clicking View > File Fragments above the file list. The interface supports searching by prefix and clearing all file fragments.
File Comparison
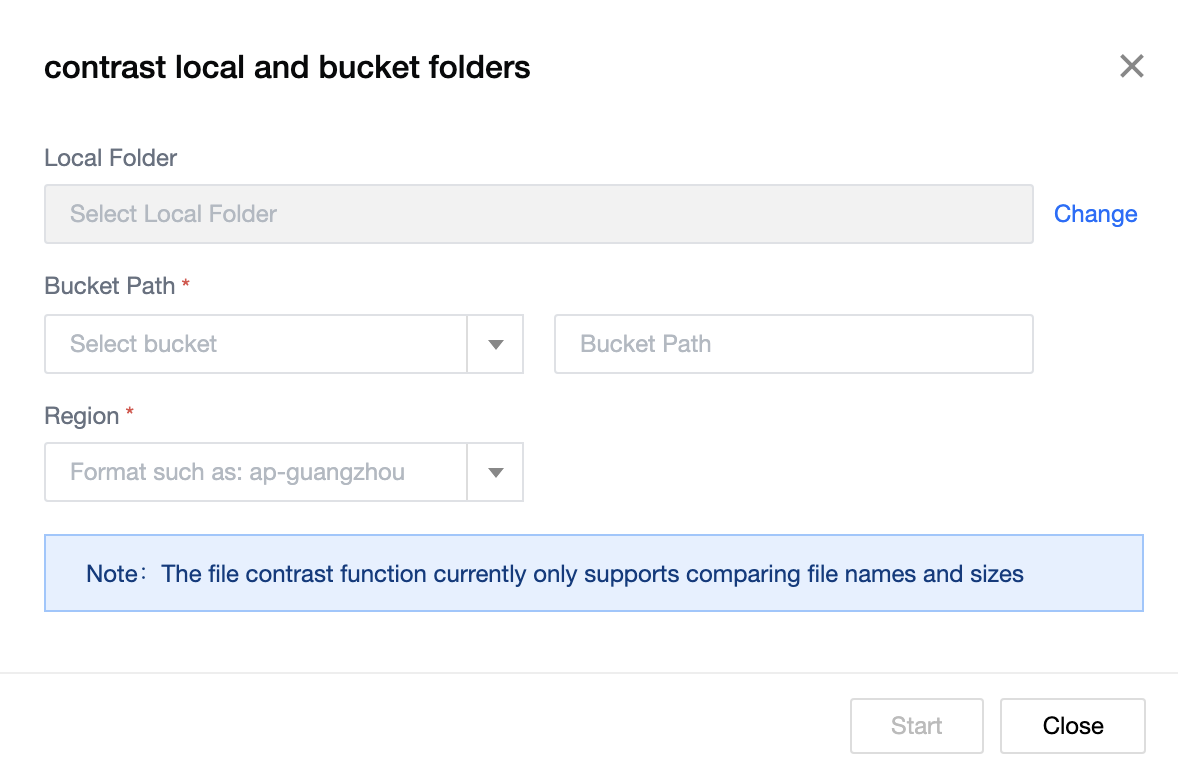
To compare files, click the toolbox icon in the upper right corner of the tool interface. In the toolbox pop-up window, select File Comparison. Then, select the local folder and the bucket to be compared. Specify the region, bucket, and directory. Finally, click Start Comparison.
Managing the File List
Click a bucket name to go to the file list. On the file list page, you can perform operations on files or folders, such as uploading files, creating folders, managing file fragments, listing historical versions, searching or refreshing the list, setting folder permissions, viewing file details, previewing, and downloading.
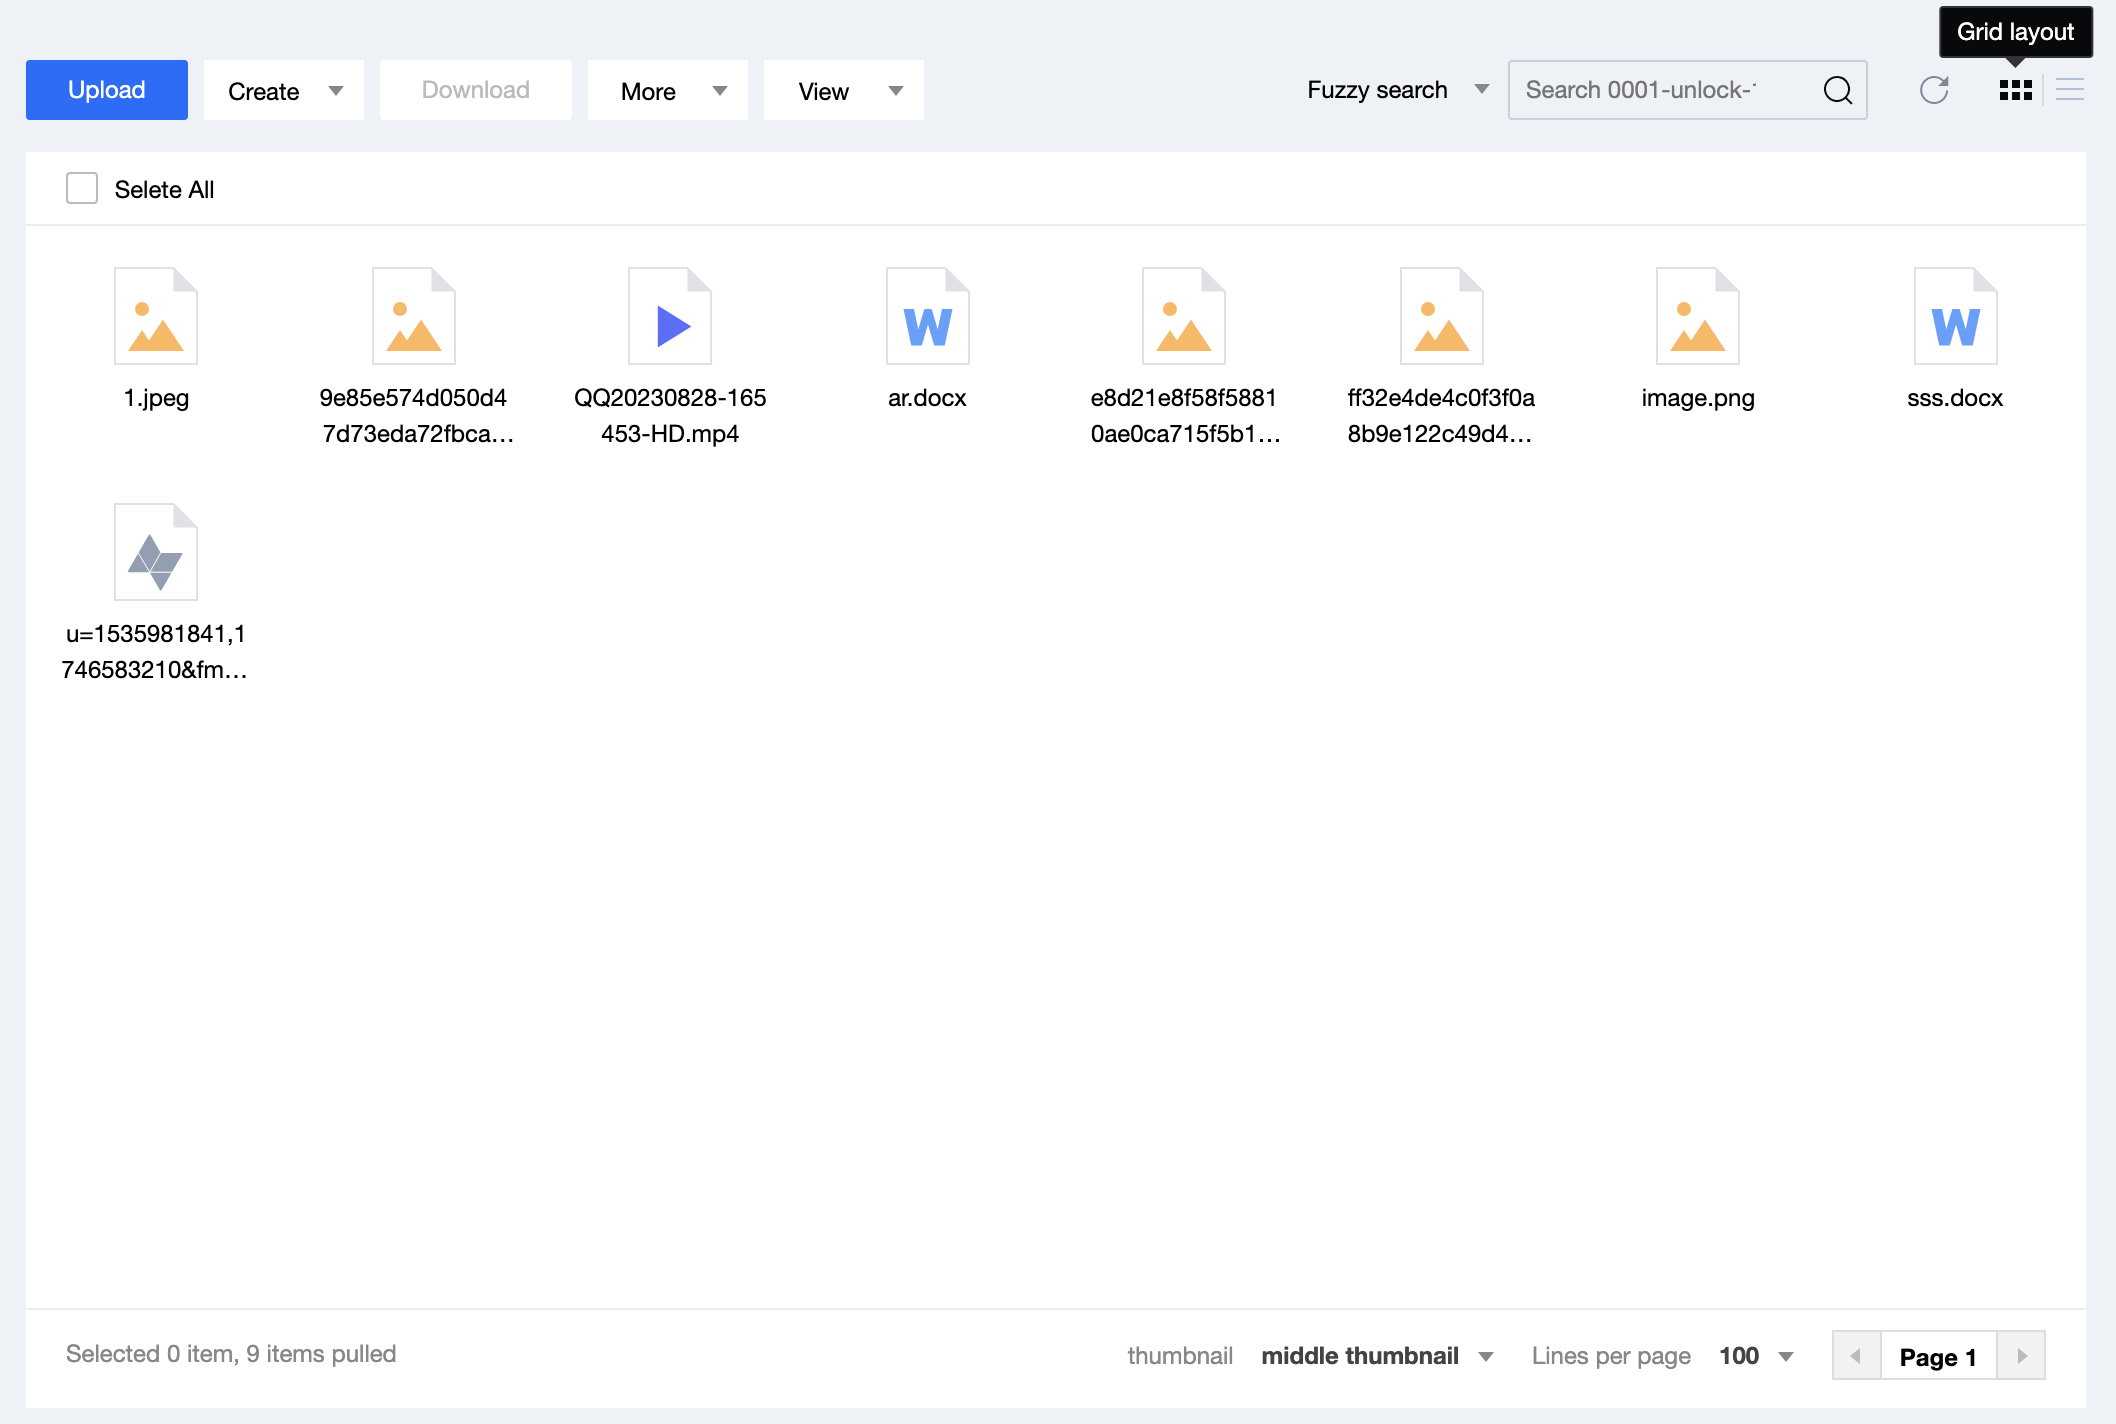
The file list supports two layouts. You can switch between them in the upper right corner of the file list. Details are as follows:
List layout: Files and folders are displayed in a list format, which is the default layout.
Grid layout: Files and folders are displayed in a grid format, which is not the default layout.
Note:
In the grid layout, you can enable the thumbnail feature at the bottom of the window. This feature is supported by CI. After you enable it, CI Image Processing and MPS fees will be incurred.
Data Processing
Video Transcoding
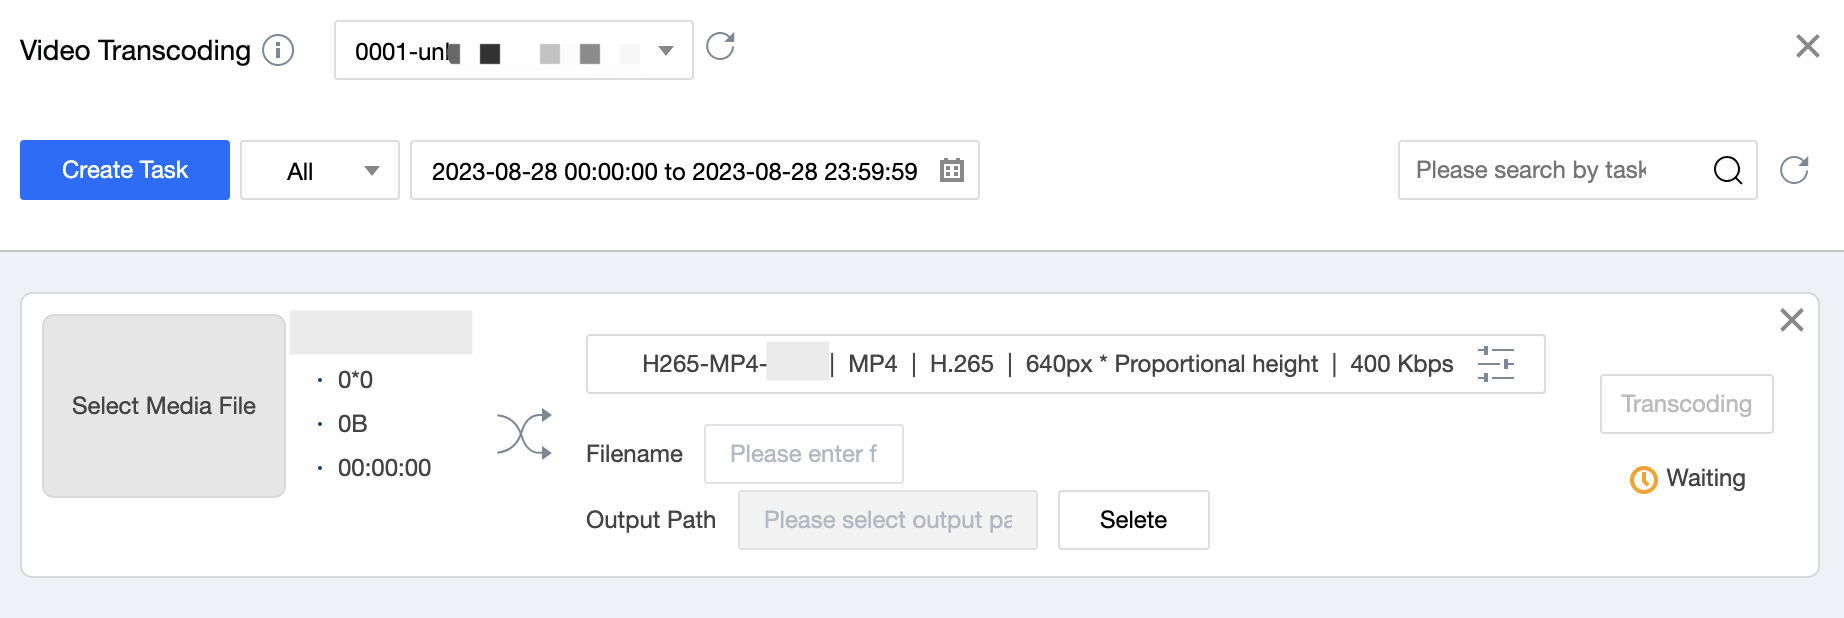
To transcode a video, click the toolbox icon in the upper right corner of the tool interface. In the toolbox pop-up window, select Video Transcoding. Then, select a bucket for which MPS is enabled, and click Create Transcoding Task. Select the media file to be transcoded and a transcoding template. Enter the file name and storage path for the transcoded output. Specify the region, bucket, and directory. Finally, click Transcode.
Image Processing
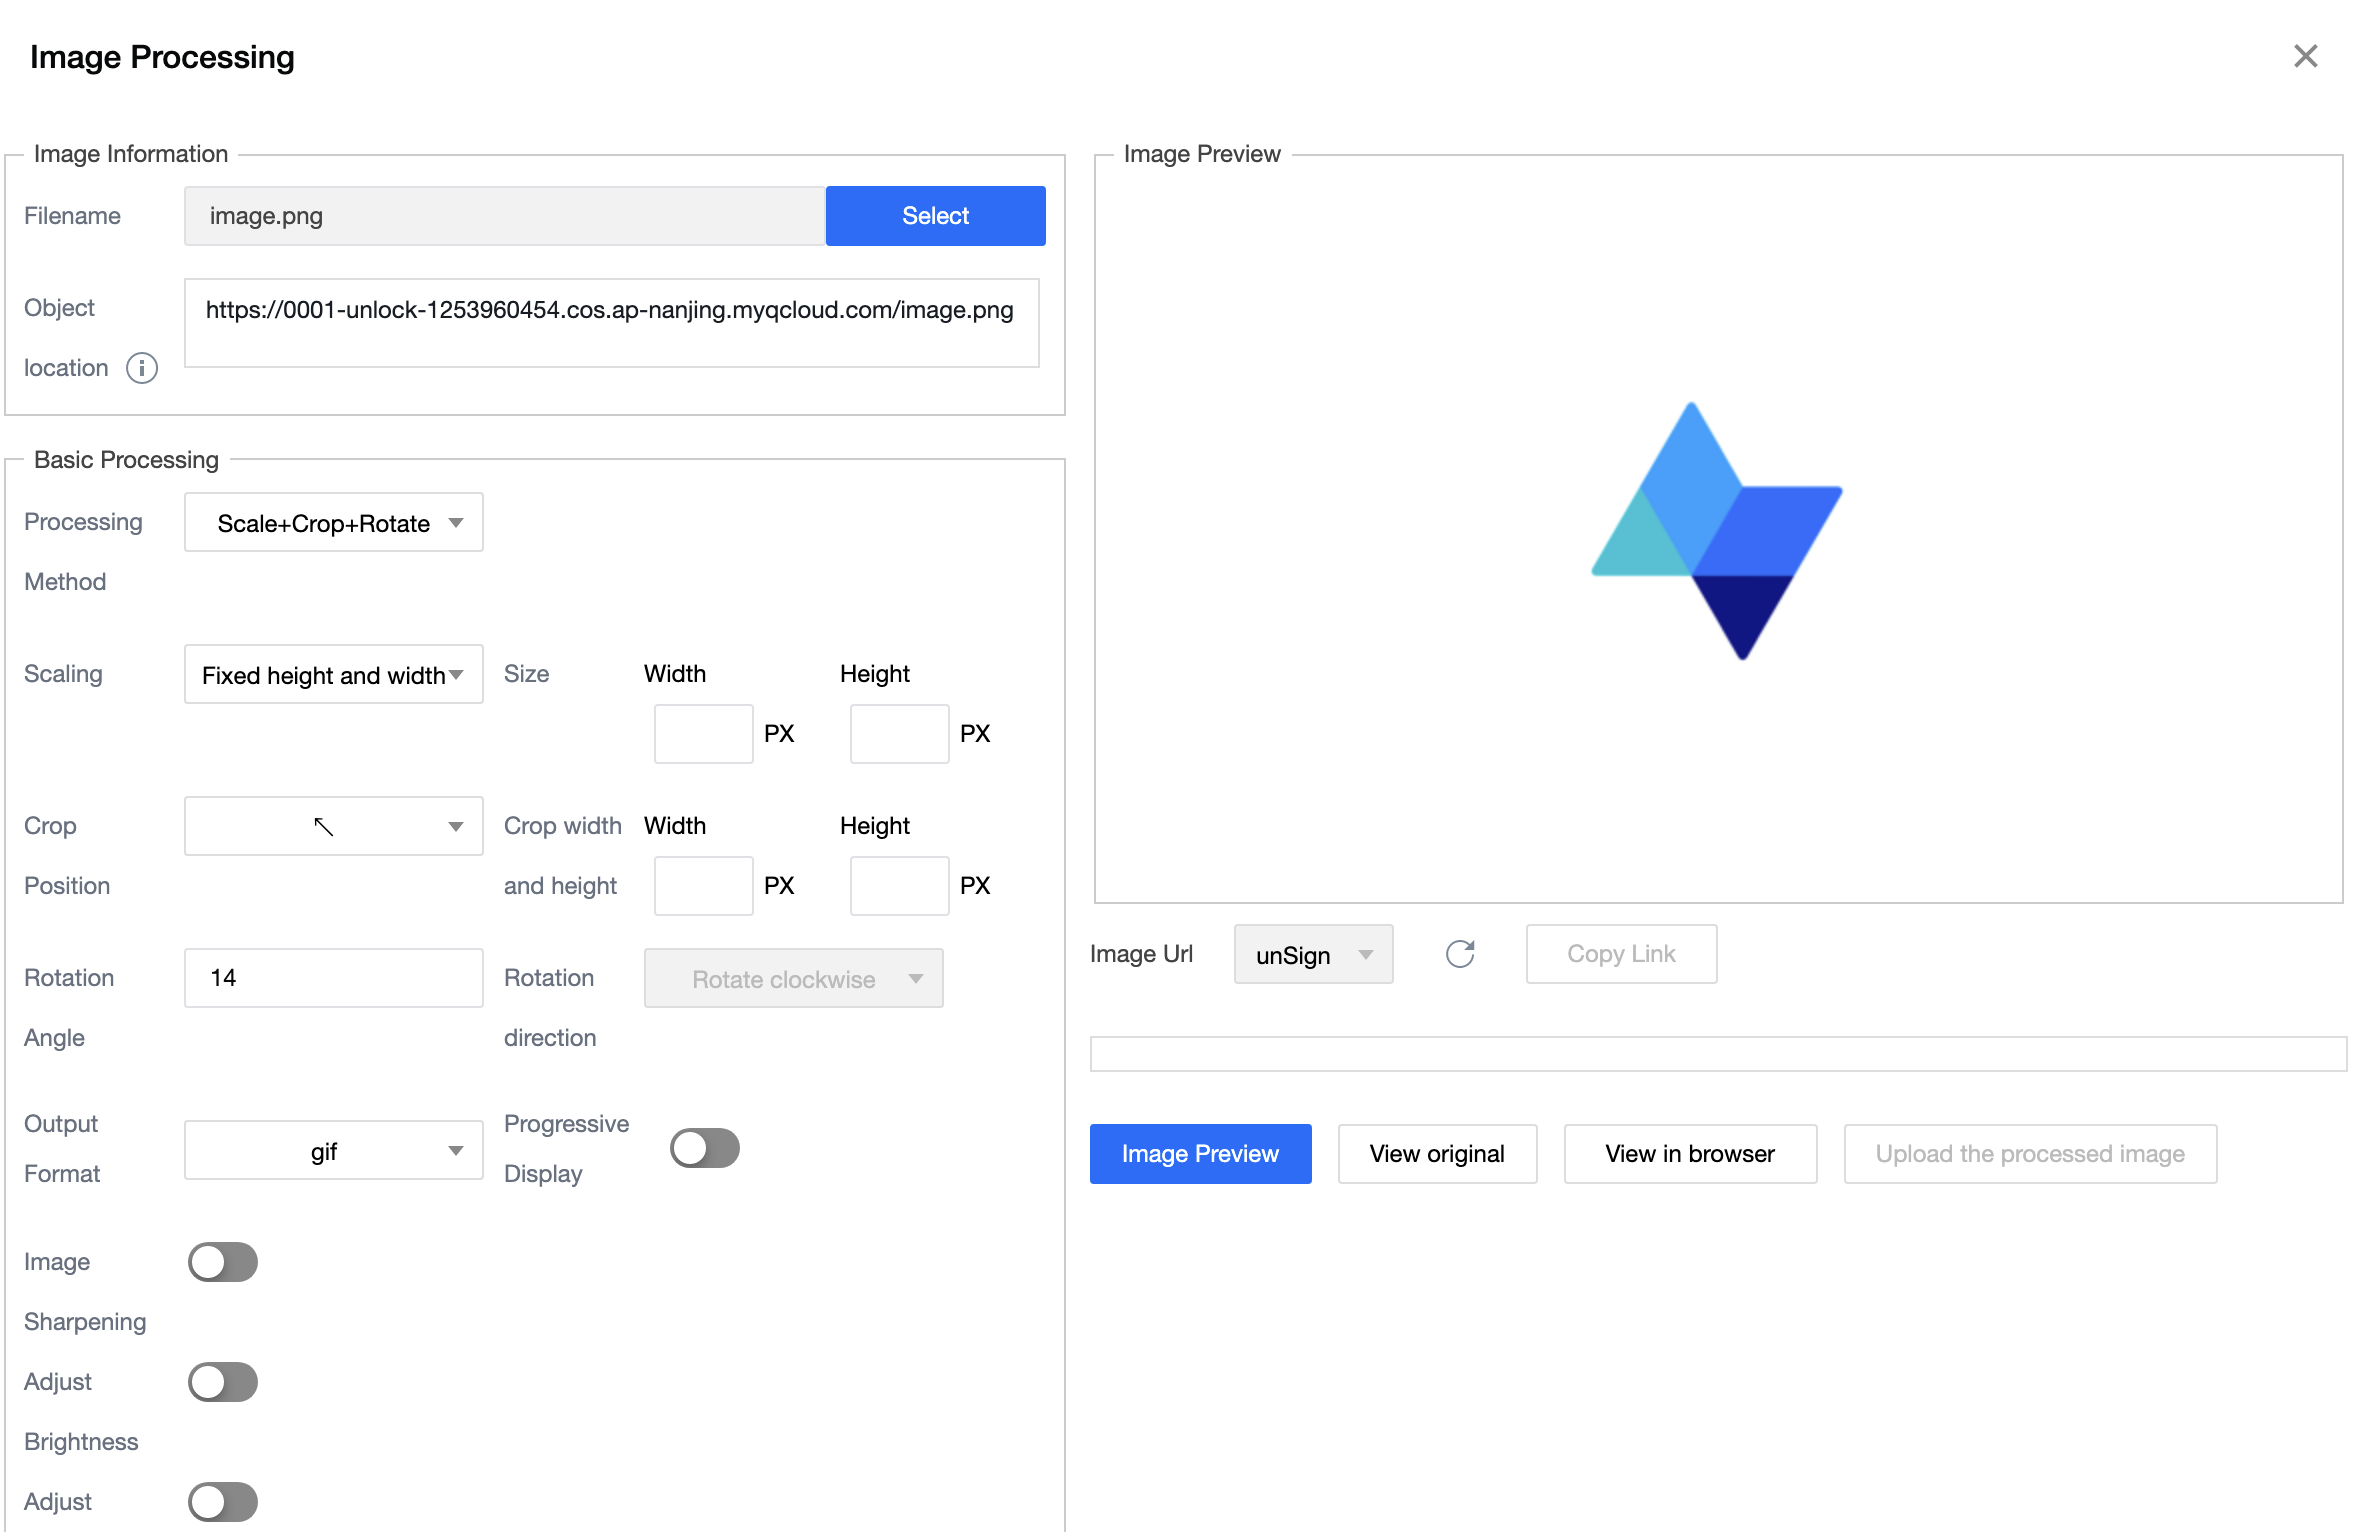
The Image Processing feature in the tool supports basic image processing such as scaling, cropping, and rotating, as well as text and image watermarks. It also supports generating links to processed images.
To use the Image Processing feature, first select the bucket for which you want to use it. Then, click the toolbox icon in the upper right corner of the tool interface. In the toolbox pop-up window, select Image Processing. In the Image Processing pop-up window, select the image file to be processed and configure the feature options. Finally, click Image Preview to generate a link to the processed image.
Software Setup
Advanced Configuration
Description
How it Works
General Configuration
EndPoint/Service domain name: The request domain name that can be customized when you call the API to obtain the bucket list. The default is service.cos.myqcloud.com.
Bucket domain name template: The request domain name that can be customized when you call APIs to operate buckets and objects. You can use a template, such as "{Bucket}.cos.{Region}.myqcloud.com". When you call the API, the Bucket and Region parameters you pass in will be used for replacement.
Automatic backup domain name switchover: If the Bucket domain name is not configured or is configured as the COS default domain name, the request will automatically retry once using the backup domain name when a network error occurs.
Use HTTPS: To use HTTPS for your bucket domain name, you need to install an SSL or TLS certificate on your website. Selecting this option makes requests more secure.
Validate HTTPS certificate: Whether to validate the HTTPS certificate during requests.
1. Choose Advanced Settings > General.
2. Configure the settings as needed according to the configuration item descriptions.
Setting up proxy
COSBrowser will use the system configured proxy to try to connect to the network by default. Make sure your proxy configuration is normal or disable the proxy configuration that cannot connect to the Internet.
1. Choose Advanced Settings > Proxy.
2. Set up a network proxy for network connections.
Set the number of concurrent file uploads/downloads
COSBrowser supports configuring the number of concurrent file upload and download tasks.
1. Choose Advanced Settings > Download/Upload.
2. Set the concurrency for batch transfers.
Set the number of concurrent chunk uploads/downloads
COSBrowser supports multipart upload and download. When the transferred file exceeds a certain size, it will be transferred in parts by default.
1. Choose Advanced Settings > Download/Upload.
2. Set the concurrency for chunked transfers.
Set the number of retries for failed uploads/downloads
When transferring files, COSBrowser will retry failed tasks by default.
1. Choose Advanced Settings > Download/Upload.
2. Set the number of retries for failed transfers.
Set single-thread upload/download speed limit
COSBrowser supports setting single-thread upload and download speed limits. Total upload (or download) speed limit = Single-thread upload (or download) speed limit x Number of concurrent files x Number of concurrent parts.