This guide walks you through implementing the "answer call" feature using the AtomicXCore SDK, leveraging its DeviceStore, CallStore, and the core UI component CallCoreView.
Core Features
To build multi-party Audio/Video Call scenarios with AtomicXCore, you’ll use the following core modules:
|
| The main call UI component. It automatically observes CallStore data, renders video streams, and supports UI customization such as layout switching, avatar, and icon configuration. |
| Manages the call lifecycle: make call, answer call, reject call, hang up. Provides real-time access to participant audio/video status, call timer, call records, and related data. |
| Controls audio/video devices: microphone (toggle/volume), camera (toggle/switch/quality), screen sharing, and real-time device status monitoring. |
Getting Started
Step 1: Activate the Service
Step 2: Integrate the SDK
1. Add Pod Dependency: Add pod 'AtomicXCore' to your project's Podfile.
target 'YourProjectTarget' do
pod 'AtomicXCore'
end
Tips:
If your project does not have a Podfile: In your terminal, navigate to your .xcodeproj directory and run pod init to generate a Podfile.
2. Install Components: In the terminal, navigate to the directory containing your Podfile and run:
pod install --repo-update
Tips:
After installation, open your project using the YourProjectName.xcworkspace file.
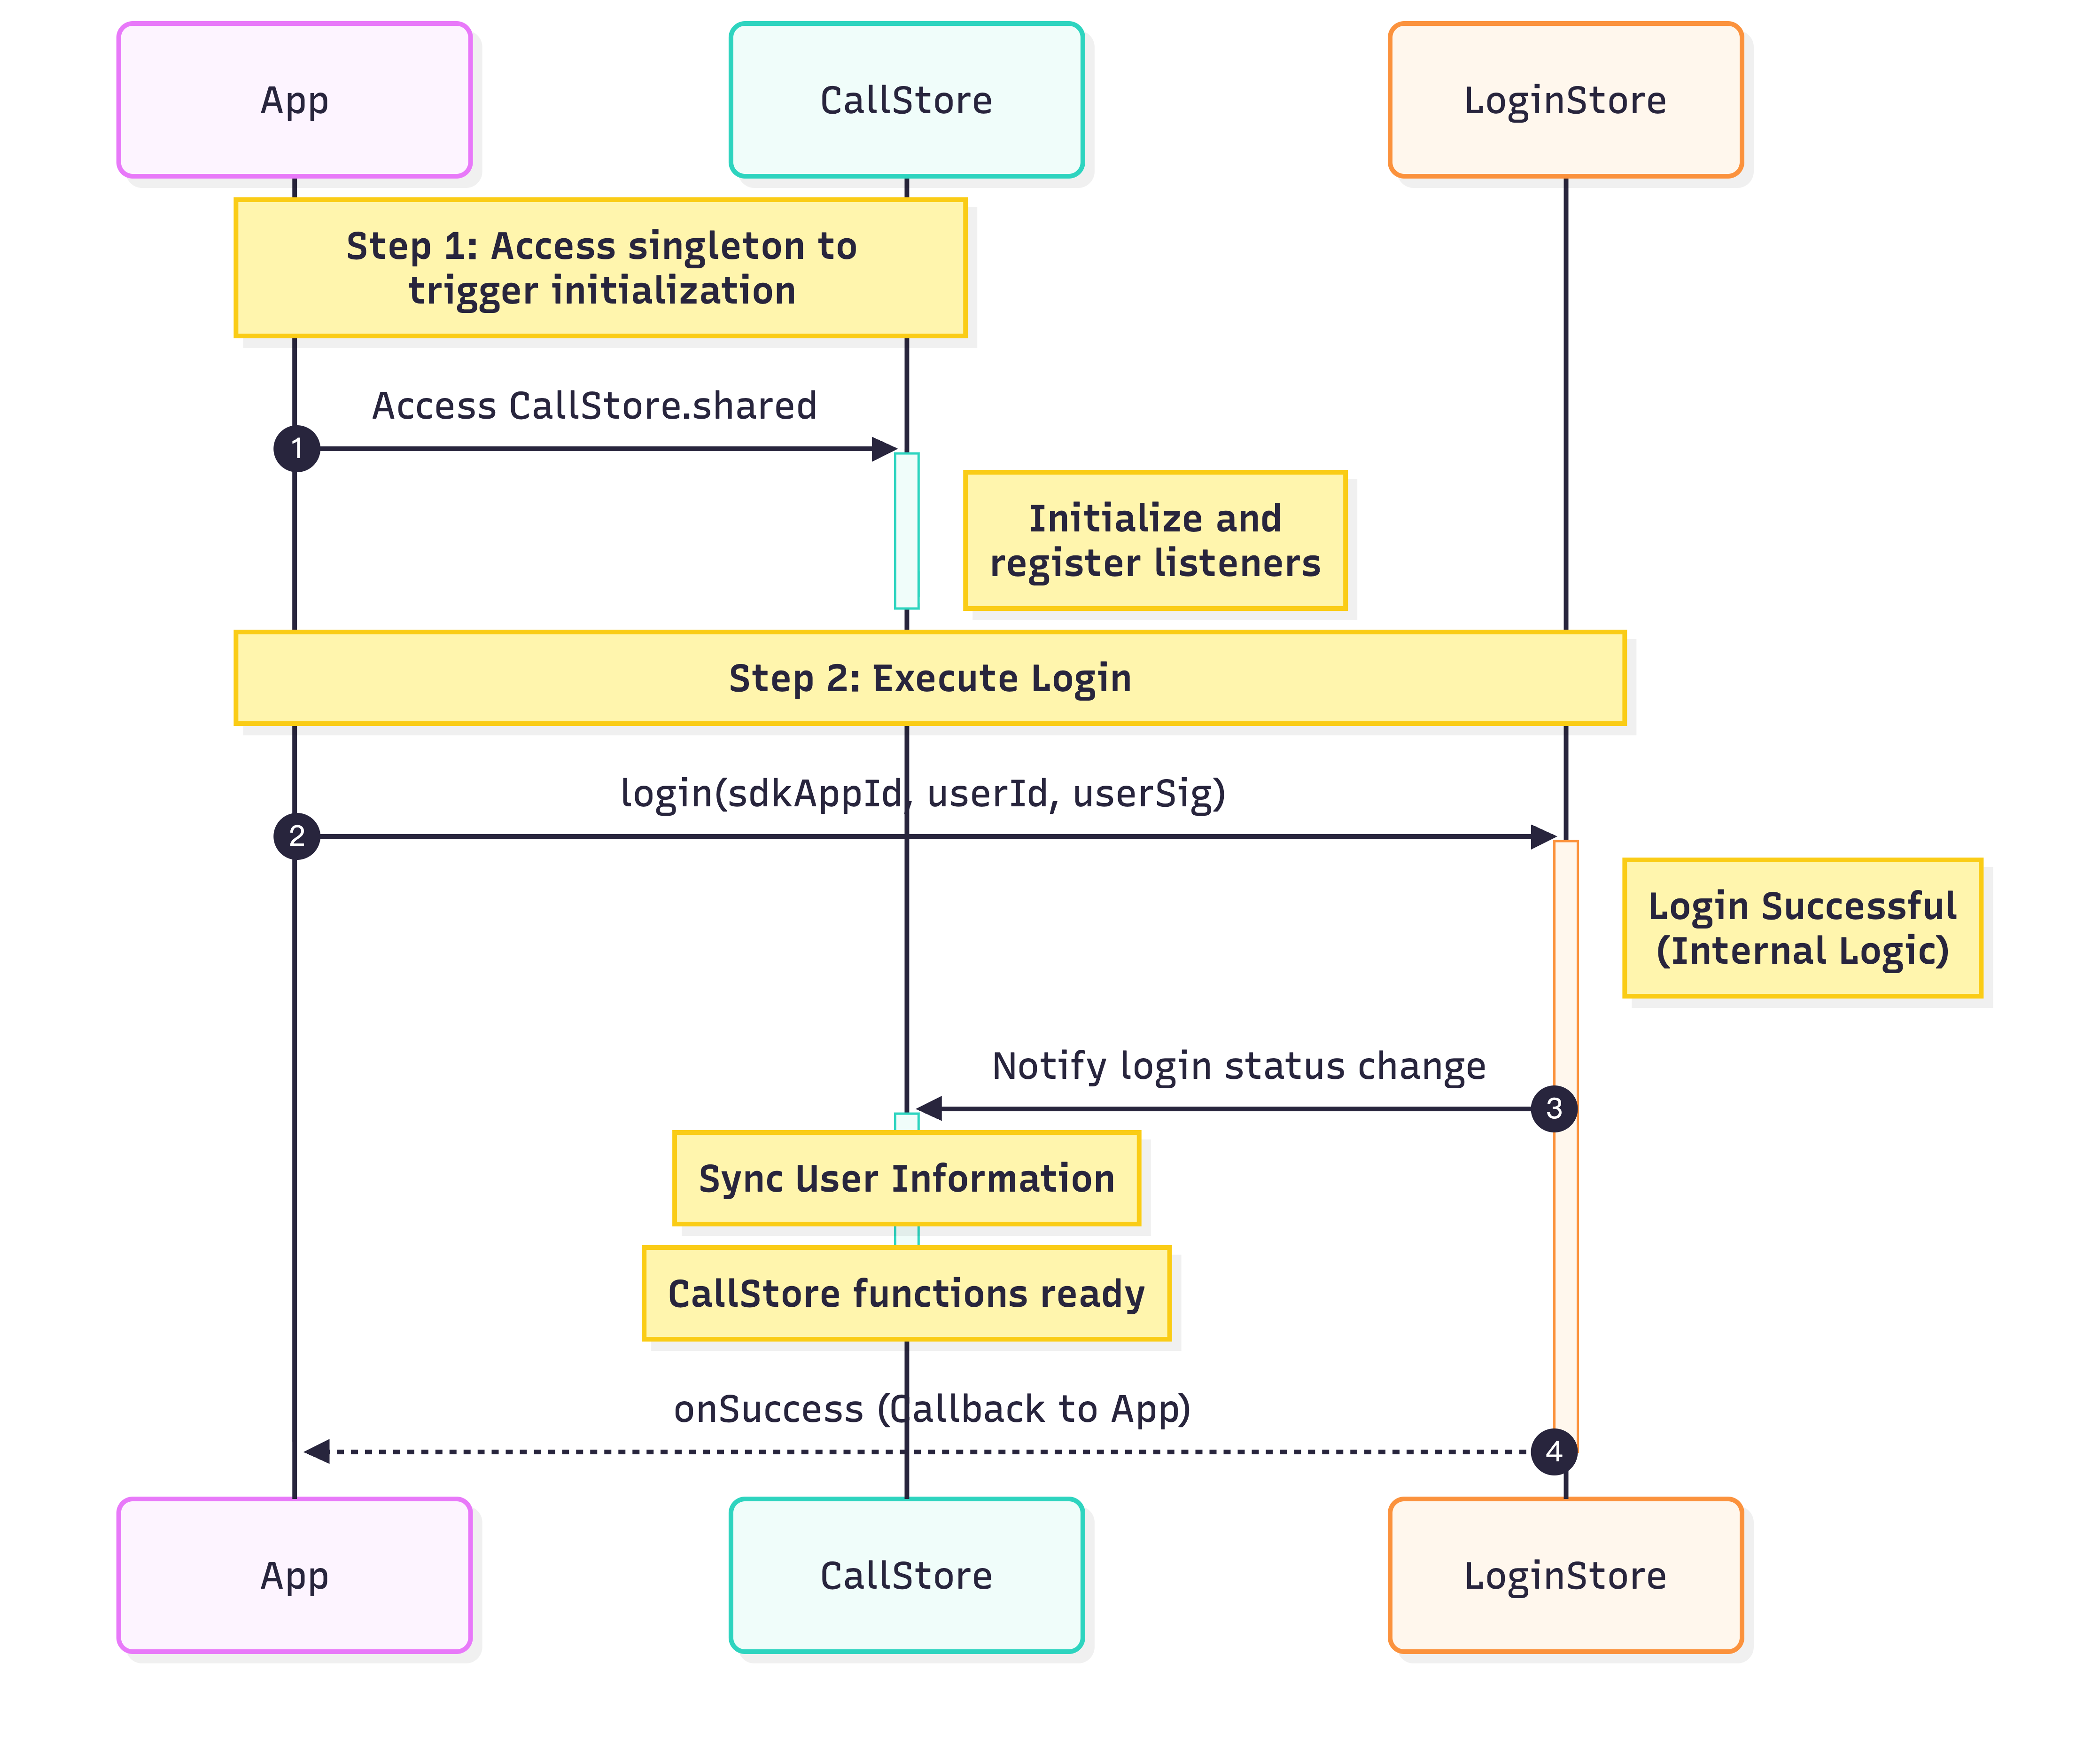
Step 3: Initialize and Log In
To start the call service, initialize CallStore and log in the user. CallStore will automatically sync user info after a successful login and enter the ready state. See the flowchart and sample code below:
import UIKit
import AtomicXCore
import Combine
class ViewController: UIViewController {
var cancellables = Set<AnyCancellable>()
override func viewDidLoad() {
super.viewDidLoad()
let _ = CallStore.shared
let userID = "test_001"
let sdkAppID: Int = 1400000001
let secretKey = "**************"
let userSig = GenerateTestUserSig.genTestUserSig(
userID: userID,
sdkAppID: sdkAppID,
secretKey: secretKey
)
LoginStore.shared.login(
sdkAppID: sdkAppID,
userID: userID,
userSig: userSig
) { result in
switch result {
case .success:
Log.info("login success")
TUICallEngine.createInstance().`init`(Int32(sdkAppID), userId: userID, userSig: userSig) {
Log.info("TUICallEngine init success")
} fail: { code, message in
Log.error("TUICallEngine init failed, code: \\(code), message: \\(message ?? "")")
}
case .failure(let error):
Log.error("login failed, code: \\(error.code), error: \\(error.message)")
}
}
}
}
|
| | Unique identifier for the current user. Only letters, numbers, hyphens, and underscores are allowed. Avoid simple IDs like 1 or 123 to prevent multi-device login conflicts. |
| | |
| | SDKSecretKey for your audio/video application, available in the console. |
| | Authentication token for TRTC. |
Implement Answer Call
Important: Make sure the user is logged in before answering a call. This is required for the service to work. Follow these 6 steps to implement the answer call feature.
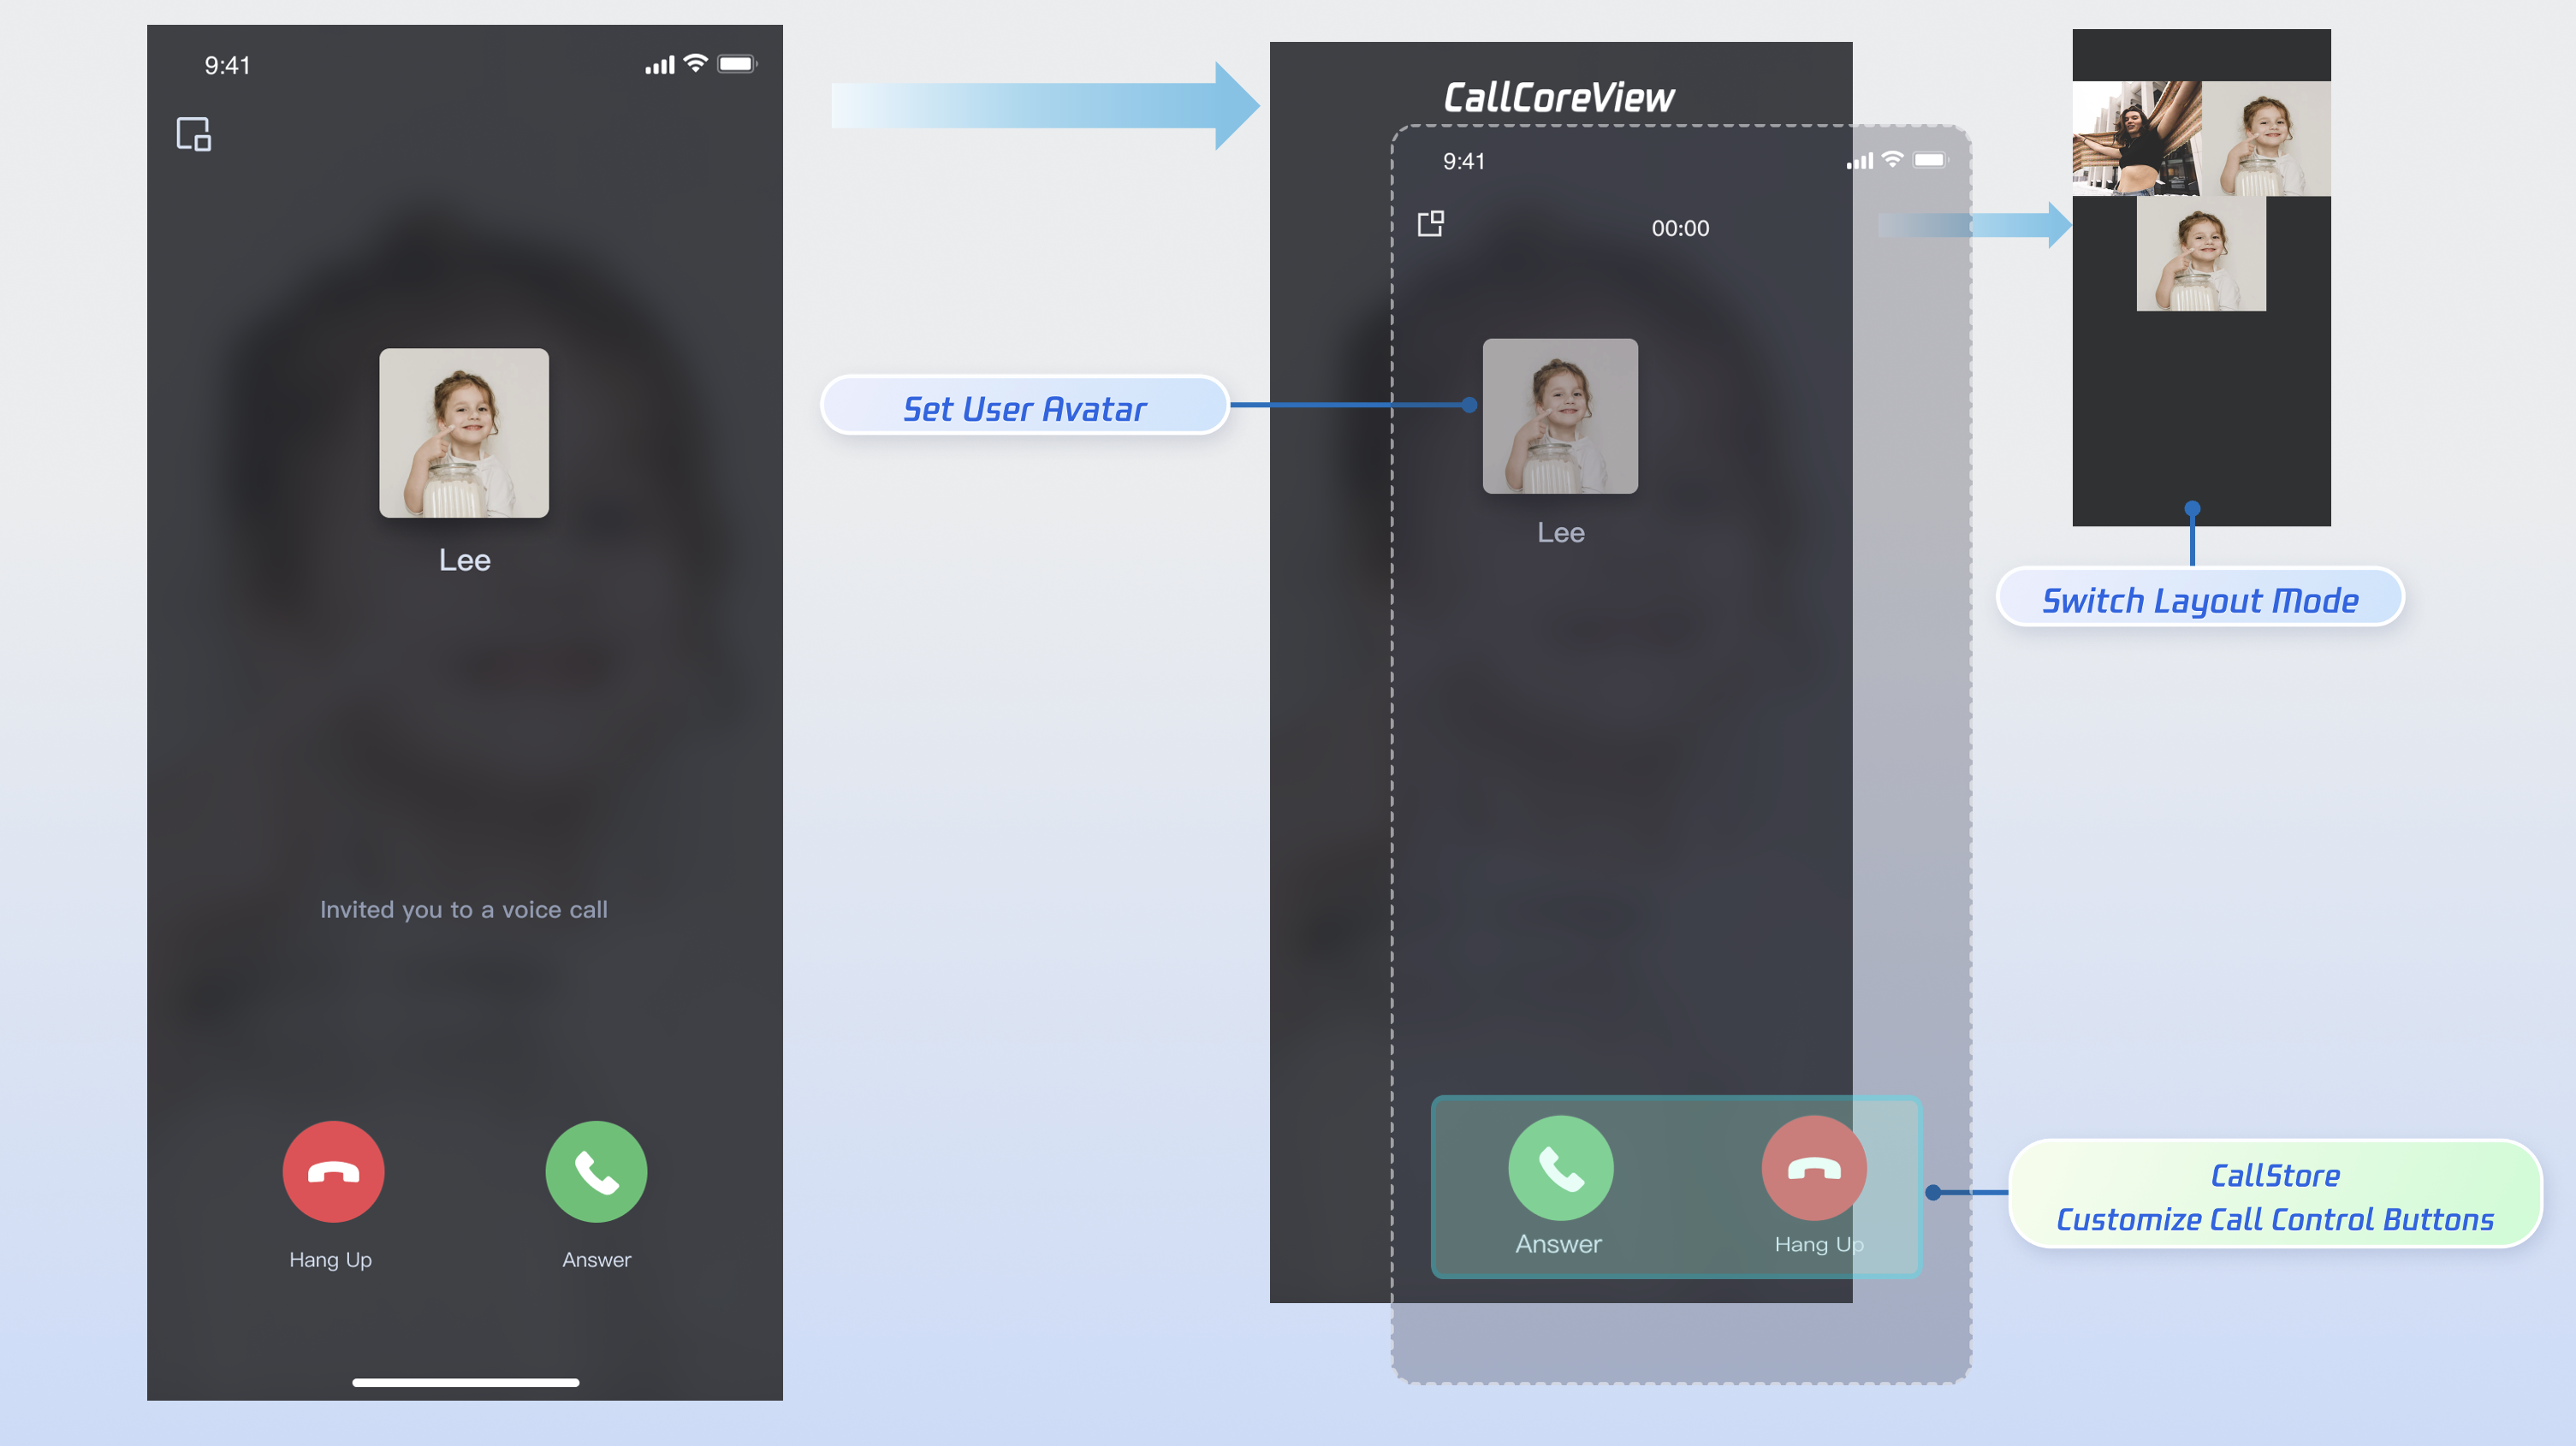
Step 1: Create Call Screen
You need a call screen that appears when a call is received.
1. Create the call screen: Implement a new UIViewController to serve as the call screen. This screen will be presented when an incoming call arrives.
2. Attach CallCoreView to the call screen: This core component observes CallStore data, renders video, and supports UI customization for layout, avatars, and icons. import UIKit
import AtomicXCore
class CallViewController: UIViewController {
override func viewDidLoad() {
super.viewDidLoad()
view.backgroundColor = .black
callCoreView = CallCoreView(frame: view.bounds)
callCoreView?.autoresizingMask = [.flexibleWidth, .flexibleHeight]
if let callCoreView = callCoreView {
view.addSubview(callCoreView)
}
}
}
CallCoreView Feature Overview:
|
| Switch between different layout modes. If not set, layout adapts automatically based on participant count. | |
| Set custom avatars for specific users by providing avatar resource paths. | |
Set volume indicator icon | Display custom volume indicator icons for different volume levels. | Customize volume indicator icon |
| Show network status icons based on real-time network quality. | Customize network status icon |
Set waiting animation for users | In multi-party calls, display a GIF animation for users in the waiting state. | Customize loading animation |
Step 2: Add Answer and Reject Controls
DeviceStore: Controls microphone (toggle/volume), camera (toggle/switch/quality), screen sharing, and monitors real-time device status. Bind these methods to button actions and update the UI in real time by listening for device status changes.
CallStore: Provides core call controls such as answer, hang up, and reject. Bind these methods to button actions and listen for call status changes to keep the UI in sync with the call state.
Icon resources: Download button icons from GitHub. These icons are designed for TUICallKit, copyright-free, and safe to use. Sample implementation for adding Answer and Reject buttons:
1.1 Add Answer and Reject Buttons: Add "Answer" and "Reject" buttons, and bind their actions to the accept and reject methods. import UIKit
import AtomicXCore
class CallViewController: UIViewController {
private var buttonReject: UIButton?
private var buttonAccept: UIButton?
override func viewDidLoad() {
super.viewDidLoad()
view.backgroundColor = .black
addControlButtons()
}
private func addControlButtons() {
let buttonWidth: CGFloat = 80
let buttonHeight: CGFloat = 80
let spacing: CGFloat = 60
let bottomMargin: CGFloat = 100
let totalWidth = buttonWidth * 2 + spacing
let startX = (view.bounds.width - totalWidth) / 2
let buttonY = view.bounds.height - bottomMargin - buttonHeight
buttonAccept = createButton(
frame: CGRect(x: startX, y: buttonY, width: buttonWidth, height: buttonHeight),
title: "Answer",
backgroundColor: .systemGreen
)
buttonAccept?.addTarget(self, action: #selector(touchAcceptButton), for: .touchUpInside)
view.addSubview(buttonAccept!)
buttonReject = createButton(
frame: CGRect(x: startX + buttonWidth + spacing, y: buttonY, width: buttonWidth, height: buttonHeight),
title: "Reject",
backgroundColor: .systemRed
)
buttonReject?.addTarget(self, action: #selector(touchRejectButton), for: .touchUpInside)
view.addSubview(buttonReject!)
}
@objc private func touchAcceptButton() {
CallStore.shared.accept(completion: nil)
}
@objc private func touchRejectButton() {
CallStore.shared.reject(completion: nil)
}
private func createButton(frame: CGRect, title: String, backgroundColor: UIColor) -> UIButton {
let button = UIButton(type: .system)
button.frame = frame
button.setTitle(title, for: .normal)
button.setTitleColor(.white, for: .normal)
button.backgroundColor = backgroundColor
button.layer.cornerRadius = frame.width / 2
button.titleLabel?.font = UIFont.systemFont(ofSize: 16)
return button
}
}
1.2 Close the call screen when the call ends: Whether the caller cancels or the callee rejects, the onCallEnded event is triggered. Listen for this event and close (dismiss) the call screen when the call ends.
import UIKit
import AtomicXCore
import Combine
class CallViewController: UIViewController {
private var cancellables = Set<AnyCancellable>()
override func viewDidLoad() {
super.viewDidLoad()
addListener()
}
private func addListener() {
CallStore.shared.callEventPublisher
.receive(on: DispatchQueue.main)
.sink { [weak self] event in
if case .onCallEnded = event {
self?.dismiss(animated: true)
}
}
.store(in: &cancellables)
}
}
Step 3: Request Audio/Video Permissions
Check audio and video permissions before connecting the call. If permissions are missing, prompt the user to grant them.
1. Declare permissions: Add the following entries to your Info.plist file with appropriate usage descriptions. These will be displayed when the system requests permissions.
<key>NSCameraUsageDescription</key>
<string>Camera access is required for video calls and group video calls.</string>
<key>NSMicrophoneUsageDescription</key>
<string>Microphone access is required for audio calls, group audio calls, video calls, and group video calls.</string>
2. Request permissions dynamically: Request audio/video permissions when an incoming call is received, or as needed by your business logic.
import AVFoundation
import UIKit
extension UIViewController {
func checkMicrophonePermission(completion: @escaping (Bool) -> Void) {
let status = AVCaptureDevice.authorizationStatus(for: .audio)
switch status {
case .authorized:
completion(true)
case .notDetermined:
AVCaptureDevice.requestAccess(for: .audio) { granted in
DispatchQueue.main.async {
completion(granted)
}
}
case .denied, .restricted:
completion(false)
@unknown default:
completion(false)
}
}
func checkCameraPermission(completion: @escaping (Bool) -> Void) {
let status = AVCaptureDevice.authorizationStatus(for: .video)
switch status {
case .authorized:
completion(true)
case .notDetermined:
AVCaptureDevice.requestAccess(for: .video) { granted in
DispatchQueue.main.async {
completion(granted)
}
}
case .denied, .restricted:
completion(false)
@unknown default:
completion(false)
}
}
func showPermissionAlert(message: String) {
let alert = UIAlertController(
title: "Permission Request",
message: message,
preferredStyle: .alert
)
alert.addAction(UIAlertAction(title: "Go to Settings", style: .default) { _ in
if let url = URL(string: UIApplication.openSettingsURLString) {
UIApplication.shared.open(url)
}
})
alert.addAction(UIAlertAction(title: "Cancel", style: .cancel))
present(alert, animated: true)
}
}
Step 4: Handle Incoming Call Notifications
Listen for the current user's call status and play a ringtone or vibration when a call is incoming. Stop the notification when the call is answered or ends.
1. Subscribe to user status: Subscribe to CallStore.shared.state.value.selfInfo to reactively monitor the current user's status.
2. Play/stop ringtone or vibration: If selfInfo.status is .waiting, play a ringtone or vibration. If the status changes to .accept, stop the notification.
import UIKit
import AtomicXCore
import Combine
import AVFoundation
class MainViewController: UIViewController {
private var audioPlayer: AVAudioPlayer?
private var cancellables = Set<AnyCancellable>()
override func viewDidLoad() {
super.viewDidLoad()
observeSelfStatus()
}
private func observeSelfStatus() {
CallStore.shared.state
.subscribe(StatePublisherSelector<CallState, CallParticipantStatus>(keyPath: \\.selfInfo.status))
.removeDuplicates()
.receive(on: DispatchQueue.main)
.sink { [weak self] status in
self?.handleRingtoneByStatus(status)
}
.store(in: &cancellables)
}
private func handleRingtoneByStatus(_ status: CallParticipantStatus) {
switch status {
case .waiting:
case .accept:
default:
}
}
}
When an incoming call arrives, determine the media type via the onCallReceived event. Enable the appropriate media devices when the call UI is displayed. 1. Listen for incoming call event: Subscribe to the onCallReceived event.
2. Enable devices based on media type: For audio calls, enable the microphone only. For video calls, enable both the microphone and camera.
import UIKit
import AtomicXCore
import Combine
class MainViewController: UIViewController {
private var cancellables = Set<AnyCancellable>()
override func viewDidLoad() {
super.viewDidLoad()
addListener()
}
private func addListener() {
CallStore.shared.callEventPublisher
.receive(on: DispatchQueue.main)
.sink { [weak self] event in
if case .onCallReceived(_, let mediaType, _) = event {
self?.openDeviceForMediaType(mediaType)
}
}
.store(in: &cancellables)
}
private func openDeviceForMediaType(_ mediaType: CallMediaType) {
DeviceStore.shared.openLocalMicrophone(completion: nil)
if mediaType == .video {
let isFront = true
DeviceStore.shared.openLocalCamera(isFront: isFront, completion: nil)
}
}
}
openLocalCamera API Parameters:
|
| | | Whether to use the front camera. - true: Front camera - false: Rear camera |
| | | Completion callback, returns the result of enabling the camera. If it fails, returns error code and message. |
openLocalMicrophone API Parameters:
|
| | | Completion callback, returns the result of enabling the microphone. If it fails, returns error code and message. |
Step 6: Present Call UI on Incoming Call
Listen for the onCallReceived event. When an incoming call is received, present the call screen. 1. Subscribe to the incoming call event: Listen for onCallReceived.
2. Present the call screen: Show the call UI when an incoming call is detected.
import UIKit
import AtomicXCore
import Combine
class MainViewController: UIViewController {
private var cancellables = Set<AnyCancellable>()
override func viewDidLoad() {
super.viewDidLoad()
addListener()
}
private func addListener() {
CallStore.shared.callEventPublisher
.receive(on: DispatchQueue.main)
.sink { [weak self] event in
if case .onCallReceived(_, _, _) = event {
let callVC = CallViewController()
callVC.modalPresentationStyle = .fullScreen
self?.present(callVC, animated: true)
}
}
.store(in: &cancellables)
}
}
onCallReceived Event Parameters:
|
| | Unique identifier for the call. |
| | Specifies whether the call is audio or video. CallMediaType.video: Video call
CallMediaType.audio: Audio call
|
Demo Effect
After completing the above 6 steps, your answer call feature will look like this:
Customize the Call UI
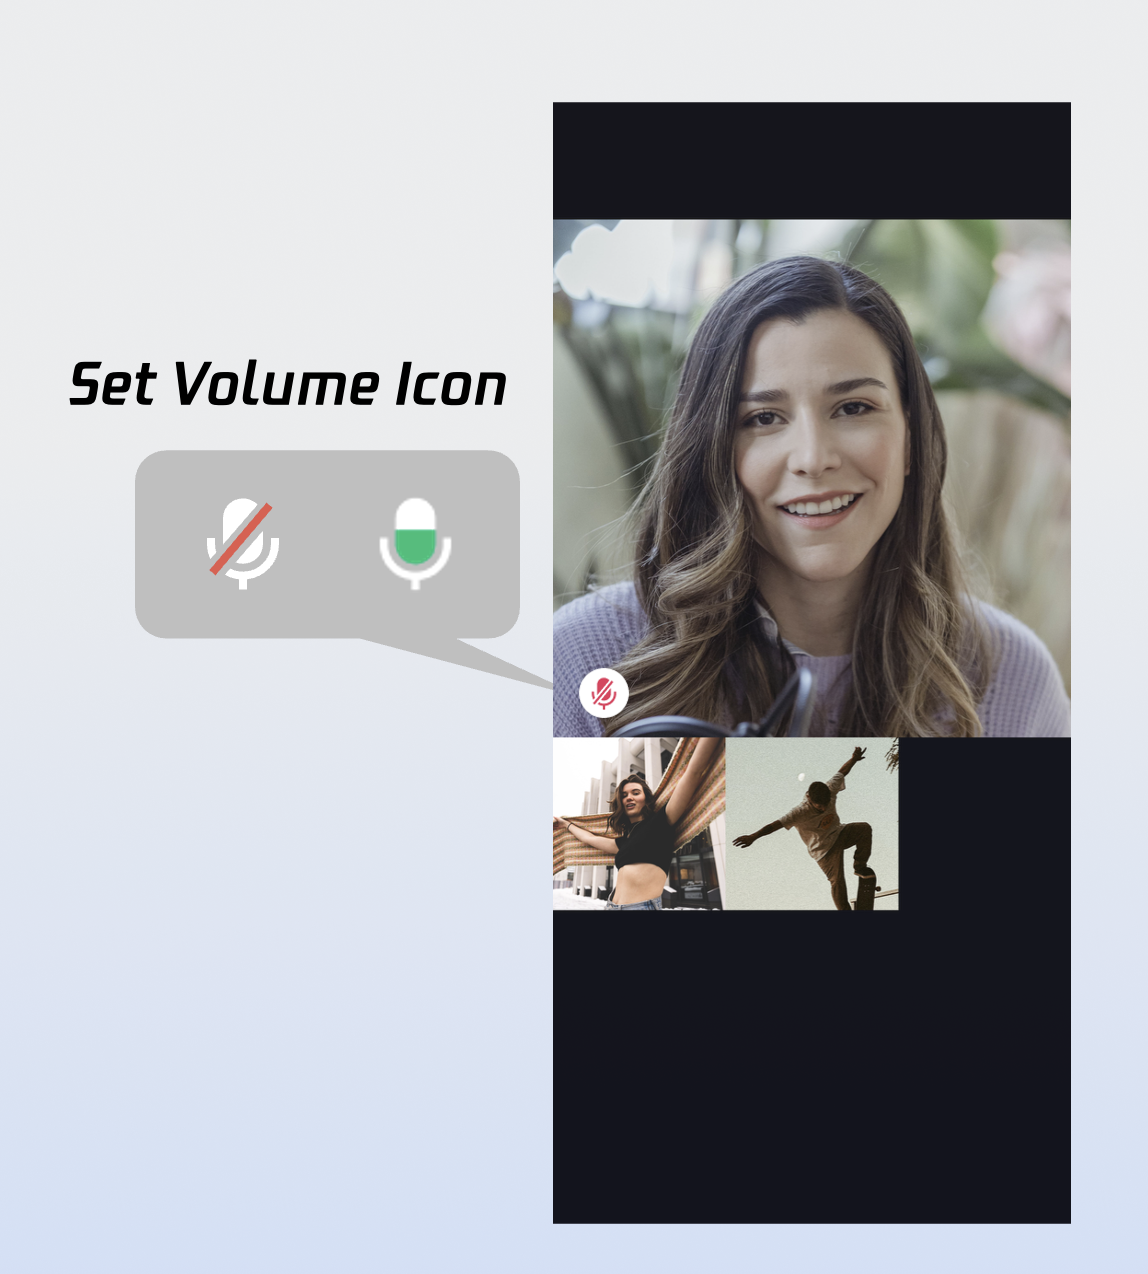
CallCoreView offers extensive UI customization, including support for custom avatars and volume indicator icons. To speed up your integration, you can download ready-to-use resources from GitHub. All resources are copyright-free. Custom Volume Indicator Icons
let volumeLevelIcons: [VolumeLevel: String] = [
.mute: "path to the corresponding icon resource"
]
callCoreView.setVolumeLevelIcons(icons: volumeLevelIcons)
setVolumeLevelIcons API Parameters:
|
| | | A dictionary mapping volume levels to icon resources. Key (VolumeLevel): VolumeLevel.mute: Microphone muted
VolumeLevel.low: Volume (0 ~ 25]
VolumeLevel.medium: Volume (25 ~ 50]
VolumeLevel.high: Volume (50 ~ 75]
VolumeLevel.peak: Volume (75 ~ 100]
Value (String): Path to the icon resource for each level. |
Volume Indicator Icons:
|
| Volume indicator icon. Recommended for VolumeLevel.low or VolumeLevel.medium. | |
| Mute icon. Recommended for VolumeLevel.mute. | |
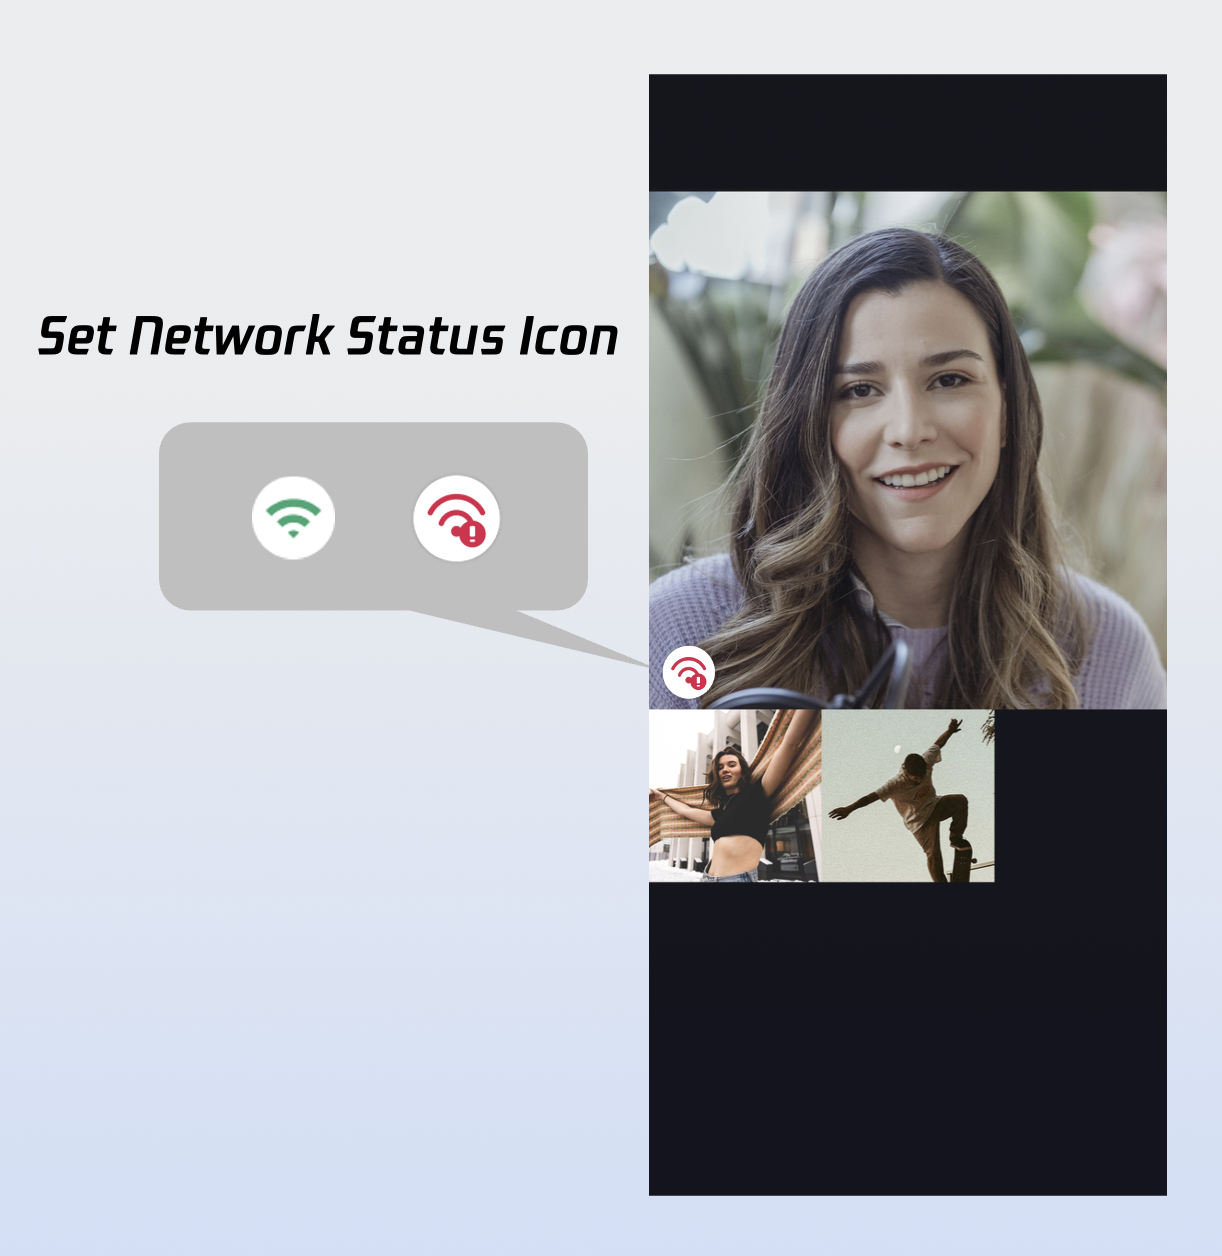
Custom Network Status Icons
let networkQualityIcons: [NetworkQuality: String] = [
.bad: "path to the corresponding icon"
]
callCoreView.setNetworkQualityIcons(icons: networkQualityIcons)
setNetworkQualityIcons API Parameters:
|
| | | Network Quality Icon Mapping Table. The dictionary structure is defined as follows: Key ( NetworkQuality ) : NetworkQuality NetworkQuality.unknown :Network status is undetermined.
NetworkQuality.excellent:Outstanding network connection.
NetworkQuality.good : Stable and good network connection.
NetworkQuality.poor : Weak network signal.
NetworkQuality.bad : Very weak or unstable network.
NetworkQuality.veryBad :Extremely poor network, near disconnection.
NetworkQuality.down :Network is disconnected.
Value ( String ) : The absolute path or resource name of the icon corresponding to each network status level. |
Poor Network Indicator Icon:
|
| Poor network indicator icon. Recommended for NetworkQuality.bad, NetworkQuality.veryBad, or NetworkQuality.down. | |
Custom Default Avatar
Use setParticipantAvatars to set user avatars. Listen to the allParticipants data to update avatars as needed. If an avatar is not set or fails to load, the default avatar is displayed.
var avatars: [String: String] = [:]
let userId = ""
let avatarPath = ""
avatars[userId] = avatarPath
callCoreView.setParticipantAvatars(avatars: avatars)
setParticipantAvatars API Parameters:
|
| | | A dictionary mapping userID to the absolute path of the user's avatar resource. |
Default Avatar Resource:
|
| Default avatar. Use as the fallback when a user's avatar fails to load or is not set. | |
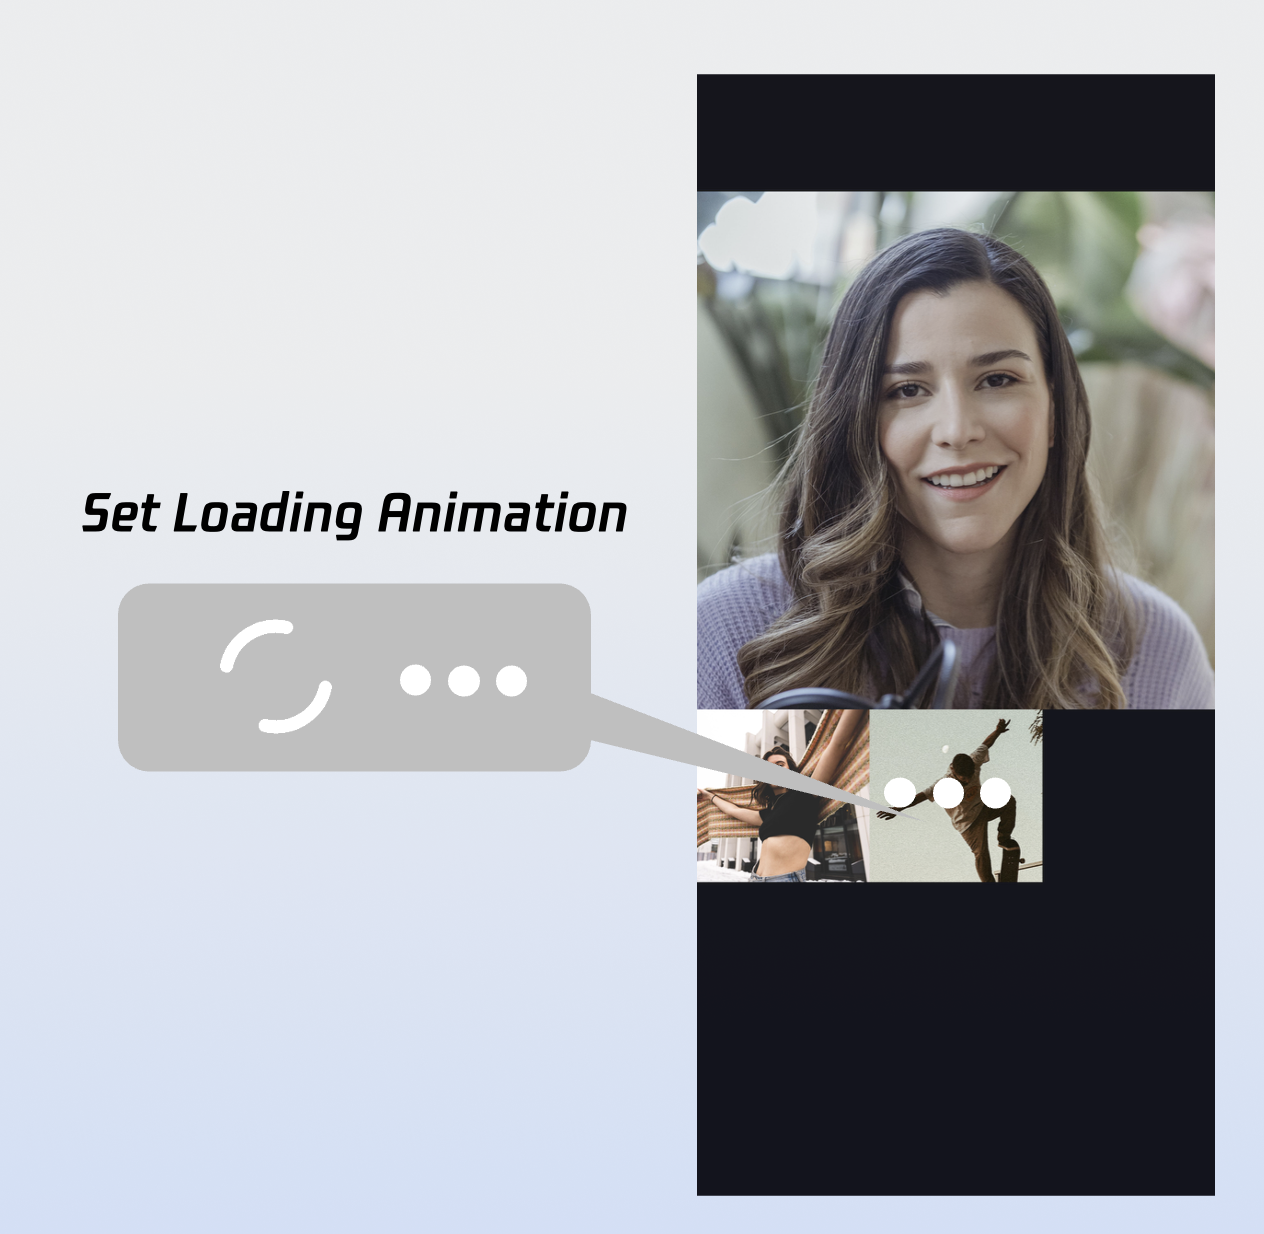
Custom Waiting Animation
let waitingAnimationPath = ""
callCoreView.setWaitingAnimation(path: waitingAnimationPath)
setWaitingAnimation API Parameters:
|
| | | Absolute path to the GIF animation resource. |
Waiting Animation:
|
| User waiting animation. Recommended for group calls; display when a user's status is waiting. | |
Add Call Timer
You can display the call duration in real time by subscribing to the activeCall field duration. 1. Subscribe to the active call: Listen to CallStore.observerState.activeCall for updates.
2. Bind duration to your UI: Bind activeCall.duration to your timer UI. This field is reactive and updates automatically; you do not need to manage a timer manually.
import UIKit
import AtomicXCore
import Combine
class TimerView: UILabel {
private var cancellables = Set<AnyCancellable>()
override init(frame: CGRect) {
super.init(frame: frame)
setupView()
}
required init?(coder: NSCoder) {
super.init(coder: coder)
setupView()
}
private func setupView() {
textColor = .white
textAlignment = .center
font = .systemFont(ofSize: 16)
}
override func didMoveToWindow() {
super.didMoveToWindow()
if window != nil {
registerActiveCallObserver()
} else {
cancellables.removeAll()
}
}
private func registerActiveCallObserver() {
CallStore.shared.state.subscribe()
.map { $0.activeCall }
.removeDuplicates { $0.duration == $1.duration }
.receive(on: DispatchQueue.main)
.sink { [weak self] activeCall in
self?.updateDurationView(activeCall: activeCall)
}
.store(in: &cancellables)
}
private func updateDurationView(activeCall: CallInfo) {
let currentDuration = activeCall.duration
let minutes = currentDuration / 60
let seconds = currentDuration % 60
text = String(format: "%02d:%02d", minutes, seconds)
}
}
Note:
For more reactive call status data, see CallState. More Features
Set User Avatar and Nickname
Before a call starts, set your own nickname and avatar using setSelfInfo. import AtomicXCore
var userProfile = UserProfile()
userProfile.userID = ""
userProfile.avatarURL = ""
userProfile.nickname = ""
LoginStore.shared.setSelfInfo(userProfile: userProfile) { result in
switch result {
case .success:
case .failure(let error):
}
}
setSelfInfo API Parameters:
|
| | | User info struct: userID: User ID
avatarURL: User avatar URL
nickname: User nickname
For more field details, please refer to the UserProfile class. |
| | | Completion callback, returns the result of the operation. |
Switch Layout Modes
CallCoreView supports three built-in layout modes. Use setLayoutTemplate to set the layout. If not set, CallCoreView will automatically use Float mode for 1v1 calls and Grid mode for multi-party calls. |
| | |
Layout: While waiting, display your own video full screen. After answering, show the remote video full screen and your own video as a floating window. Interaction: Drag the small window or tap to swap big/small video. | Layout: All participant videos are tiled in a grid. Best for 2+ participants. Tap to enlarge a video. Interaction: Tap a participant to enlarge their video. | Layout: In 1v1, remote video is fixed; in multi-party, the active speaker is shown full screen. Interaction: Shows your own video while waiting, displays call timer after answering. |
let callCoreView = CallCoreView(frame: view.bounds)
callCoreView.autoresizingMask = [.flexibleWidth, .flexibleHeight]
let template = CallLayoutTemplate.grid
callCoreView.setLayoutTemplate(template)
setLayoutTemplate API Parameters:
|
| | | CallCoreView's layout mode CallLayoutTemplate.float :
Layout: While waiting, display your own video full screen. After answering, show the remote video full screen and your own video as a floating window. Interaction: Drag the small window or tap to swap big/small video. CallLayoutTemplate.grid :
Layout: All participant videos are tiled in a grid. Best for 2+ participants. Tap to enlarge a video. Interaction: Tap a participant to enlarge their video. CallLayoutTemplate.pip :
Layout: In 1v1, remote video is fixed; in multi-party, the active speaker is shown full screen. Interaction: Shows your own video while waiting, displays call timer after answering. |
Implement In-App Floating Window
The AtomicXCore SDK provides a CallPipView component for in-app floating windows. If your call UI is covered by other pages (e.g., user presses back while a call is ongoing), a floating window can be shown so users can always see call status and quickly return to the call UI.
Step 1: Create the floating window controller.
import UIKit
import AtomicXCore
import Combine
class FloatWindowViewController: UIViewController {
var tapGestureAction: (() -> Void)?
private var cancellables = Set<AnyCancellable>()
private lazy var callCoreView: CallCoreView = {
let view = CallCoreView(frame: self.view.bounds)
view.autoresizingMask = [.flexibleWidth, .flexibleHeight]
view.setLayoutTemplate(.pip)
view.isUserInteractionEnabled = false
return view
}()
override func viewDidLoad() {
super.viewDidLoad()
view.backgroundColor = UIColor(white: 0.1, alpha: 1.0)
view.layer.cornerRadius = 10
view.layer.masksToBounds = true
view.addSubview(callCoreView)
let tapGesture = UITapGestureRecognizer(target: self, action: #selector(handleTap))
view.addGestureRecognizer(tapGesture)
DispatchQueue.main.asyncAfter(deadline: .now() + 1.0) { [weak self] in
self?.observeCallStatus()
}
}
@objc private func handleTap() {
tapGestureAction?()
}
private func observeCallStatus() {
CallStore.shared.state
.subscribe(StatePublisherSelector<CallState, CallParticipantStatus>(keyPath: \\.selfInfo.status))
.removeDuplicates()
.receive(on: DispatchQueue.main)
.sink { [weak self] status in
if status == .none {
NotificationCenter.default.post(name: NSNotification.Name("HideFloatingWindow"), object: nil)
}
}
.store(in: &cancellables)
}
deinit {
cancellables.removeAll()
}
}
Step 2: Add floating window management logic to your main UI.
import UIKit
import AtomicXCore
class MainViewController: UIViewController {
private var floatWindow: UIWindow?
override func viewDidLoad() {
super.viewDidLoad()
NotificationCenter.default.addObserver(
self,
selector: #selector(showFloatingWindow),
name: NSNotification.Name("ShowFloatingWindow"),
object: nil
)
NotificationCenter.default.addObserver(
self,
selector: #selector(hideFloatingWindow),
name: NSNotification.Name("HideFloatingWindow"),
object: nil
)
}
@objc private func showFloatingWindow() {
let selfStatus = CallStore.shared.state.value.selfInfo.status
guard selfStatus == .accept else {
return
}
guard floatWindow == nil else { return }
guard let windowScene = UIApplication.shared.connectedScenes.first as? UIWindowScene else {
return
}
let pipWidth: CGFloat = 100
let pipHeight: CGFloat = pipWidth * 16 / 9
let pipX = UIScreen.main.bounds.width - pipWidth - 20
let pipY: CGFloat = 100
let window = UIWindow(windowScene: windowScene)
window.windowLevel = .alert + 1
window.backgroundColor = .clear
window.frame = CGRect(x: pipX, y: pipY, width: pipWidth, height: pipHeight)
let floatVC = FloatWindowViewController()
floatVC.tapGestureAction = { [weak self] in
self?.openCallViewController()
}
window.rootViewController = floatVC
self.floatWindow = window
window.isHidden = false
window.makeKeyAndVisible()
if let mainWindow = windowScene.windows.first(where: { $0 != window }) {
mainWindow.makeKey()
}
}
@objc private func hideFloatingWindow() {
floatWindow?.isHidden = true
floatWindow = nil
}
private func openCallViewController() {
hideFloatingWindow()
guard let topVC = getTopViewController() else {
return
}
let callVC = CallViewController()
callVC.modalPresentationStyle = .fullScreen
topVC.present(callVC, animated: true)
}
private func getTopViewController() -> UIViewController? {
guard let windowScene = UIApplication.shared.connectedScenes.first as? UIWindowScene,
let keyWindow = windowScene.windows.first(where: { $0.isKeyWindow }),
let rootVC = keyWindow.rootViewController else {
return nil
}
var topVC = rootVC
while let presentedVC = topVC.presentedViewController {
topVC = presentedVC
}
return topVC
}
deinit {
NotificationCenter.default.removeObserver(self)
}
}
Step 3: Add floating window trigger logic in the call UI.
import UIKit
import AtomicXCore
class CallViewController: UIViewController {
override func viewWillAppear(_ animated: Bool) {
super.viewWillAppear(animated)
NotificationCenter.default.post(name: NSNotification.Name("HideFloatingWindow"), object: nil)
}
override func viewWillDisappear(_ animated: Bool) {
super.viewWillDisappear(animated)
let selfStatus = CallStore.shared.state.value.selfInfo.status
if selfStatus == .accept {
NotificationCenter.default.post(name: NSNotification.Name("ShowFloatingWindow"), object: nil)
}
}
}
Implement System Picture-in-Picture (PiP)
AtomicXCore SDK supports system PiP via the underlying TRTC engine. When the app goes to the background, the call video can float as a system PiP window above other apps, allowing users to continue video calls while multitasking.
Note:
1. Add the Background Modes capability in Xcode's Signing & Capabilities and enable Audio, AirPlay, and Picture in Picture.
2. Requires iOS 15.0 or later.
1. Configure PiP parameters: Set fill mode, user video regions, canvas parameters, etc.
import AtomicXCore
enum PictureInPictureFillMode: Int, Codable {
case fill = 0
case fit = 1
}
struct PictureInPictureRegion: Codable {
let userId: String
let width: Double
let height: Double
let x: Double
let y: Double
let fillMode: PictureInPictureFillMode
let streamType: String
let backgroundColor: String
}
struct PictureInPictureCanvas: Codable {
let width: Int
let height: Int
let backgroundColor: String
}
struct PictureInPictureParams: Codable {
let enable: Bool
let cameraBackgroundCapture: Bool?
let canvas: PictureInPictureCanvas?
let regions: [PictureInPictureRegion]?
}
struct PictureInPictureRequest: Codable {
let api: String
let params: PictureInPictureParams
}
2. Enable PiP: Use configPictureInPicture to enable or disable PiP.
let params = PictureInPictureParams(
enable: true,
cameraBackgroundCapture: true,
canvas: nil,
regions: nil
)
let request = PictureInPictureRequest(
api: "configPictureInPicture",
params: params
)
let encoder = JSONEncoder()
if let data = try? encoder.encode(request),
let jsonString = String(data: data, encoding: .utf8) {
TUICallEngine.createInstance().callExperimentalAPI(jsonObject: jsonString)
}
Keep Screen Awake During Calls
To prevent the screen from sleeping during a call, set UIApplication.shared.isIdleTimerDisabled = true when the call UI appears, and restore it when the UI disappears.
class CallViewController: UIViewController {
override func viewDidLoad() {
super.viewDidLoad()
UIApplication.shared.isIdleTimerDisabled = true
}
override func viewWillDisappear(_ animated: Bool) {
super.viewWillDisappear(animated)
UIApplication.shared.isIdleTimerDisabled = false
}
}
Background Audio/Video Capture Issues
To allow your app to capture audio and video in the background (e.g., when locked or switched to another app), you must:
1. Configure iOS background modes: In Xcode, open your project, select your target, go to Signing & Capabilities, add Background Modes, and enable:
Audio, AirPlay, and Picture in Picture
Voice over IP
Remote notifications (optional, for offline push)
Your Info.plist will include:
<key>UIBackgroundModes</key>
<array>
<string>audio</string>
<string>voip</string>
<string>remote-notification</string>
</array>
2. Configure AVAudioSession: Set up the audio session before the call starts (e.g., in the call UI's viewDidLoad or before making/answering a call).
import AVFoundation
private func setupAudioSession() {
let audioSession = AVAudioSession.sharedInstance()
do {
try audioSession.setCategory(.playAndRecord, options: [.allowBluetooth, .allowBluetoothA2DP])
try audioSession.setActive(true)
} catch {
}
}
3. Special handling for ringtone playback (optional): To play the ringtone through the speaker, temporarily switch the audio session to .playback mode.
private func setAudioSessionForRingtone() {
let audioSession = AVAudioSession.sharedInstance()
do {
try audioSession.setCategory(.playback, options: [.allowBluetooth, .allowBluetoothA2DP])
try audioSession.overrideOutputAudioPort(.speaker)
try audioSession.setActive(true)
} catch {
}
}
private func restoreAudioSessionForCall() {
let audioSession = AVAudioSession.sharedInstance()
do {
try audioSession.setCategory(.playAndRecord, options: [.allowBluetooth, .allowBluetoothA2DP])
try audioSession.setActive(true)
} catch {
}
}
Next Steps
Congratulations! You have implemented the answer call feature. Next, see Making Your First Call to add call initiation to your app. FAQs
If the callee is offline and comes online within the call invitation timeout, will they receive the incoming call event?
For one-on-one calls, if the callee comes online within the timeout, they will receive the incoming call invitation. For group calls, if the callee comes online within the timeout, up to 20 unprocessed group messages will be retrieved, and if there is a call invitation, the incoming call event will be triggered.