tencent cloud

Tencent Real-Time Communication

Release Notes and Announcements
Release Notes
Recent Product Announcement
TRTC Live (TUILiveKit) Product Launch Announcement
TRTC Conference Official Editions Launched
The commercial version of Conference is coming soon
Terms and Conditions Applicable to $9.9 Starter Package
Rules for the "First Subscription $100 Discount" Promotion
Announcement on the Start of Beta Testing for Multi-person Audio and Video Conference
TRTC Call Official Editions Launched
License Required for Video Playback in New Version of LiteAV SDK
TRTC to Offer Monthly Packages
Product Introduction
Overview
Concepts
Features
Strengths
Use Cases
Performance Statistics
Tencent RTC Quickplay: Experience Ultimate Real-Time Audio and Video Interaction!
Purchase Guide
Billing Overview
Free Minutes
Monthly subscription
Pay-as-you-go
TRTC Overdue and Suspension Policy
FAQs
Refund Instructions
User Tutorial
Free Demo
Call
Overview
Activate the Service
Run Demo
Integration
Offline Call Push
Conversational Chat
On-Cloud Recording
AI Noise Reduction
UI Customization
Calls integration to Chat
Additional Features
No UI Integration
Server APIs
Client APIs
Solution
ErrorCode
Release Notes
FAQs
Conference
Overview(TUIRoomKit)
Activate the Service (TUIRoomKit)
Run Demo(TUIRoomKit)
Integration(TUIRoomKit)
Screen Sharing (TUIRoomKit)
Schedule a meeting (TUIRoomKit)
In-meeting Call (TUIRoomKit)
UI Customization(TUIRoomKit)
Virtual Background (TUIRoomKit)
Conference Control (TUIRoomKit)
Cloud Recording (TUIRoomKit)
AI Noise Reduction (TUIRoomKit)
In-Conference Chat (TUIRoomKit)
Robot Streaming (TUIRoomKit)
Enhanced Features (TUIRoomKit)
Client APIs (TUIRoomKit)
Server APIs (TUIRoomKit)
FAQs (TUIRoomKit)
Error Code (TUIRoomKit)
SDK Update Log (TUIRoomKit)
Live
Billing of Video Live Component
Overview
Activating the Service (TUILiveKit)
Run Demo
No UI Integration
UI Customization
Live Broadcast Monitoring
Video Live Streaming
Voice Chat Room
Advanced Features
Client APIs
Server APIs
Error Codes
Release Notes
FAQs
RTC Engine
Activate Service
SDK Download
API Examples
Usage Guidelines
API Reference Manual
Advanced Features
AI Integration
Overview
Configure MCP Server
Install Skills
Integration Guide
FAQ
RTC RESTFUL API
History
Introduction
API Category
Room Management APIs
Stream mixing and relay APIs
On-cloud recording APIs
Data Monitoring APIs
Pull stream Relay Related interface
Web Record APIs
AI Service APIs
Cloud Slicing APIs
Cloud Moderation APIs
Making API Requests
Call Quality Monitoring APIs
Usage Statistics APIs
Data Types
Appendix
Error Codes
Console Guide
Application Management
Package Management
Usage Statistics
Monitoring Dashboard
Development Assistance
Solution
Real-Time Chorus
FAQs
Migration Guide
Billing
Features
UserSig
Firewall Restrictions
How to Downsize Installation Package
Android and iOS
Web
Flutter
Electron
TRTCCalling for Web
Audio and Video Quality
Others
Legacy Documentation
RTC RoomEngine SDK(Old)
Integrating TUIRoom (Web)
Integrating TUIRoom (Android)
Integrating TUIRoom (iOS)
Integrating TUIRoom (Flutter)
Integrating TUIRoom (Electron)
TUIRoom APIs
On-Cloud Recording and Playback (Old)
RTC Analytics Monthly Packages (Previous Version)
Protocols and Policies
Compliance
Security White Paper
Notes on Information Security
Service Level Agreement
Apple Privacy Policy: PrivacyInfo.xcprivacy
TRTC Policy
Privacy Policy
Data Processing And Security Agreement
Glossary

Sound Effects (Flutter)

PDF
Focus Mode
Font Size
Last updated: 2026-02-27 20:58:07
This guide shows you how to use the AudioEffectStore and DeviceStore modules from the AtomicXCore framework to quickly add audio effect controls to your live streaming app. With these modules, you can implement features like microphone volume adjustment, in-ear monitoring, and a range of engaging voice changer and reverb effects.


Core Features

By integrating AudioEffectStore and DeviceStore, you can enable the following features in your live streaming app:
Microphone Volume Control: Adjust the local capture volume to control how loud the host sounds to the audience.
In-Ear Monitor: Let hosts or guests hear their own voice in real time through headphones for monitoring and pronunciation correction.
Voice Changer Effects: Provide multiple voice changer options, such as Child, Girl, Uncle, and more.
Reverb Effects: Simulate various acoustic environments, including KTV, metallic, deep, bright, and others.

Concept Overview

Core Concept
Type
Key Responsibilities & Description
class
Tracks the current state of the audio effects module, typically for UI rendering. Includes voice changer status, reverb status, in-ear monitor enabled status, and in-ear monitor volume. All properties are ValueListenable and support state change subscriptions.
class
Singleton data manager for the audio effects module. Use this to call audio effect APIs. After you call an API, the relevant audioEffectState property updates automatically; subscribe to this reactive state for real-time updates.
class
Tracks the current state of the device module, typically for UI rendering. Key properties include camera and microphone device status, capture volume, and more. All properties are ValueListenable and support state change subscriptions.
class
Singleton data manager for the device module. Use this to control camera and microphone APIs. After you call an API, the relevant state property updates automatically; subscribe to this reactive state for real-time updates.

Implementation Steps

Step 1: Integrate the Component

Live streaming: Refer to Quick Integration to integrate AtomicXCore and complete service access.
Voice chat room: Refer to Quick Integration to integrate AtomicXCore and complete service access.

Step 2: Obtain a Store Instance

Both AudioEffectStore and DeviceStore are singletons. You can access their instances anywhere in your project using the shared property. For a full implementation example, refer to the audio_effect_panel_widget.dart file in the TUILiveKit open-source UI demo project.
import 'package:flutter/material.dart';
import 'package:atomic_x_core/atomicxcore.dart';

class _AudioEffectPanelWidgetState {
final _audioEffectStore = AudioEffectStore.shared;
final _deviceStore = DeviceStore.shared;
}

Step 3: Implement the In-Ear Monitor

In-ear monitor allows users to hear their own microphone input in real time. You can manage this feature using the APIs described below.
Note:
The in-ear monitoring feature typically needs to connect to headphones to work properly.
1. Enable/Disable Ear Monitoring: Use a Switch widget to enable or disable in-ear monitor.
2. Set the Volume of IEMs: Use a Slider widget to set the volume. Map the slider value to the volume parameter and call setVoiceEarMonitorVolume(volume). The valid range is [0, 150], so map your UI control's value (e.g., slider 0.0 - 1.0) to 0 - 150.
3. Listen for Status Updates to Update UI: Listen for real-time in-ear monitor state changes to update your UI accordingly.

Sample Code

import 'package:flutter/material.dart';
import 'package:atomic_x_core/atomicxcore.dart';

/// Ear Monitoring Control Component
class EarMonitorWidget extends StatelessWidget {
const EarMonitorWidget({super.key});

@override
Widget build(BuildContext context) {
final audioEffectStore = AudioEffectStore.shared;

return Column(
crossAxisAlignment: CrossAxisAlignment.start,
children: [
// 1. Toggle ear monitoring
ValueListenableBuilder<bool>(
valueListenable: audioEffectStore.audioEffectState.isEarMonitorOpened,
builder: (context, isOpened, child) {
return SwitchListTile(
title: const Text('Ear Monitoring'),
subtitle: const Text('Insert a headset')
value: isOpened,
onChanged: (value) {
audioEffectStore.setVoiceEarMonitorEnable(value);
},
);
},
),
// 2. Adjust ear return volume
ValueListenableBuilder<int>(
valueListenable: audioEffectStore.audioEffectState.earMonitorVolume,
builder: (context, volume, child) {
return ListTile(
title: const Text('Ear Monitoring Volume'),
subtitle: Slider(
value: volume.toDouble(),
min: 0,
max: 150,
divisions: 150,
onChanged: (value) {
audioEffectStore.setVoiceEarMonitorVolume(value.toInt());
},
),
trailing: Text('$volume'),
);
},
),
],
);
}
}

SetVoiceEarMonitorEnable API Parameters

Parameter Name
Type
Description
enable
bool
Enable in-ear monitor:
true: Enable.
false: Disable.

SetVoiceEarMonitorVolume API Parameters

Parameter Name
Type
Description
volume
int
Ear return volume.
Value ranges from 0 to 150.
Default value: 100.

Step 4: Adjust Microphone Volume

To control the host's microphone capture volume, call DeviceStore.setCaptureVolume(volume) with your desired value.
1. Set Capturing Volume: You can use the Slider control to drag the slider left and right to adjust volume, and map the Slider value to the volume value before calling setCaptureVolume(volume). Please note, this API accepts a parameter range of [0, 150], so you need to map the UI control value (such as the Slider's 0.0 - 1.0) to the 0 - 150 range.
2. Subscribe to State Updates: Listen for real-time capture volume changes to update your UI.

Sample Code

import 'package:flutter/material.dart';
import 'package:atomic_x_core/atomicxcore.dart';

/// Voice Volume Control Component
class CaptureVolumeWidget extends StatelessWidget {
const CaptureVolumeWidget({super.key});

@override
Widget build(BuildContext context) {
final deviceStore = DeviceStore.shared;

return ValueListenableBuilder<int>(
valueListenable: deviceStore.state.captureVolume,
builder: (context, volume, child) {
return ListTile(
title: const Text('Voice Volume'),
subtitle: Slider(
value: volume.toDouble(),
min: 0,
max: 150,
divisions: 150,
onChanged: (value) {
deviceStore.setCaptureVolume(value.toInt());
},
),
trailing: Text('$volume'),
);
},
);
}
}

SetCaptureVolume API Parameters

Parameter Name
Type
Description
volume
int
Capture volume size.
Value ranges from 0 to 150.
Default value: 100.

Step 5: Apply Voice Changer Effects

To change the host's voice, call setAudioChangerType(type) and pass the desired enum value.

Sample Code

import 'package:flutter/material.dart';
import 'package:atomic_x_core/atomicxcore.dart';

/// Voice changing effect selection component
class VoiceChangerWidget extends StatelessWidget {
const VoiceChangerWidget({super.key});

@override
Widget build(BuildContext context) {
final audioEffectStore = AudioEffectStore.shared;

return Column(
crossAxisAlignment: CrossAxisAlignment.start,
children: [
const Padding(
padding: EdgeInsets.all(16),
child: Text('Voice-changing effect', style: TextStyle(fontSize: 18, fontWeight: FontWeight.bold)),
),
ValueListenableBuilder<AudioChangerType>(
valueListenable: audioEffectStore.audioEffectState.audioChangerType,
builder: (context, changerType, child) {
return Padding(
padding: const EdgeInsets.symmetric(horizontal: 16),
child: Wrap(
spacing: 8,
runSpacing: 8,
children: AudioChangerType.values.map((type) {
return ChoiceChip(
label: Text(_getChangerTypeName(type)),
selected: changerType == type,
onSelected: (selected) {
if (selected) {
audioEffectStore.setAudioChangerType(type);
}
},
);
}).toList(),
),
);
},
),
],
);
}

String _getChangerTypeName(AudioChangerType type) {
switch (type) {
case AudioChangerType.none:
return 'Disable';
case AudioChangerType.child:
return 'mischievous child';
case AudioChangerType.girl:
return 'loli';
case AudioChangerType.uncle:
return 'uncle';
case AudioChangerType.ethereal:
return 'ethereal';
}
}
}

SetAudioChangerType API Parameters

Parameter Name
Type
Description
type
Voice-changing effects enumeration.

Step 6: Apply Reverb Effects

To add reverb effects to the host's voice, call setAudioReverbType(type) and pass the desired enum value.

Sample Code

import 'package:flutter/material.dart';
import 'package:atomic_x_core/atomicxcore.dart';

/// Reverb effect selection component
class ReverbWidget extends StatelessWidget {
const ReverbWidget({super.key});

@override
Widget build(BuildContext context) {
final audioEffectStore = AudioEffectStore.shared;

return Column(
crossAxisAlignment: CrossAxisAlignment.start,
children: [
const Padding(
padding: EdgeInsets.all(16),
child: Text('Reverb effect', style: TextStyle(fontSize: 18, fontWeight: FontWeight.bold)),
),
ValueListenableBuilder<AudioReverbType>(
valueListenable: audioEffectStore.audioEffectState.audioReverbType,
builder: (context, reverbType, child) {
return Padding(
padding: const EdgeInsets.symmetric(horizontal: 16),
child: Wrap(
spacing: 8,
runSpacing: 8,
children: AudioReverbType.values.map((type) {
return ChoiceChip(
label: Text(_getReverbTypeName(type)),
selected: reverbType == type,
onSelected: (selected) {
if (selected) {
audioEffectStore.setAudioReverbType(type);
}
},
);
}).toList(),
),
);
},
),
],
);
}

String _getReverbTypeName(AudioReverbType type) {
switch (type) {
case AudioReverbType.none:
return 'Disable';
case AudioReverbType.ktv:
return 'KTV';
case AudioReverbType.room:
return 'Small room';
case AudioReverbType.hall:
return 'Great hall';
case AudioReverbType.deep:
return 'deep';
case AudioReverbType.loud:
return 'resonant';
case AudioReverbType.metallic:
return 'metallic sound';
case AudioReverbType.magnetic:
return 'magnetic';
case AudioReverbType.recordingStudio:
return 'studio';
}
}
}

SetAudioReverbType API Parameters

Parameter Name
Type
Description
type
Reverb effects enumeration.

Step 7: Reset Sound Effect Settings

Important:
AudioEffectStore and DeviceStore are singletons, so audio effects and device settings take effect globally. If you do not want the settings of the current live streaming room to affect other live streaming rooms created later, you need to reset the audio effects and device settings when the current live streaming room ends.
You may need to reset sound effect settings in the following two scenarios:
1. When the current live streaming room ends, call the store's reset() method to reset sound effects.
2. When you need to reset all devices and sound effect settings, call the store's reset() method to reset sound effects.
import 'package:flutter/material.dart';
import 'package:atomic_x_core/atomicxcore.dart';

/// Sound effect reset component
class AudioEffectResetWidget extends StatelessWidget {
const AudioEffectResetWidget({super.key});

void _resetAudioEffect() {
AudioEffectStore.shared.reset();
DeviceStore.shared.reset();
}

@override
Widget build(BuildContext context) {
return ElevatedButton(
onPressed: _resetAudioEffect,
child: const Text('Reset sound effect settings'),
);
}
}

Complete Sample Code

import 'package:flutter/material.dart';
import 'package:atomic_x_core/atomicxcore.dart';

/// Sound effect settings page
class AudioEffectPage extends StatelessWidget {
const AudioEffectPage({super.key});

@override
Widget build(BuildContext context) {
final audioEffectStore = AudioEffectStore.shared;
final deviceStore = DeviceStore.shared;

return Scaffold(
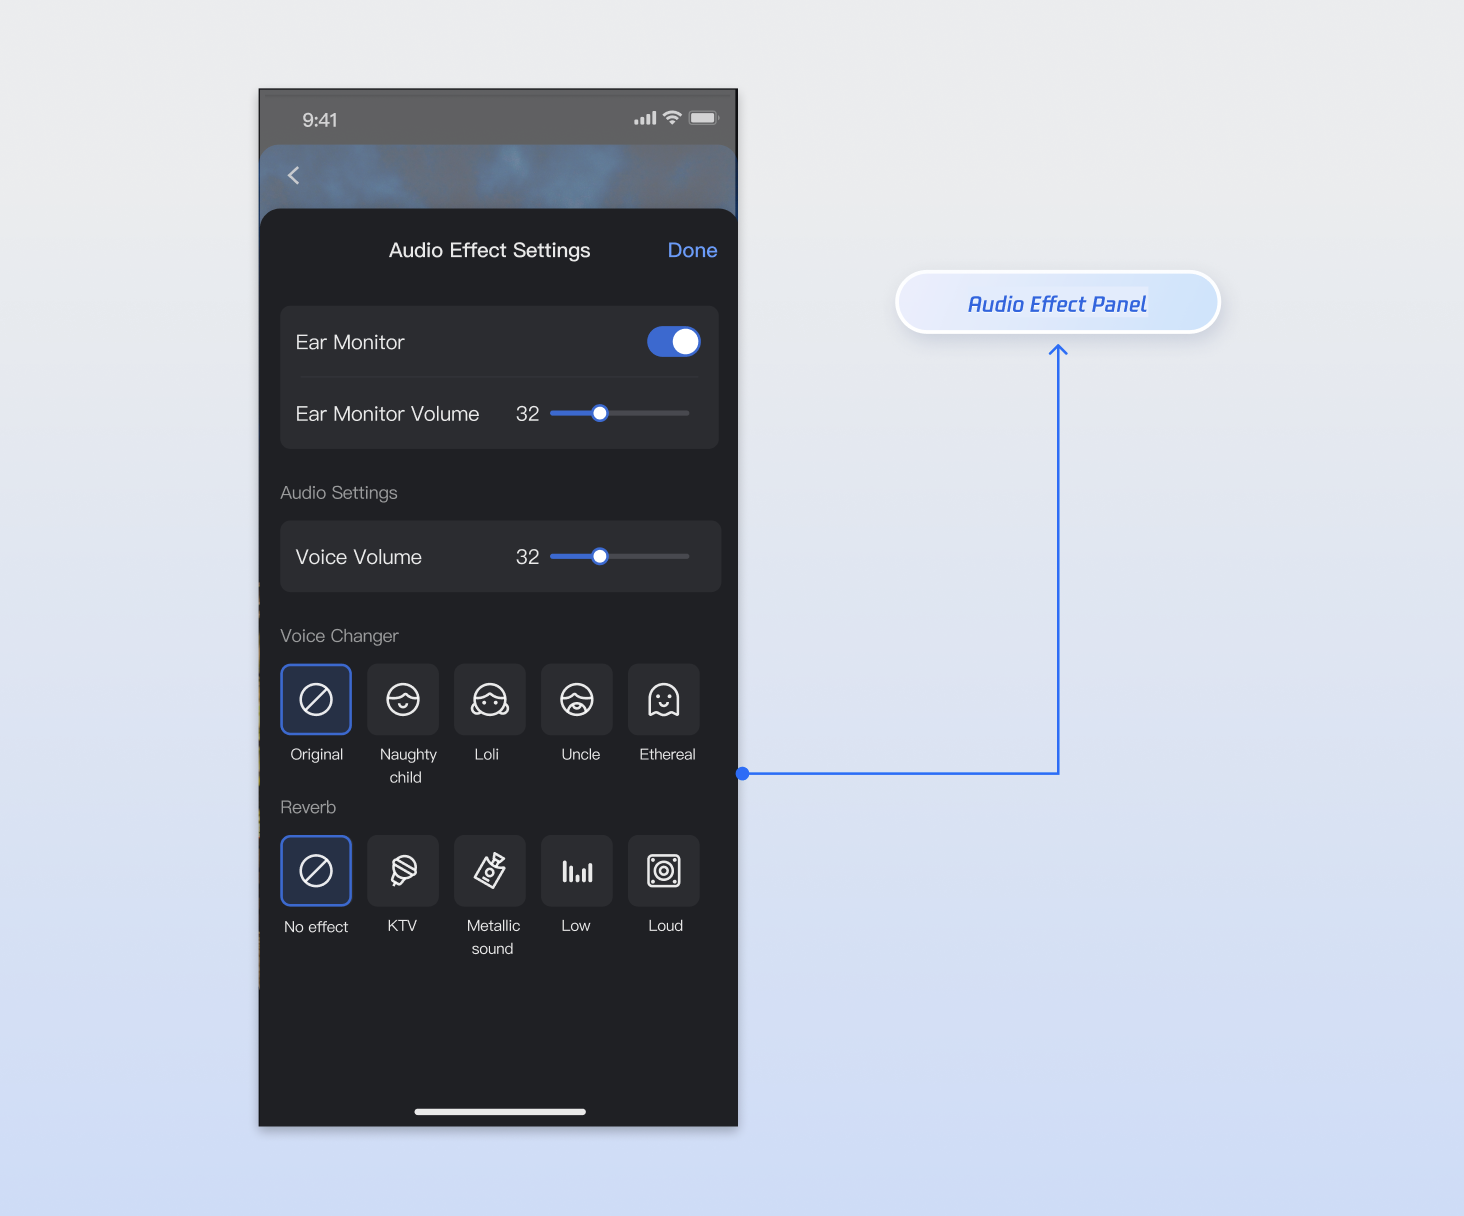
appBar: AppBar(title: const Text('Sound effect settings')),
body: ListView(
children: [
// Voice volume
const Padding(
padding: EdgeInsets.all(16),
child: Text('Voice volume', style: TextStyle(fontSize: 18, fontWeight: FontWeight.bold)),
),
ValueListenableBuilder<int>(
valueListenable: deviceStore.state.captureVolume,
builder: (context, volume, child) {
return ListTile(
title: const Text('Capture Volume'),
subtitle: Slider(
value: volume.toDouble(),
min: 0,
max: 150,
divisions: 150,
onChanged: (value) {
deviceStore.setCaptureVolume(value.toInt());
},
),
trailing: Text('$volume'),
);
},
),
const Divider(),

// Ear return settings
const Padding(
padding: EdgeInsets.all(16),
child: Text('Ear monitoring', style: TextStyle(fontSize: 18, fontWeight: FontWeight.bold)),
),
ValueListenableBuilder<bool>(
valueListenable: audioEffectStore.audioEffectState.isEarMonitorOpened,
builder: (context, isOpened, child) {
return SwitchListTile(
title: const Text('Enable Ear Monitoring'),
subtitle: const Text('Insert a headset')
value: isOpened,
onChanged: (value) {
audioEffectStore.setVoiceEarMonitorEnable(value);
},
);
},
),
ValueListenableBuilder<int>(
valueListenable: audioEffectStore.audioEffectState.earMonitorVolume,
builder: (context, volume, child) {
return ListTile(
title: const Text('Ear Monitoring Volume'),
subtitle: Slider(
value: volume.toDouble(),
min: 0,
max: 150,
divisions: 150,
onChanged: (value) {
audioEffectStore.setVoiceEarMonitorVolume(value.toInt());
},
),
trailing: Text('$volume'),
);
},
),
const Divider(),

// Voice changing settings
const Padding(
padding: EdgeInsets.all(16),
child: Text('Voice-changing', style: TextStyle(fontSize: 18, fontWeight: FontWeight.bold)),
),
ValueListenableBuilder<AudioChangerType>(
valueListenable: audioEffectStore.audioEffectState.audioChangerType,
builder: (context, changerType, child) {
return Padding(
padding: const EdgeInsets.symmetric(horizontal: 16),
child: Wrap(
spacing: 8,
runSpacing: 8,
children: AudioChangerType.values.map((type) {
return ChoiceChip(
label: Text(_getChangerTypeName(type)),
selected: changerType == type,
onSelected: (selected) {
if (selected) {
audioEffectStore.setAudioChangerType(type);
}
},
);
}).toList(),
),
);
},
),
const SizedBox(height: 16),
const Divider(),

// Reverb settings
const Padding(
padding: EdgeInsets.all(16),
child: Text('Reverb', style: TextStyle(fontSize: 18, fontWeight: FontWeight.bold)),
),
ValueListenableBuilder<AudioReverbType>(
valueListenable: audioEffectStore.audioEffectState.audioReverbType,
builder: (context, reverbType, child) {
return Padding(
padding: const EdgeInsets.symmetric(horizontal: 16),
child: Wrap(
spacing: 8,
runSpacing: 8,
children: AudioReverbType.values.map((type) {
return ChoiceChip(
label: Text(_getReverbTypeName(type)),
selected: reverbType == type,
onSelected: (selected) {
if (selected) {
audioEffectStore.setAudioReverbType(type);
}
},
);
}).toList(),
),
);
},
),
const SizedBox(height: 24),

// reset button
Padding(
padding: const EdgeInsets.all(16),
child: ElevatedButton(
onPressed: () {
audioEffectStore.reset();
deviceStore.reset();
},
child: const Text('Reset sound effect settings'),
),
),
],
),
);
}

String _getChangerTypeName(AudioChangerType type) {
switch (type) {
case AudioChangerType.none:
return 'Disable';
case AudioChangerType.child:
return 'mischievous child';
case AudioChangerType.girl:
return 'loli';
case AudioChangerType.uncle:
return 'uncle';
case AudioChangerType.ethereal:
return 'ethereal';
}
}

String _getReverbTypeName(AudioReverbType type) {
switch (type) {
case AudioReverbType.none:
return 'Disable';
case AudioReverbType.ktv:
return 'KTV';
case AudioReverbType.room:
return 'Small room';
case AudioReverbType.hall:
return 'Great hall';
case AudioReverbType.deep:
return 'deep';
case AudioReverbType.loud:
return 'resonant';
case AudioReverbType.metallic:
return 'metallic sound';
case AudioReverbType.magnetic:
return 'magnetic';
case AudioReverbType.recordingStudio:
return 'studio';
}
}
}

API documentation

For detailed information about all public interfaces and attributes of AudioEffectStore, DeviceStore and its related classes, see the official API documentation of the AtomicXCore framework.
Store/Component
Feature Description
API Reference
AudioEffectStore
Audio effect management: Perform audio effect settings and obtain real-time audio effect status.
DeviceStore
Device management: perform camera and microphone operations and obtain real-time device status.

FAQs

Are there any restrictions on when to call audio effect and device APIs?

No, there are no restrictions. Settings in AudioEffectStore and DeviceStore are global. You can call related APIs (such as setting voice changer, reverb, or in-ear monitor) at any time before or after joining a live room. Changes take effect immediately and persist.

What is the difference between "Microphone Volume" and "In-Ear Monitor Volume"?

This is a common source of confusion. The differences are:
Microphone Volume (Capture Volume): Set via DeviceStore.shared.setCaptureVolume(). Controls how loud the host sounds to the audience.
In-Ear Monitor Volume (Ear Monitor Volume): Set via AudioEffectStore.shared.setVoiceEarMonitorVolume(). Controls only how loud the host hears themselves in their headphones and does not affect the audience.

Why does a newly created live room already have audio effects, or the volume is unexpectedly high or low?

Because AudioEffectStore and DeviceStore are singletons, audio effect and device settings are global. This usually happens if you previously set audio effects and didn't reset them. Be sure to call reset() when appropriate.

Why can't I hear myself after enabling "In-Ear Monitor"?

Check the following:
1. Are headphones connected? In-ear monitor usually requires headphones. Make sure wired or Bluetooth headphones are connected.
2. Is the volume set to 0? Verify that "In-Ear Monitor Volume" is not set to 0.
3. Is the microphone enabled? Ensure that the microphone in DeviceStore is enabled (i.e., openLocalMicrophone() has been called).

Can I use voice changer and reverb effects at the same time?

Yes. AudioChangerType and AudioReverbType can be used together. For example, you can apply both AudioChangerType.girl and AudioReverbType.ktv simultaneously.

Help and Support

Was this page helpful?

Help us improve! Rate your documentation experience in 5 mins.

Feedback