iOS
下载
聚焦模式
字号
本文将介绍如何快速接入 TUICallKit 组件。您可以在 10 分钟内完成以下关键步骤,最终获得一个功能完备的音视频通话界面。
准备工作
环境要求
iOS 系统版本要求:iOS 13.0 及以上
开发工具版本要求:Xcode 13 及以上版本,Xcode 15 及以上版本会遇到 Sandbox 错误,请参见 Sandbox 问题解决方案 进行修复。
依赖管理工具要求:CocoaPods 环境安装
设备需满足:搭载 iOS 13.0 及以上系统的 iPhone、iPad 等 Apple 移动设备(确保应用可正常安装与运行)。
开通服务
快速接入
1.导入组件
1. 添加 Pod 依赖:
若项目已有 Podfile 文件。
在您项目的
Podfile 文件中添加 pod 'TUICallKit_Swift' 依赖。例如:target 'YourProjectTarget' dopod 'TUICallKit_Swift'end
若项目没有 Podfile 文件。
在终端中进入到您的
.xcodeproj 目录下,然后执行 pod init 命令创建 Podfile 文件,创建完成后,在您的 Podfile 文件中添加 pod 'TUICallKit_Swift' 依赖。例如:// 1cd /Users/yourusername/Projects/YourProject// 2podinit// 3在生成的 Podfile 文件中target 'YourProjectTarget' dopod 'TUICallKit_Swift'end
2. 安装组件:
在终端进入到
Podfile 文件所在的目录,然后执行以下命令安装组件。pod update
2.工程配置
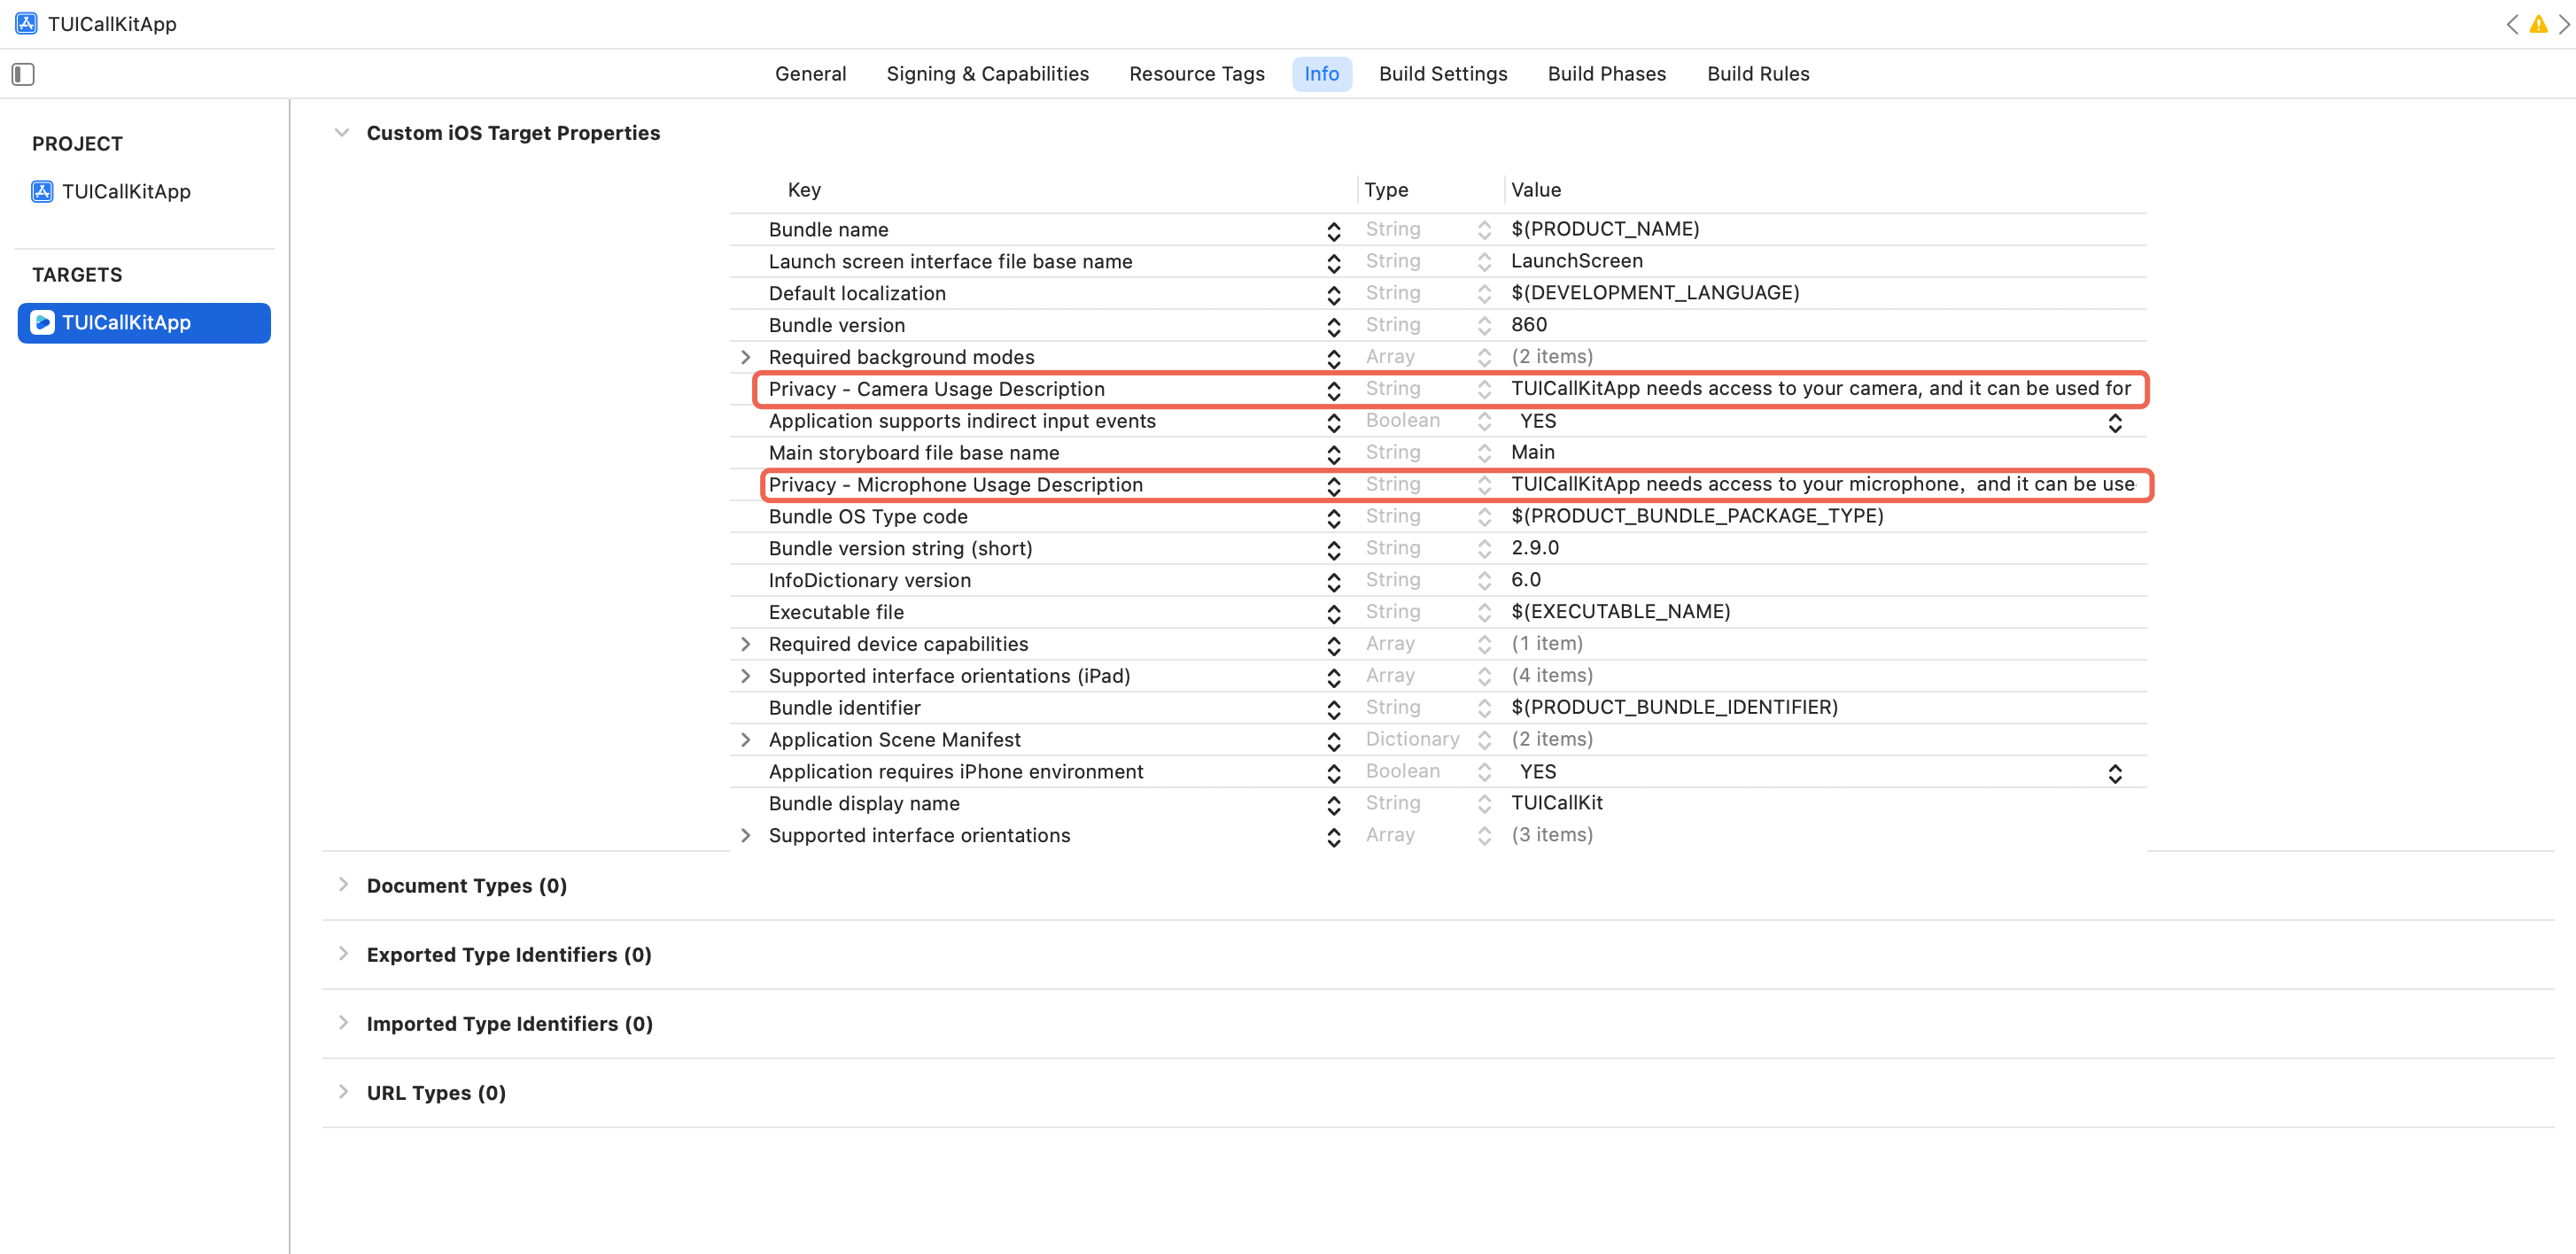
为了使用音视频功能,您的应用需要获取麦克风和摄像头的权限。请在应用的
Info.plist 文件中添加以下两项,并填写对应的使用说明,这些说明将在系统请求权限时向用户显示:<key>NSCameraUsageDescription</key><string>TUICallKitApp 需要访问您的摄像头,并可用于视频通话、群组视频通话等功能。</string><key>NSMicrophoneUsageDescription</key><string>TUICallKitApp 需要访问您的麦克风,并可用于音频通话、群组音频通话、视频通话、群组视频通话等功能</string>
3.登录
在您的项目中添加如下代码,它的作用是通过调用 TUICore 中的相关接口完成 TUI 组件的登录。这一步骤至关重要,只有在成功登录之后,您才能正常使用 TUICallKit 提供的各项功能。
login
import TUICoreimport TUICallKit_Swiftfunc application(_ application: UIApplication, didFinishLaunchingWithOptions launchOptions: [UIApplication.LaunchOptionsKey: Any]?) -> Bool {let userID = "denny" // 请替换为您的 UserIdlet sdkAppID: Int32 = 0 // 请替换为在控制台得到的 SDKAppIDlet secretKey = "****" // 请替换为在控制台得到的 SecretKeylet userSig = GenerateTestUserSig.genTestUserSig(userID: userID, sdkAppID: sdkAppID, secretKey: secretKey)TUILogin.login(sdkAppID, userID: userID, userSig: userSig) {print("login success")} fail: { code, message inprint("login failed, code: \\(code), error: \\(message ?? "nil")")}return true}
#import <TUICore/TUILogin.h>#import <TUICallKit_Swift/TUICallKit_Swift-Swift.h>- (BOOL)application:(UIApplication *)application didFinishLaunchingWithOptions:(NSDictionary *)launchOptions {NSString *userID = @"denny"; // 请替换为您的 UserIdint sdkAppID = 0; // 请替换为第一步在控制台得到的 SDKAppIDNSString *secretKey = @"****"; // 请替换为第一步在控制台得到的 SecretKeyNSString *userSig = [GenerateTestUserSig genTestUserSigWithUserID:userID sdkAppID:sdkAppID secretKey:secretKey];[TUILogin login:sdkAppIDuserID:userIDuserSig:userSigsucc:^{NSLog(@"login success");} fail:^(int code, NSString * _Nullable msg) {NSLog(@"login failed, code: %d, error: %@", code, msg);}];return YES;}
参数 | 类型 | 说明 |
userId | String | 只允许包含大小写英文字母(a-z A-Z)、数字(0-9)及下划线和连词符。 |
sdkAppId | int | |
secretKey | String | |
userSig | String | 一种安全保护签名,用于对用户进行登录鉴权认证,确认用户是否真实,阻止恶意攻击者盗用您的云服务使用权。 |
说明:
开发环境:如果您在本地开发调试阶段,可以采用本地
GenerateTestUserSig.genTestSig函数生成 userSig。该方法中 secretKey 很容易被反编译逆向破解,一旦您的密钥泄露,攻击者就可以盗用您的腾讯云流量。生产环境:如果您的项目要发布上线,请采用 服务端生成 UserSig 的方式。
4.设置昵称和头像[可选]
setSelfInfo
import TUICallKit_SwiftTUICallKit.createInstance().setSelfInfo(nickname: "jack", avatar: "https:/****/user_avatar.png") {} fail: { code, message in}
#import <TUICore/TUILogin.h>#import <TUICallKit_Swift/TUICallKit_Swift-Swift.h>NSString *nickname = @"jack";NSString *avatar = @"https:/****/user_avatar.png";[[TUICallKit createInstance] setSelfInfo:nickname avatar:avatar callback:nil];
参数 | 类型 | 说明 |
nickname | String | 目标用户的昵称 |
avatar | String | 目标用户的头像 |
5.发起通话
拨打方可以通过调用 calls 函数,并指定通话类型和被叫方的 userID,来发起语音或视频通话。calls 接口同时支持一对一通话和多人通话。当 userIDList 中包含一个 userID 时,为一对一通话;当 userIDList 包含多个 userID 时,则为多人通话。
calls
import TUICallKit_Swift// 发起单人语音通话TUICallKit.createInstance().calls(userIdList: ["mike"], callMediaType: .audio, params: nil) {} fail: { code, message in}
#import <TUICallKit_Swift/TUICallKit_Swift-Swift.h>#import <RTCRoomEngine/TUICallEngine.h>[[TUICallKit createInstance] calls:@[@"mike"] callMediaType:TUICallMediaTypeAudio params:NULL succ:^{} fail:^(int code, NSString * _Nullable errMsg) {}];
参数 | 类型 | 说明 |
userIdList | [String] | 目标用户的 userId 列表 |
mediaType | 通话的媒体类型,例如视频通话、语音通话 | |
params | 通话扩展参数,例如:房间号、通话邀请超时时间,离线推送自定义内容等 |
6.接听通话
接听端完成登录后,拨打端发起通话,接收端就可以收到通话邀请,同时伴随铃声和震动。
更多功能
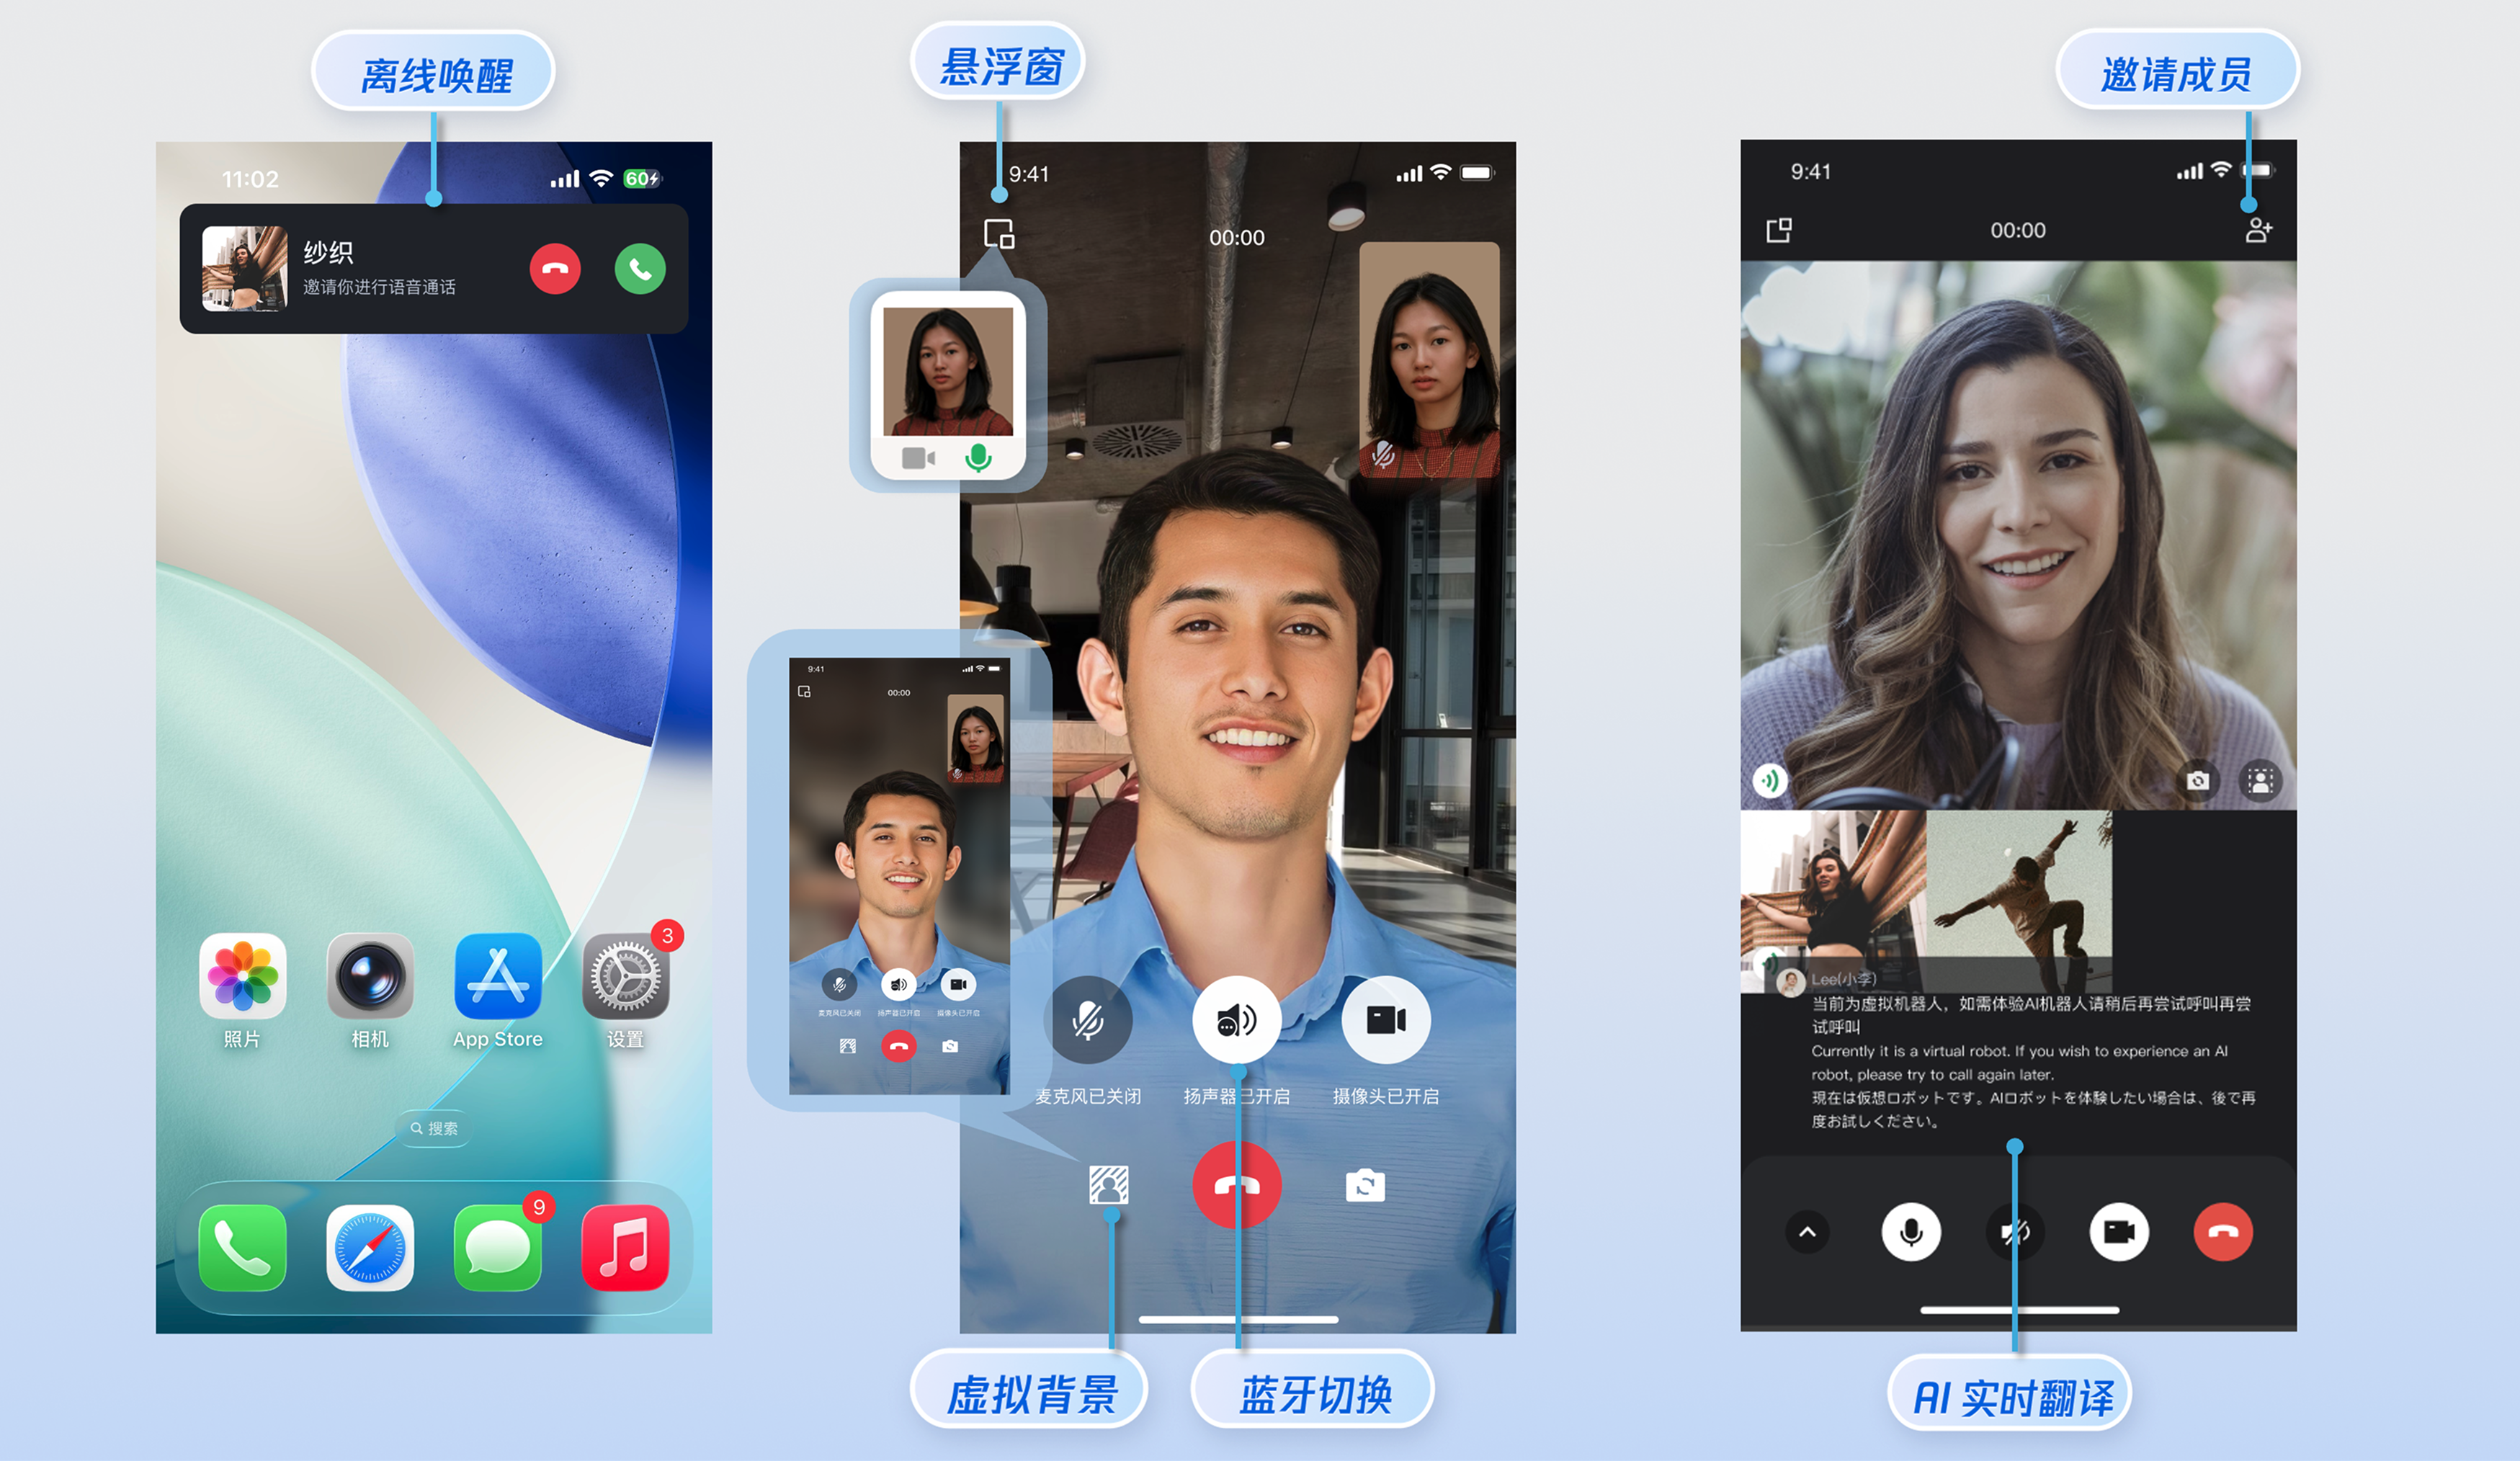
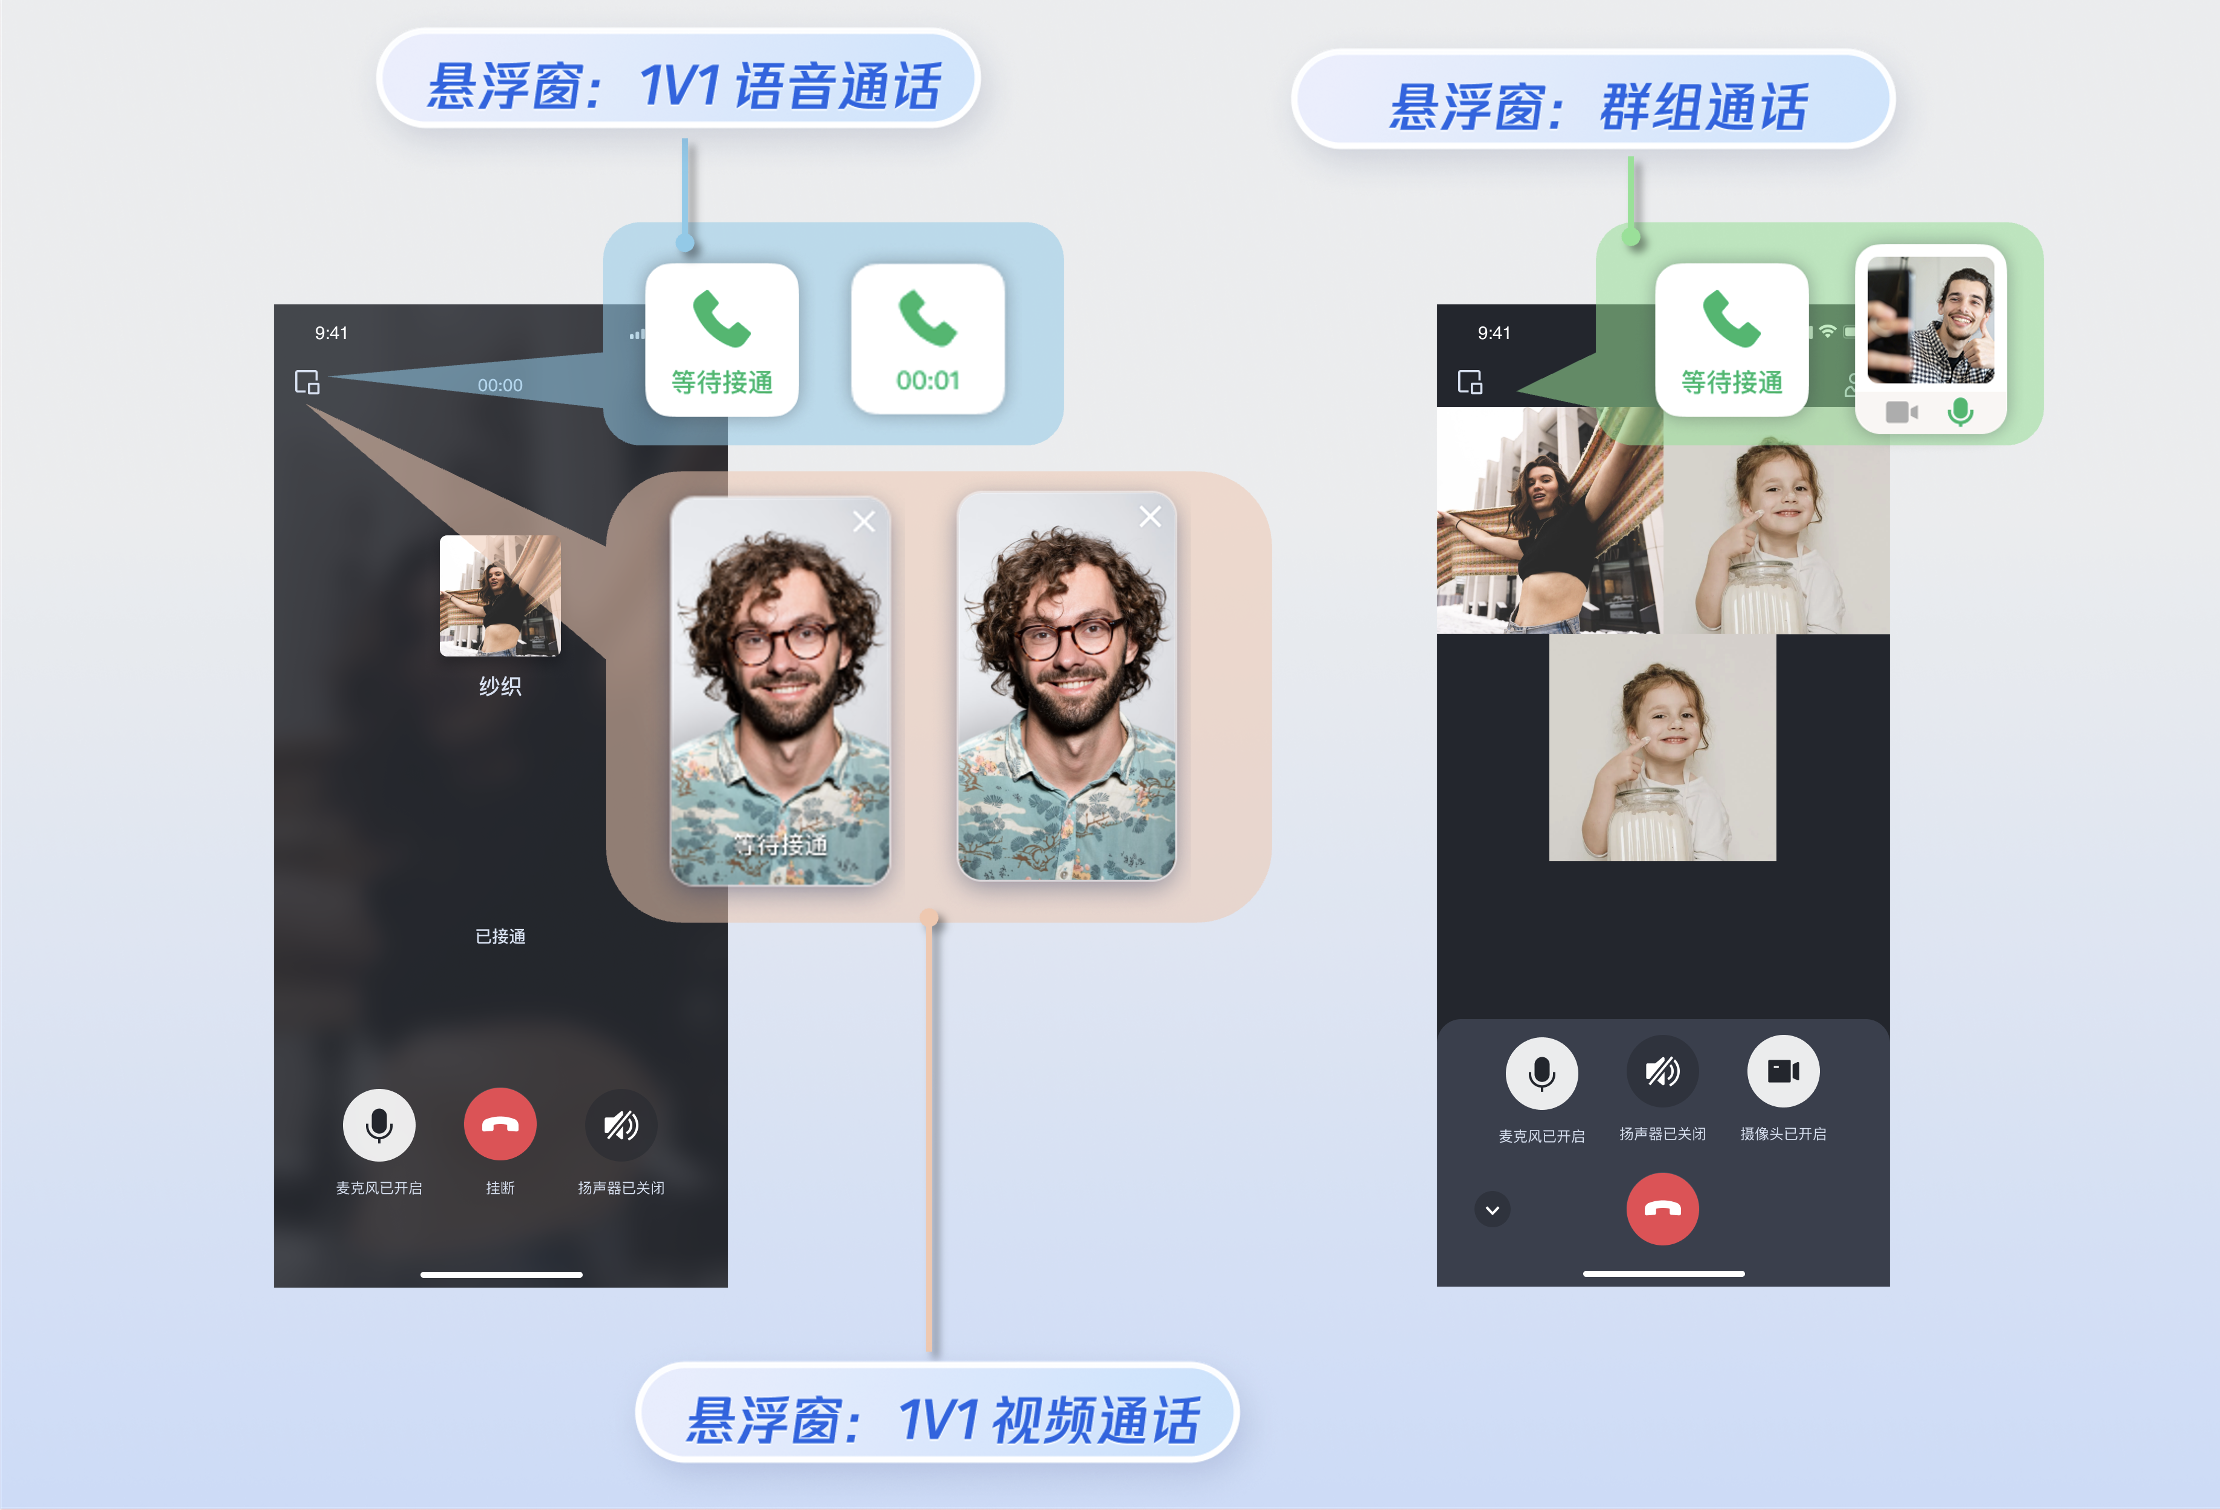
开启悬浮窗功能
您可以通过调用 enableFloatWindow 开启/关闭悬浮窗功能,在初始化 TUICallKit 组件时启用该功能,默认状态为关闭(false)。可通过点击通话界面左上角的悬浮窗按钮,将通话界面缩小为悬浮窗形式。
enableFloatWindow
import TUICallKit_SwiftTUICallKit.createInstance().enableFloatWindow(enable: true)
[[TUICallKit createInstance] enableFloatWindow:YES];
详情:默认为false,通话界面左上角的悬浮窗按钮隐藏,设置为 true 后显示。
开启来电横幅
您可以通过调用
enableIncomingBanner 接口开启或关闭来电横幅功能:默认(关闭)状态下,被叫端收到邀请会直接弹出全屏通话界面;开启后则会先展示横幅通知,然后根据需要再拉起全屏通话界面。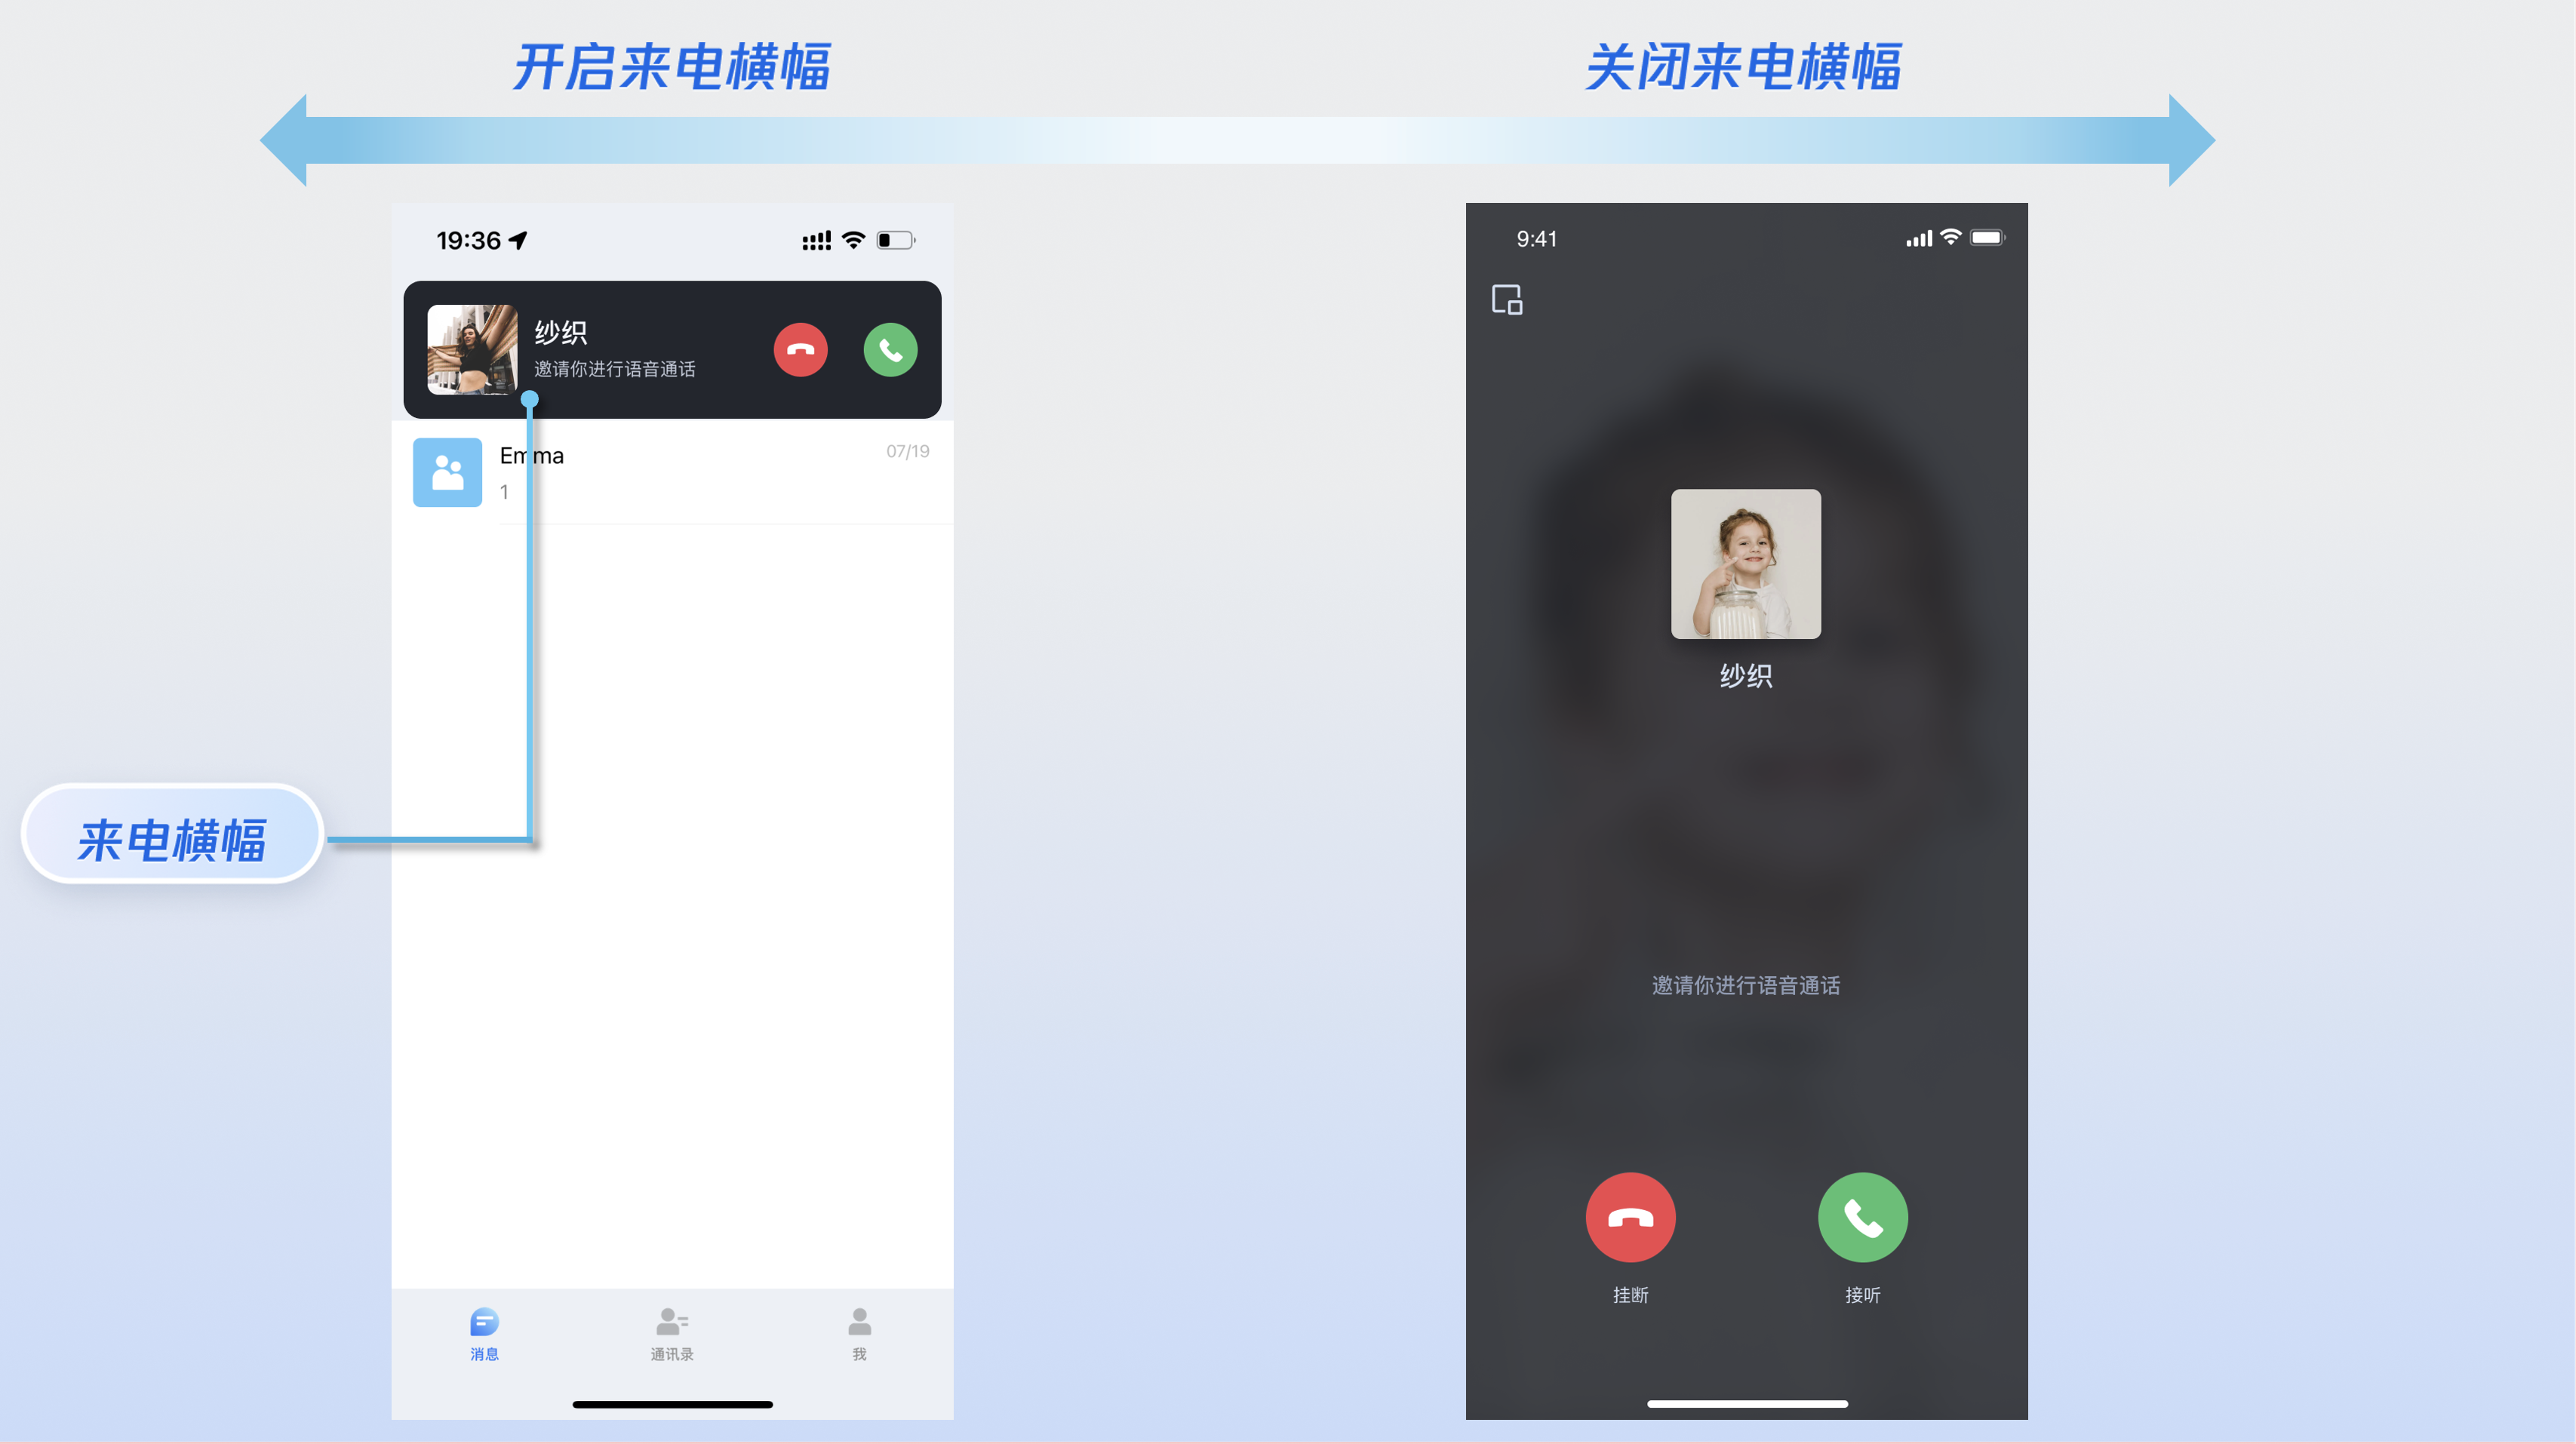
enbalecomingBanner
import TUICallKit_SwiftTUICallKit.createInstance().enableIncomingBanner(enable: true)
[[TUICallKit createInstance] enableIncomingBanner:YES];
详情:默认为 false,被叫端收到邀请后默认弹出全屏通话等待界面。开启后先展示一个横幅,然后根据需要拉起全屏通话界面。
多人通话
主叫方使用
calls 方法发起通话时,若被叫用户列表超过一人,则自动视为群组通话。其他成员可通过 join 方法加入该多人通话。发起多人通话:使用
calls 方法发起通话时,若被叫用户列表(userIdList)超过一人,则自动视为群组通话。calls
import TUICallKit_SwiftTUICallKit.createInstance().calls(userIdList: ["mike"], callMediaType: .audio, params: nil) {} fail: { code, message in}
#import <TUICallKit_Swift/TUICallKit_Swift-Swift.h>#import <RTCRoomEngine/TUICallEngine.h>[[TUICallKit createInstance] calls:@[@"mike", @"tate"] callMediaType:TUICallMediaTypeAudio params:NULL succ:^{} fail:^(int code, NSString * _Nullable errMsg) {}];
参数 | 类型 | 说明 |
userIdList | [String] | 目标用户的 userId 列表 |
mediaType | 通话的媒体类型,例如视频通话、语音通话 | |
params | 通话扩展参数,例如:房间号、通话邀请超时时间,离线推送自定义内容等 |
加入多人通话:可使用
join 方法加入指定的群组通话。join
import TUICallKit_SwiftTUICallKit.createInstance().join(callId: "")
[[TUICallKit createInstance] joinWithCallId: @"***"];
参数 | 类型 | 说明 |
callId | String | 此次通话的唯一标识。 |
语言设置
支持的语言:目前支持简体中文、繁体中文、英文、日文和阿拉伯语。
切换语言:TUICallKit 默认语言与手机系统保持一致 。如果需要切换语言,可以使用
TUIGlobalization.setPreferredLanguage方法设置语言,以设置语言为英文示例代码如下。 setLanguage
import TUICorefunc steLanguage() {TUIGlobalization.setPreferredLanguage("en")}
参数 | 类型 | 说明 |
language | String | 设置的语言: "zh-Hans" :简体中文 。 "zh-Hant" :繁体中文。 "en" :英文。 "ar" :阿拉伯语。 |
说明:
如需设置其他语言,请联系我们(info_rtc@tencent.com)获取协助。
铃声设置
您可通过以下方式设置默认铃声、来电静音模式、离线推送铃声:
设置默认铃声(方式2):通过 setCallingBell 接口设置被叫端收到的来电铃声。
setCallingBell
import TUICallKit_SwiftTUICallKit.createInstance().setCallingBell(filePath: "***/callingBell.mp3")
[[TUICallKit createInstance] setCallingBell:@"***/callingBell.mp3"];
详情:这里仅限传入本地文件地址,需要确保该文件目录是应用可以访问的。铃声设置后与设备绑定,更换用户,铃声依旧会生效。如需恢复默认铃声,filePath传空即可。
参数 | 类型 | 说明 |
filePath | String | 铃声文件的路径 |
来电静音模式:您可以通过 enableMuteMode 设置静音模式。
enableMuteMode
import TUICallKit_SwiftTUICallKit.createInstance().enableMuteMode(enable: true)
[TUICallKit createInstance] enableMuteMode: YES];
详情:开启后,收到通话请求,不会播放来电铃声。
自定义离线推送铃声:
TUIOfflinePushInfo 参数配置说明
import TUICallKit_Swiftlet params = TUICallParams()let pushInfo: TUIOfflinePushInfo = TUIOfflinePushInfo()pushInfo.title = "TUICallKit"pushInfo.desc = "TUICallKit.have.new.invitation"pushInfo.iOSPushType = .apnspushInfo.ignoreIOSBadge = falsepushInfo.iOSSound = "phone_ringing.mp3"pushInfo.androidSound = "phone_ringing"// OPPO必须设置ChannelID才可以收到推送消息,这个channelID需要和控制台一致pushInfo.androidOPPOChannelID = "tuikit"// FCM channel ID, 您需要更改 PrivateConstants.java 并设置 "fcmPushChannelId"pushInfo.androidFCMChannelID = "fcm_push_channel"// VIVO 消息类型: 0-推送消息,1-系统消息(送达率较高)pushInfo.androidVIVOClassification = 1// HuaWei 消息类型: https://developer.huawei.com/consumer/cn/doc/development/HMSCore-Guides/message-classification-0000001149358835pushInfo.androidHuaWeiCategory = "IM"params.userData = "User Data"params.timeout = 30params.offlinePushInfo = pushInfoTUICallKit.createInstance().call(userId: "123456", callMediaType: .audio, params: params) {} fail: {code, message in}
[[TUICallKit createInstance] call:@"mike 的 id" params:[self getCallParams] callMediaType:TUICallMediaTypeVideo];- (TUICallParams *)getCallParams {TUIOfflinePushInfo *offlinePushInfo = [self createOfflinePushInfo];TUICallParams *callParams = [TUICallParams new];callParams.offlinePushInfo = offlinePushInfo;callParams.timeout = 30;return callParams;}+ (TUIOfflinePushInfo *)createOfflinePushInfo {TUIOfflinePushInfo *pushInfo = [TUIOfflinePushInfo new];pushInfo.title = @"";pushInfo.desc = TUICallingLocalize(@"TUICallKit.have.new.invitation");pushInfo.iOSPushType = TUICallIOSOfflinePushTypeAPNs;pushInfo.ignoreIOSBadge = NO;pushInfo.iOSSound = @"phone_ringing.mp3";pushInfo.AndroidSound = @"phone_ringing";// OPPO必须设置ChannelID才可以收到推送消息,这个channelID需要和控制台一致pushInfo.AndroidOPPOChannelID = @"tuikit";// FCM channel ID, 您需要更改 PrivateConstants.java 并设置 "fcmPushChannelId"pushInfo.AndroidFCMChannelID = @"fcm_push_channel";// VIVO 消息类型: 0-推送消息,1-系统消息(送达率较高)pushInfo.AndroidVIVOClassification = 1;// HuaWei 消息类型: https://developer.huawei.com/consumer/cn/doc/development/HMSCore-Guides/message-classification-0000001149358835pushInfo.AndroidHuaWeiCategory = @"IM";return pushInfo;}
详情:VoIP 推送不支持自定义推送铃声。 APNs 推送可以在调用 call 接口拨打电话时设置 params 的 offlinePushInfo 中的 iOSSound 字段, iOSSound 传语音文件名。
注意:
离线推送声音设置(仅对 iOS 生效),如果要自定义 iOSSound,需要先把语音文件链接进 Xcode 工程,然后把语音文件名(带后缀名)设置给 iOSSound。
铃声时长应小于30s。
自定义您的 UI
替换图标按钮
您可以直接替换 Resources\\Assets.xcassets 文件夹下的图标,以确保整个 App 中的图标色调风格保持一致。以下列出了基本的功能按钮,您可以替换对应的图标以适配自己的业务场景。
常用图标文件名列表
图标 | 文件名称 | 说明 |
 | icon_dialing.png | 接听来电图标 |
 | icon_hangup.png | 挂断通话图标 |
 | icon_mute_on.png | 关闭麦克风图标 |
 | ticon_handsfree.png | 关闭扬声器图标 |
 | icon_camera_off.png | 关闭摄像头图标 |
 | icon_add_user.png | 通话过程中邀请用户图标 |
常见问题
我需要自己修改 UI,每次更新 pod 后就会刷新源码,导致修改丢失,该如何处理?
1. Fork TUICallKit仓库 到您个人 GitHub 账号下。
2. 采用 本地 pod 方式在您的工程中引用对应代码。
pod 'TUICallKit_Swift', :path=>"您的 TUICallKit_Swift.podspec 路径"
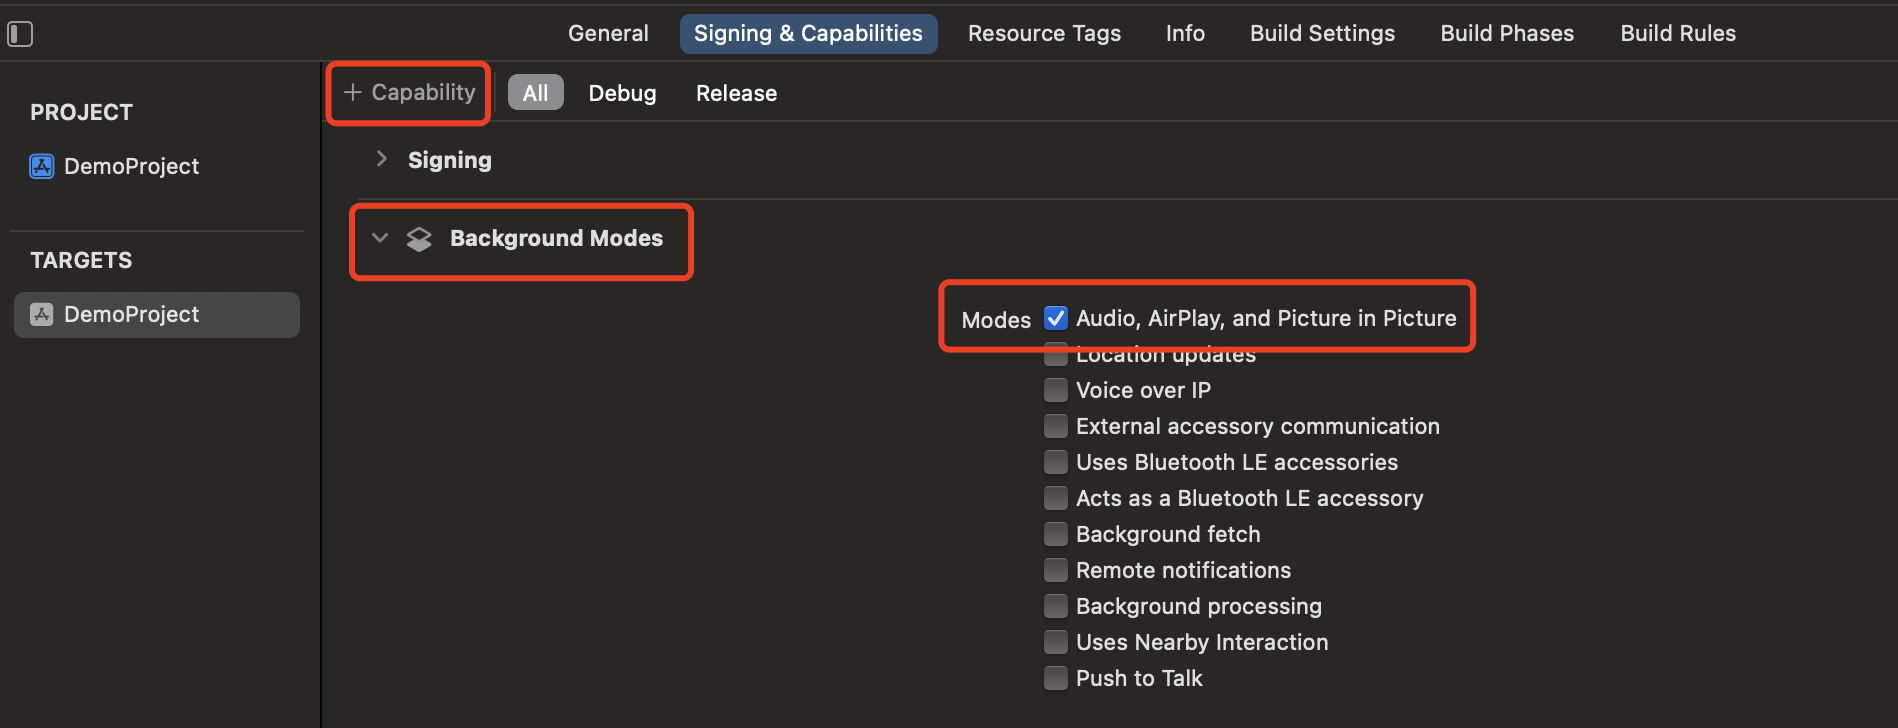
TUICallKit 是否支持后台运行?
支持,如需要进入后台仍然运行相关功能,可选中当前工程项目,在 Capabilities 下的 Background Modes 模块中勾选 Audio,AirPlay, and Picture in Picture ,如下图所示:
交流与反馈
如果有任何需要或者反馈,您可以联系:info_rtc@tencent.com。
文档反馈