Getting Started
Unduh
Mode fokus
Ukuran font
Overview
AI Agent Security Gateway is an intelligent security hub for large language model scenarios. It provides three core capabilities: model asset management, MCP security protection, and rapid MCP Server packaging, helping enterprises achieve secure, controllable, and efficient deployment of AI infrastructure.
This document describes how to quickly configure AI Agent Security Gateway. The overall integration process is as follows:
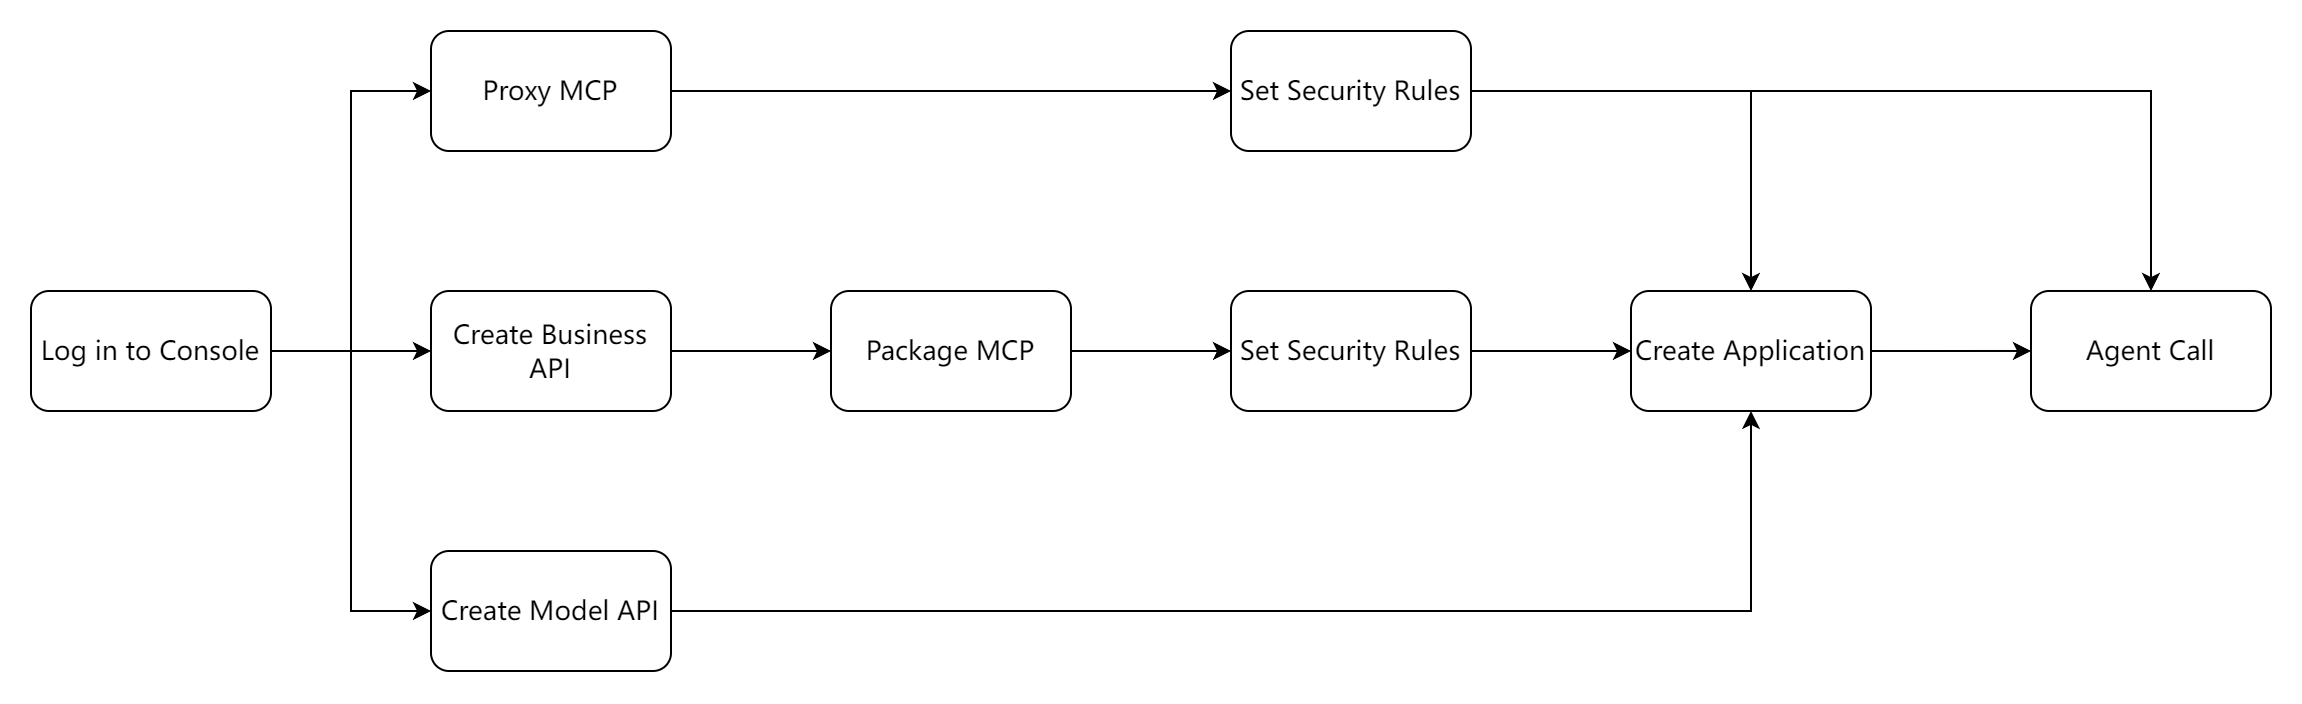
As the neural hub for agent platform protection, AI Agent Security Gateway supports the following typical integration scenarios:
Unified Model Access: Centrally manage and secure internal and external large model APIs.
MCP Encapsulation/Proxy: Encapsulate business APIs as MCP services, or proxy existing MCP services, with security detection capabilities.
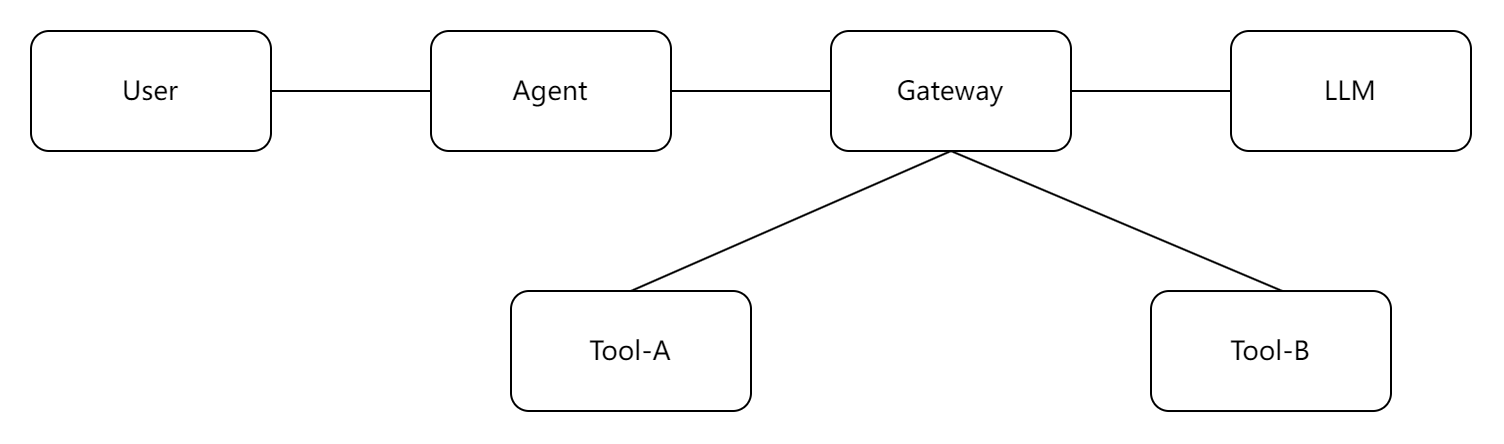
The deployment topology is as follows:
Prerequisites
You have logged in to the AI Agent Security Gateway console and completed the individual identity verification guide or the enterprise identity verification guide.
You have purchased an AI Agent Security Gateway instance. When purchasing, you need to select the appropriate VPC and subnet, and determine the deployment location of the gateway instance based on actual business requirements. For details, see Purchase Methods to configure the instance.
Network access to the corresponding VPC has been established.
Scenario 1: Unified Model Access
Step 1: Creating a Model Access
1. Log in to the AI Agent Security Gateway console and choose Model > Model Management in the left sidebar.
2. On the Model Management page, click Create Model.
3. On the Create Model Access page, enter the model parameter information.
Note:
If model credentials require authentication, go to Authentication Configuration > Credentials to create credentials first, and then configure model access.
4. Click Confirm to complete the model access gateway configuration.
Step 2: Creating a Model API
1. Log in to the AI Agent Security Gateway console and choose Model > Model API in the left sidebar.
2. On the Model API page, click Create Model API and associate it with an integrated backend model.
Step 3: Configuring Security Rules
1. Set security rules. Token Control supports calculating cumulative consumption in three ways: time window, natural day, or natural month. You can also configure policies such as traffic control, content security, and prompt security.
2. Click Save to complete the model API configuration. After the configuration is completed, a call path will be automatically generated and can be provided to external callers.
Step 4: Creating an Application
1. Log in to the AI Agent Security Gateway console and choose Applications in the left sidebar.
2. On the Applications page, click Create Application, select an authentication type (APIKey / SecretKey / No Authentication / Login) based on your business requirements, and enter the application configuration information. If you only need pure proxy forwarding, select No Authentication.
3. Associate the created model API. When associating, you can set traffic control and token control policies.
4. Click OK to complete the application creation.
Step 5: Generating an API Key
Note:
If the application selects the No Authentication type, you do not need to generate a key. Skip this step.
1. Log in to the AI Agent Security Gateway console and choose Applications in the left sidebar.
2. In the application list, find the target application and click Generate in the Key Count column to generate a call key.
3. Click Copy and close the dialog box.
Note:
After a key is generated, it cannot be queried again. Keep the APIKey secure.
Scenario 2: MCP Encapsulation (MCP Tool Protection)
Step 1: Creating a Business API
You can import API information based on your business needs for subsequent encapsulation of MCP services.
1. Log in to the AI Agent Security Gateway console and choose API > API List in the left sidebar.
2. On the API List page, click Create API.
3. On the Basic Information page, enter the basic API information and click Next.
4. On the frontend and backend configuration page, configure the relevant parameters based on the backend service type, and click Next.
5. On the Advanced Configuration (Optional) page, configure advanced settings as needed.
6. Click Save to complete the API creation.
Step 2: Encapsulating MCP
1. Log in to the AI Agent Security Gateway console and choose MCP in the left sidebar.
2. On the MCP page, click Create Encapsulated MCP.
3. On the Basic Information page, select the application to which the current encapsulated MCP belongs, and enter the MCP information.
4. Click Next and select the API to import from the API list.
5. Click Import Tool, select the detection rules and advanced configurations to enable in the advanced configuration, and set the corresponding handling actions.
6. Click Save and debug based on the request path.
Step 3: Configuring Detection Rules
AI Agent Security Gateway supports unified management of MCP security detection rules, including security detection rules, sensitive content detection rules, and content security rules.
3.1 Security Detection Rules
1. In the left sidebar, choose Security Configurations > Security Detection Rules.
2. On the Security Detection Rules page, select the corresponding rules to configure based on your actual business needs.
3. Click MCP Rule Configuration for the corresponding rule to manage the MCP Server configurations under the current rule.
4. In MCP rule configuration, select the corresponding MCP Server to change the rule status and handling action.
5. In special cases, you can enable One-Click ByPass. After it is enabled, all applications and MCPs under the current rule will no longer be checked by the relevant rules.
Note:
One-Click ByPass is only suitable for temporary emergency scenarios and is not recommended for long-term use.
3.2 Sensitive Content Detection Rules
1. In the left sidebar, choose Security Configurations > Sensitive Content Detection Rules.
2. On the Sensitive Content Detection Rules page, select the corresponding rules to configure based on your actual business needs. Detection of key data fields such as ID card numbers, phone numbers, and email addresses is currently supported, and sensitive data is masked.
3. Click MCP Rule Configuration for the corresponding rule to manage the MCP Server configurations under the current rule.
4. In MCP rule configuration, select the corresponding MCP Server to change the rule status and handling action.
5. In special cases, you can enable One-Click ByPass. After it is enabled, all applications and MCPs under the current rule will no longer be checked by the relevant rules.
Note:
One-Click ByPass is only suitable for temporary emergency scenarios and is not recommended for long-term use.
Step 4: Creating an Application
1. Log in to the AI Agent Security Gateway console and choose Applications in the left sidebar.
2. Click Create Application, select an authentication type (APIKey / SecretKey / No Authentication / Login) based on your business requirements, and enter the application configuration information. If you only need pure proxy forwarding, select No Authentication.
3. Click Create Application to complete the application creation. After creation, you can associate the corresponding MCP or API.
4. After the application is created, you can view its details.
Step 5: Viewing Security Logs
AI Agent Security Gateway provides the attack security log feature by default, which records details such as the time when security rules are triggered and the types of security rules. Security logs support two viewing methods: SQL-based raw logs and statistical charts.
1. Log in to the AI Agent Security Gateway console and choose Security Logs in the left sidebar.
2. On the Security Logs page, select the instance to which the logs you want to search belong.
3. Add search criteria and a log time range in the search box to filter data.
4. On the Raw Logs tab, you can perform quick statistical analysis on fields and view the distribution of field values, time trends, and numerical statistics without writing query statements.
Scenario 3: MCP Proxy
The operation steps for the MCP proxy scenario are basically the same as those for the encapsulation mode. The difference is that you select the proxy mode when creating an MCP. The specific steps are as follows:
1. Log in to the AI Agent Security Gateway console and choose MCP in the left sidebar.
2. On the MCP page, click Create Proxy MCP.
3. On the Basic Information page, select the application to which the current proxy MCP belongs, and enter the MCP information.
4. Click Next to obtain the tool information under the current MCP protocol.
5. Click Next, select the detection rules and advanced configurations to enable, and set the corresponding handling actions.
6. Click Save and perform debugging based on the request path.
Bantuan dan Dukungan
Apakah halaman ini membantu?
Anda juga dapat Menghubungi Penjualan atau Mengirimkan Tiket untuk meminta bantuan.
masukan