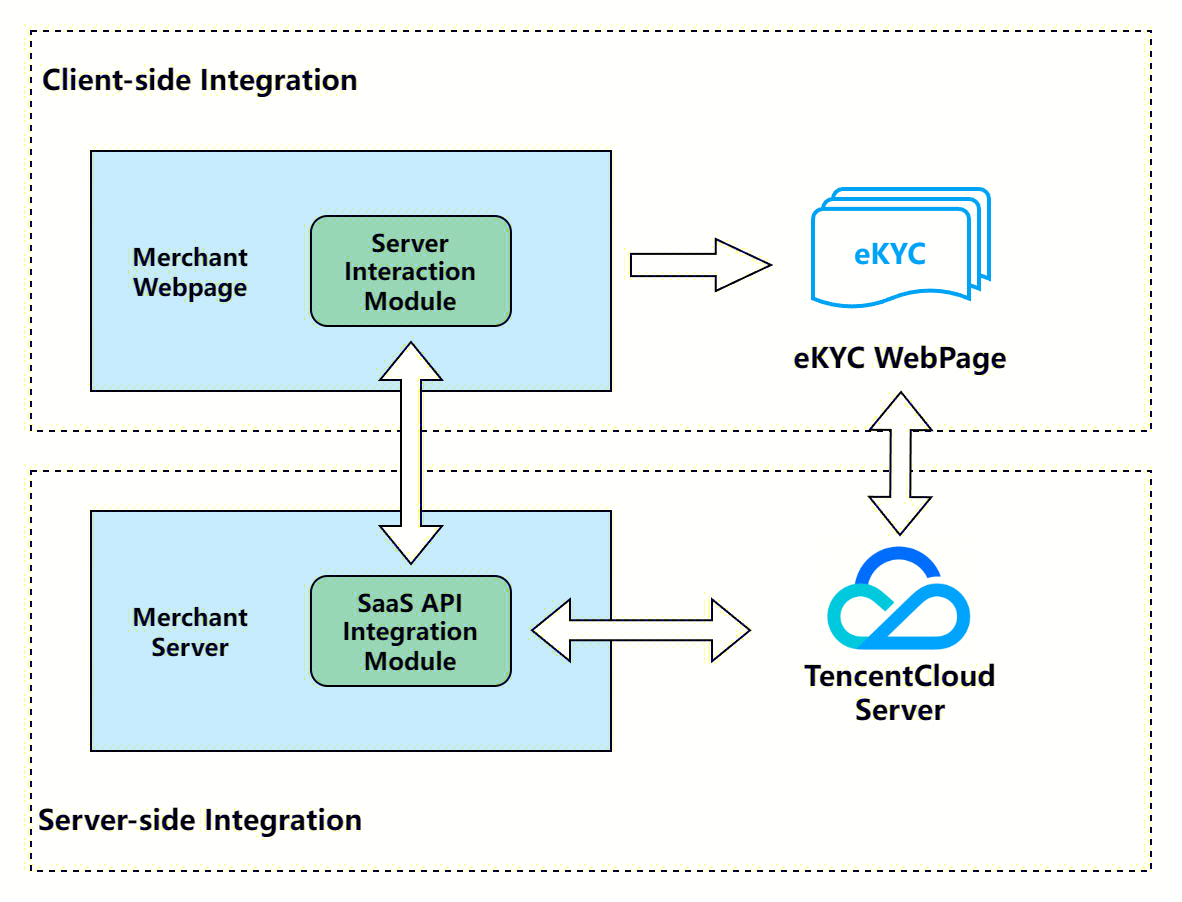
The following figure shows the architecture diagram for eKYC liveness verification (Mobile H5):
Overall Interaction Flow
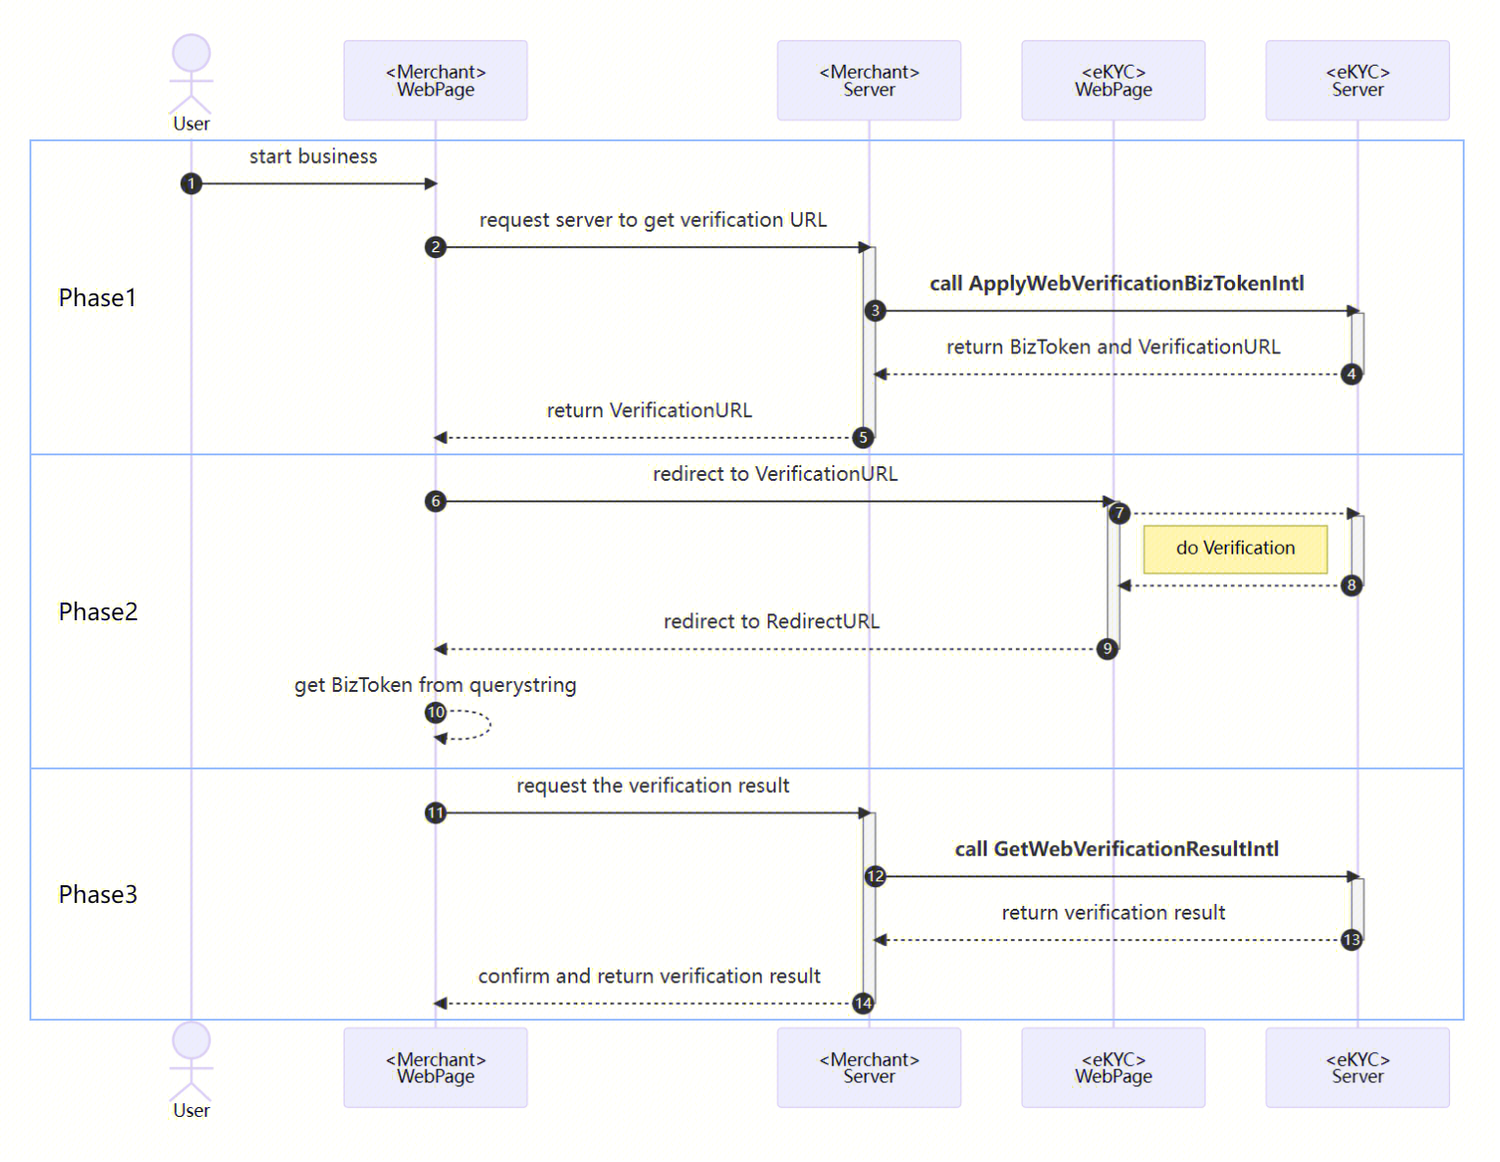
The following figure illustrates the overall interaction logic between the customer and Tencent Cloud eKYC. The roles in the figure are described as follows:
User: Mobile H5 user
Merchant WebPage: Customer frontend page
Merchant Server: Customer backend service
eKYC WebPage: eKYC frontend page
eKYC Server: eKYC backend service
The detailed recommended interaction flow is as follows:
Stage 1: Applying for a Verification Token
1. The verification process is triggered by client-side business activities.
2. Merchant WebPage sends a request to Merchant Server, notifying it to initiate a verification process.
3. Merchant Server calls the ApplyWebVerificationBizTokenIntl API by passing in the relevant parameters. Refer to Step 1 of the server-side integration.
4. Upon receiving the request, the eKYC Server returns the BizToken and VerificationURL for that verification process to the Merchant Server.
5. Merchant Server saves the obtained BizToken and sends the VerificationURL to Merchant WebPage.
Stage 2: User Verification Execution
1. From Merchant WebPage, navigate to the VerificationURL to open the eKYC WebPage. Refer to Step 1 of the frontend integration.
2. The user completes the verification process on the eKYC WebPage.
3. After the verification is completed, eKYC Server sends the verification result to eKYC WebPage, and Merchant WebPage displays the result page.
4. After the user clicks Next, the eKYC WebPage is redirected to the RedirectURL, with the token parameter appended to the URL.
5. The token parameter for the current verification process is obtained by Merchant WebPage from the URL. Refer to Step 2 of the frontend integration.
Stage 3: Obtaining Verification Results
1. Merchant WebPage sends a request to Merchant Server, notifying it to obtain the verification result information.
2. Merchant Server calls the GetWebVerificationResultIntl API by passing in the relevant parameters. Refer to Step 2 of the server-side integration.
3. After receiving the request, eKYC Server returns the detailed information of that verification process to Merchant Server.
4. Merchant Server returns the result information to Merchant WebPage, which then proceeds with the subsequent business process based on the result.
Server-Side Integration
Calling the API to Apply for a Web Verification Token and Generate a Verification URL (Corresponding to Stage 1)
Call the ApplyWebVerificationBizTokenIntl API to obtain the BizToken and the verification address VerificationURL. This corresponds to point 3 in the sequence diagram.
CompareImageBase64: Compares the Base64-encoded string of a photo. The Base64-encoded string must not exceed 8 MB.
RedirectURL: The Web redirect address after verification is completed. It includes the protocol header, hostname, and path, for example: https://www.tencentcloud.com/products/faceid. After the verification process is completed, the BizToken for that session is appended to the redirect address, and the redirection is performed in the format https://www.tencentcloud.com/products/faceid?token={BizToken}.
Extra: A business passthrough parameter. Its maximum length is 1000 characters, and it is returned in the GetWebVerificationResultIntl API. It can be omitted if not required.
Config: The configuration for customizing the verification page. It can be omitted if not required.
The Config data structure is as follows:
AutoSkip: Whether to skip the result display page and automatically redirect to the RedirectURL upon successful verification. The default value is false. For descriptions of other fields, see WebVerificationConfigIntl.
Confirming the Result of the Current Verification Process (Corresponding to Phase 3)
After the verification process is completed, the merchant frontend notifies the merchant server to obtain the verification result. The merchant server then calls the GetWebVerificationResultIntl API and returns the final result to the frontend page. This corresponds to point 12 in the sequence diagram.
The final verification result should be based on the information returned by this API. The verification process is considered passed when the ErrorCode field in the response is 0, and considered failed in all other cases. For a detailed list of error codes, see Liveness Detection and Face Comparison (Mobile HTML5) Error Codes.
BizToken: The BizToken generated by the ApplyWebVerificationBizTokenIntl API. It serves as the unique identifier for that verification session.
if_, ok := err.(*errors.TencentCloudSDKError); ok {
fmt.Printf("An API error has returned: %s", err)
return
}
if err !=nil{
panic(err)
}
if response.Response.ErrorCode ==nil{
fmt.Print("the verification is uncompleted.")
return
}
errorCode :=*response.Response.ErrorCode
errorMsg :=*response.Response.ErrorMsg
if errorCode ==0{
// Verification passed
fmt.Print("Success")
}else{
// Verification failed
fmt.Printf("Fail: %s\\n", errorMsg)
}
}
Frontend Integration
Obtaining the VerificationURL and Redirecting to Initiate the Verification Process (Corresponding to Phase 2)
The customer frontend page obtains the VerificationURL requested by the server and redirects to that address to enter the verification process. The user then completes the liveness comparison process by following the prompts. This corresponds to point 6 in the sequence diagram.
Obtaining the BizToken from the Callback URL and Requesting the Verification Result from the Backend (Corresponding to Phase 2)
After the verification is completed, the page is redirected to the RedirectURL. The BizToken parameter for that session is appended to the RedirectURL. You can obtain the BizToken parameter by parsing the RedirectURL and use it to retrieve the result information of this liveness comparison. This corresponds to point 12 in the sequence diagram.